Fix Microsoft Compatibility Telemetry High Disk Usage
Do you want to fix the Microsoft Compatibility Telemetry (CompatTelRunner.exe) high disk usage problem in Windows 11/10? If yes, then you’re on the right page.
Sometimes, the CompatTelRunner.exe service/process causes some issues, like high CPU and disk usage. So, this will slow down your machine. If you have a low-end specs PC, then you may suffer a 100% disk usage problem.
In this guide, I’ll show you how to fix Microsoft Compatibility Telemetry High Disk/CPU Usage.
Windows 11/10 OS is faster than its older versions. But both versions run plenty of services in the background to enhance the user experience.
However, some services and processes are required to run, but others aren’t. Microsoft Compatibility Telemetry (CompatTelRunner.exe) process is optional. If you join the Microsoft Customer Experience Improvement Program while installing the Windows OS, then the CompatTelRunner.exe process will run in the background. On the other hand, it may be enabled by default on most Windows devices.
You can easily disable the Microsoft Compatibility Telemetry service. Disabling it won’t affect your machine or system.
What is the Microsoft Compatibility Telemetry service?
Well, Microsoft Compatibility Telemetry is a Windows 11/10 system process (CompatTelRunner.exe) that collects data of your device and software that runs on your device. It contains the usage, performance, and diagnostic data of your machine and sends it to the Microsoft servers.
At the same time, this diagnostic data supports a broader Microsoft security solution framework by helping detect vulnerabilities, maintain system integrity, and improve troubleshooting capabilities.
It helps the Windows developers to identify the OS problems, bugs, and performance issues. Hence, the data is useful for the developers to fix the problems in future updates to enhance the user experience.
This diagnostic data is also helpful to keep Windows OS secure and troubleshoot the OS problems.
Why Microsoft Compatibility Telemetry service cause high disk usage?
The Service is enabled on almost all Windows devices. CompatTelRunner.exe is an executable file that is located in the System32 folder. The process executes automatically when you turn on your system.
If this service is enabled on your device, then it will keep running in the background and collect the real-time data of your machine. Hence, it will put extra load on your device, and you may notice the high CPU and Disk usage in the task manager. It also causes high hard disk and CPU temperatures.
Reasons to disable the Microsoft Compatibility Telemetry service
If you have a PC with low specifications, then you may need to turn off the telemetry service. The list is given below for the reasons to disable it.
- If your PC/Laptop has an HDD rather than an SSD, then you may notice that the CompatTelRunner.exe process causes high disk usage. On the other hand, devices with SSD can easily handle the load,d and you may not see any impact from this process.
- You have an old laptop or PC with a low-performance CPU, and the CPU doesn’t handle unnecessary background processes.
- CompatTelRunner.exe process is eating up your device resources and slowing down your PC. Also, you face unwanted software and OS crashes.
- You prefer Privacy and don’t want to send any type of data from your device to Microsoft servers.
How to Fix Microsoft Compatibility Telemetry Service High Disk Usage
To fix the Microsoft Compatibility Telemetry service’s high disk usage, you have two options. The first one is that you can allow only the required diagnostic data to Microsoft. Windows 11/10 allows you to choose how much data you want to send. And the second option is, you can disable the Microsoft Compatibility Telemetry service completely. However, you can also delete the process executable file from your system.
Method 1. Disable the Optional Diagnostic Data option from Settings
Diagnostic and feedback data tell Microsoft what is going on your Windows device,, i.,e. Is it working properly or not? This data also helps to troubleshoot the problems and keep the OS safe and secure.
When it comes to privacy, Microsoft offers transparency about which data is collected by Windows OS.
However, you can completely stop sending the diagnostic data from your device, but Microsoft recommends the minimum setting to require diagnostic data.
By default, the optional diagnostic data option is enabled, which sends some additional information about your device and puts extra load on the CPU and disk drive. On the other hand, the required diagnostic data option sends minimum data, i.e, it tells Microsoft whether your device is working properly or not.
Steps to Disable Optional Diagnostic Data on Windows 11
- Click on the Start menu and open Settings. Otherwise, press the Windows key + I from the keyboard to open the Settings app.
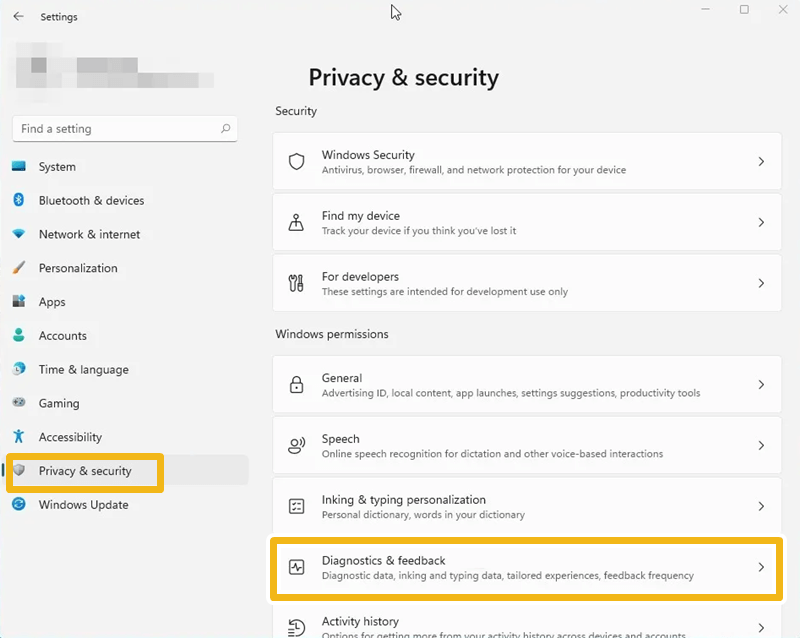
- Open Privacy and Security from the left pane. After that, open the Diagnostic & feedback option from under Windows permissions.

- Toggle off the button on the right side of Send optional diagnostic data.

- That’s it. Restart your PC.
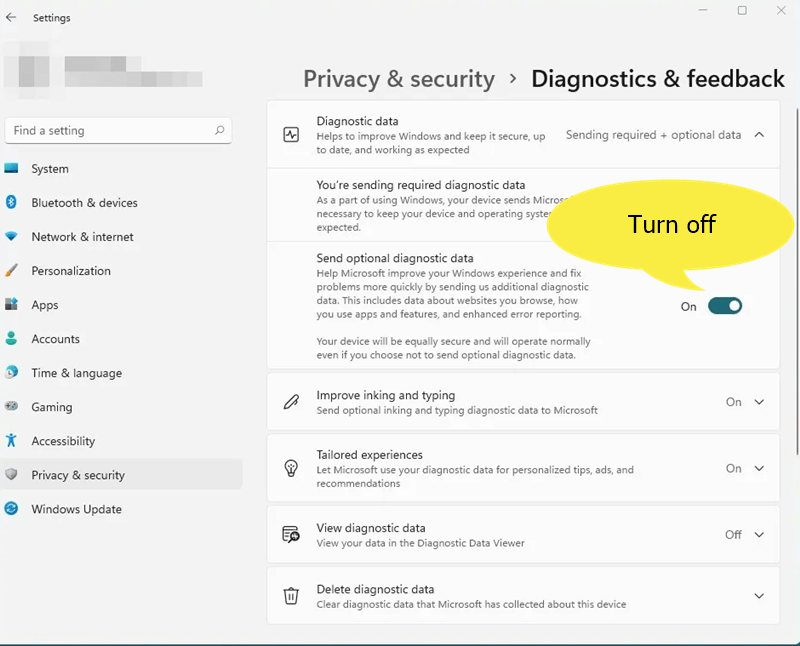
Additionally, you can turn off Tailored experiences and view diagnostic data options as well. Also, you can delete diagnostic data.
Steps to Disable Optional Diagnostic Data on Windows 10
- Open the Settings app by pressing Win key + I from the keyboard. Otherwise, click on the Start menu and click on the Gear icon to open the Settings app.
- Open the Privacy option and click on the Diagnostics & feedback option from the left pane.
- Select the required diagnostic data option by clicking on the radio button.

- That’s all.

Scroll down to the end of the page and select the Never option from the Feedback frequency drop-down menu.
Additionally, you can turn off Tailored experiences and view the diagnostic data option. Also, click on the delete button to clear the collected data.
Method 2. Disable the Microsoft Compatibility Telemetry service
If the first method isn’t working for you and you still have a high disk usage issue, then you should Telemetry this service. There are 4 ways to turn off this process completely. Let’s get started
1. Using Task Scheduler
Task Scheduler is an app/program in Windows OS that schedules computer tasks to run automatically. You can disable the CompatTelRunner.exe process from the task scheduler app.
The steps are given below. Let’s get started.
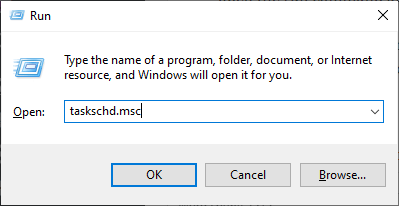
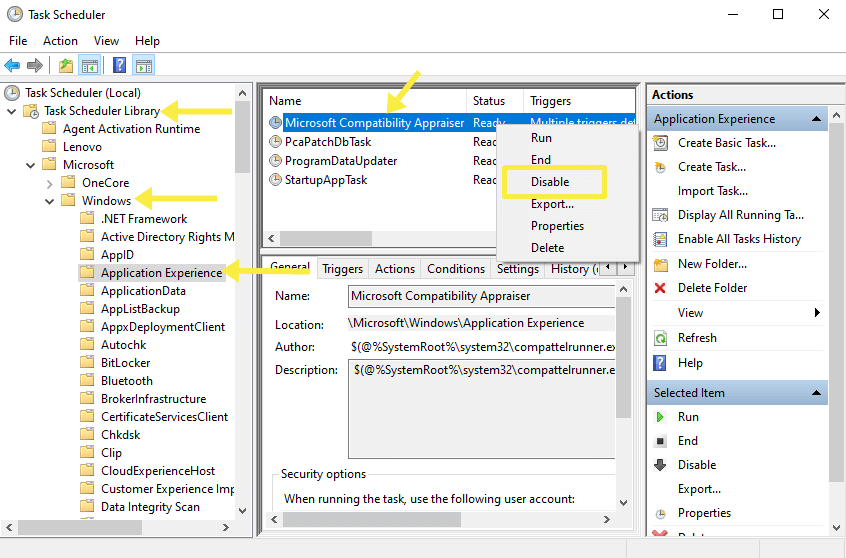
- Open the task scheduler on your PC. On Windows 11, click on the Start menu and type Task Scheduler in the search bar. On Windows 10, type Task Scheduler in the Cortana search bar. Alternatively, press Windows key + R to open the run command and type “taskschd.msc” (without quotes) in the run command and press the Enter button.

- Go to Task Scheduler Library » Microsoft » Windows » Application Experience.
- Right-click on the Microsoft Compatibility Appraiser and click on the Disable option from the context menu.

That’s all.
2. Using Group Policy Editor
If you have Professional and Enterprise editions of the Windows 11/10 OS, then you can use the group policy editor to disable the Telemetry service.
The steps are given below.
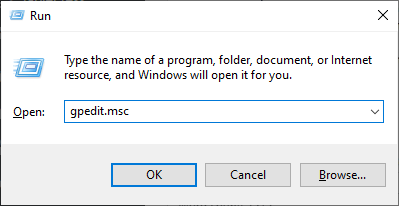
- Open the Run command by pressing Windows key + R from the keyboard and type gpedit.msc and click on the OK button to open it.
- Go to Computer Configuration » Administrative Templates » Windows Components » Data Collection and Preview Builds.
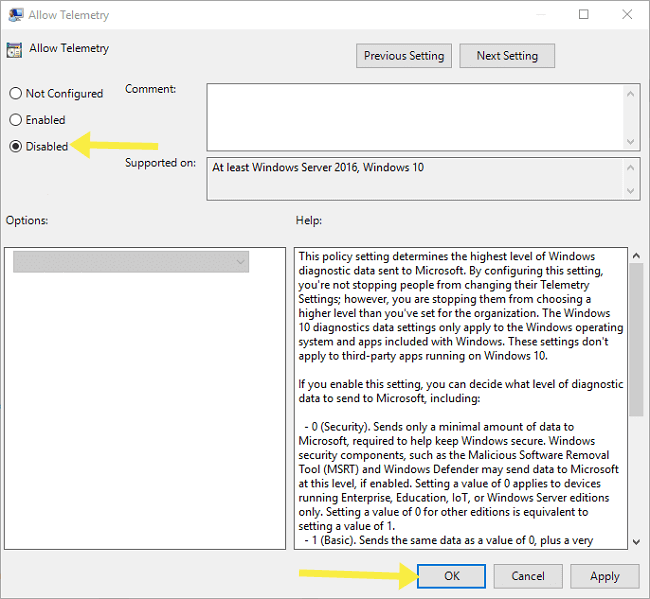
- From the Data Collection and Preview Builds folder, double-click on the Allow Telemetry option to open it.

- Select the Disabled option by clicking on the radio button, and select the Ok button to apply the changes.


3. From Services
Windows 11/10 has a lot of services that run in the background. But Microsoft gives control to manage these services. You can open the services app to manage (start, stop, and configure) background services.
The telemetry service starts automatically when you turn on your device. So, from servers, you can disable the automatic startup functionality of the telemetry service. You can also stop the running telemetry service.
The steps are given below.
- Open the Run command by pressing Windows key + R from the keyboard and type “services.msc” (without quotes) in the run command prompt. Click on the Ok button to proceed.
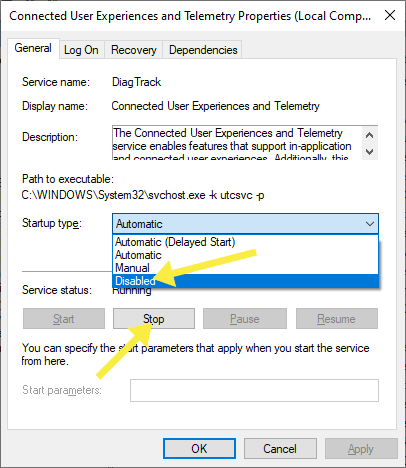
You can also open the services app by searching from the Start menu in Windows 11 and from the Cortana search bar in Windows 10. - Now the services app will be open, and you’ll see the list of all available services of Windows OS available on your device. Scroll down and double-click on the “Connected User Experiences and Telemetry” service. This service manages the event-driven collection and transmission of diagnostic and usage data.

- Click on the Startup drop-down menu and select the Disabled option from the list. By default, the Automatic option is selected. Click on the Stop button to stop the running process in the background.

- Now, click on the Apply/Ok button to save the changes.


That’s all.
4. Using Registry Editor. The registry editor allows Windows users to view and make changes (create, delete, manipulate & make changes, rename, change values, subkeys, import-export, etc.) in Windows registry files.
By creating a new registry key, you can turn off the telemetry service.
The steps are given below. Let’s get started.
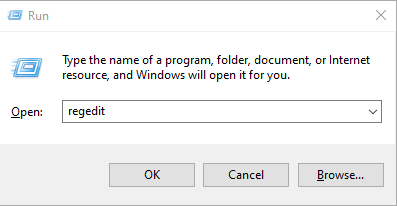
- Open Registry Editor on Windows 11/10 by searching from the Start menu or the Run command. To open the editor from the run command, press Win key + R from the keyboard, type regedit, and click on the OK button to proceed. Click on the Yes button if the User Account Control pop up prompted.

- Navigate to HKEY_LOCAL_MACHINE » SOFTWARE » Policies » Microsoft » Windows » DataCollection.
- Now, right-click on the DataCollection folder and select New » DWORD (32-bit) Value. Name the registry value to “Allow Telemetry” (without quotes).

- After that, double-click on the Allow Telemetry registry value and Type 0 in the value data. Click on Ok to apply the changes.


Method 3. Delete CompatTelRunner.exe File (Not Recommended)
If none of the above methods is working, then you may need to delete the CompatTelRunner.exe file that is running in the background.
However, the Windows OS prohibits deleting system files directly. But it doesn’t mean that you can’t delete the files. There are some steps you need to follow.
You need to log in as an administrator on your Windows 11/10 device to delete this system file.
The steps are given below.
- Open This PC and go to the C:\Windows\System32 folder.
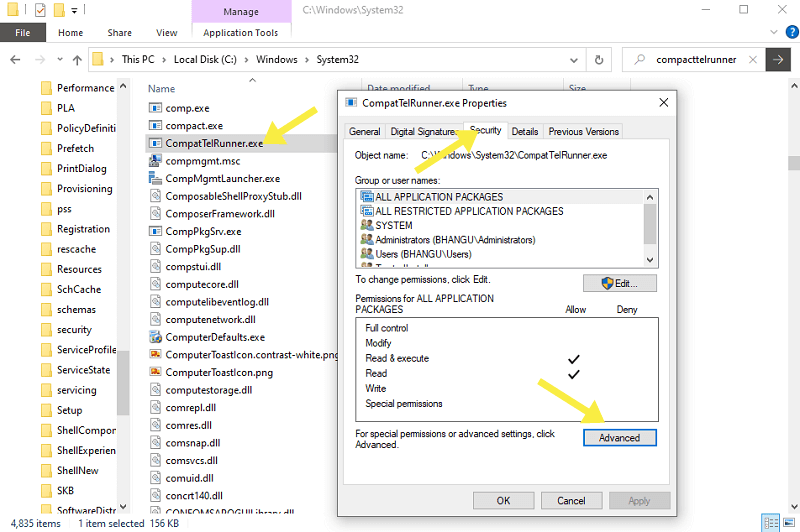
- Search for the CompactTelRunner file in the System32 folder. You can use the Windows search feature to find the file easily. Type CompactTelRunner in the search box in the top right of the explorer to find the file.
- After that, right-click on the file and select Properties from the context menu.
- Open the Security tab and click on the Advanced button at the bottom.

- Click on the Change option on the right side of the Owner option. After that, open the Advanced option.
- Now, click on the Find Now button, select your PC username, and click on the Ok button.
- Click on the OK button again. After that, select Apply and Ok to save the changes.
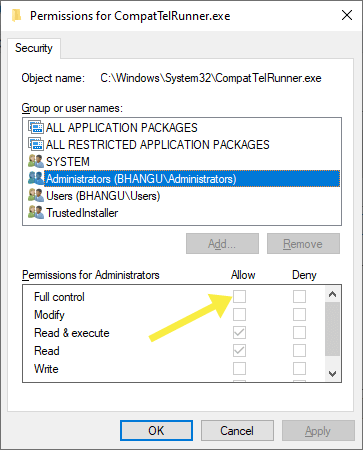
- Now again right-click on the CompactTelRunner and go to Properties,» Security tab,» Advanced,» Click on the username to select it,» Edit. After that, enable the Full control option and click on the Ok button. After that,t apply the changes and click on the OK button.

- Delete the CompactTelRunner file. For this, right-click on the file and select the Delete option. Click on Yes to confirm.
Method 4. Stop the Microsoft Compatibility Telemetry service temporarily
If you notice that the Microsoft Compatibility Telemetry service eats up your device resources, then you can disable it from Task Manager. However, the service will be restarted after some time, but if you don’t want to disable it permanently, then this method is useful for you.
The steps are given below.
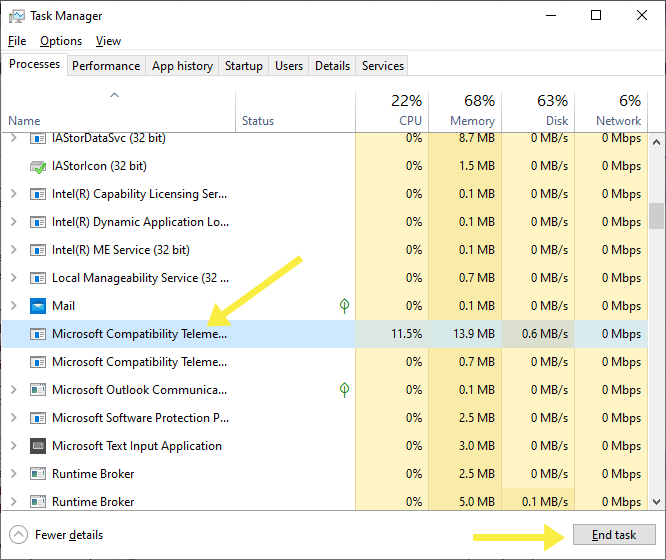
- Open the task manager on Windows 11/10 by pressing Ctrl + Shift +Esc from the keyboard.
- Click on the More details to see all the processes.
- Sort processes by name. Scroll down and right-click on the Microsoft Telemetry Service option from under Background processes. Click on the End Task option from the context menu. That’s all.

- If you see the verification pop-up window. Enable the “Abandon unsaved data and shut down” option by ticking it.
- Click on the Shut down button to stop the process.
Other fixes to solve the Microsoft Compatibility Telemetry service’s high disk usage
Some other fixes also work for some users. If you don’t want to disable or delete the telemetry service, then these fixes may solve your telemetry high disk usage problem. However, the first method is best for most users.
1. Restart your device
If you see high disk usage because of the CompactTelRunner process, then wait for one or two minutes. If the problem still exists, then restart your device.
2. Update Windows 11/10
Check for the OS updates. If any update is available, then install it on your device. To update Windows 11/10, open Settings by pressing Windows key + I, then go to Update and Security. Click on the Check for updates.
3. Uninstall/Update Software or apps that regularly crash.
If any software or app constantly crashes on your device, then you should uninstall or update it. Windows OS records the crash reports and uploads them to the Microsoft servers.
4. Run SFC Scan to restore corrupted Windows files
By restoring corrupted Windows system files, you may also solve the Microsoft Compatibility Telemetry high disk usage problem.
You can run an SFC scan to restore the corrupted OS files.
For this, press Windows key + R and type cmd in the run command. Click on Ok to open the command.
After that, type sfc /scannow and press the Enter button on the keyboard. The scan will start, and Windows will fix the problems automatically.
Frequently Asked Questions
1. How to know if the Microsoft Compatibility Telemetry service causes high disk usage?
You can know it from the task manager. Open the task manager by pressing Ctrl + Shift + Esc keys and click on More details. You’ll see the live disk usage in percentage. Click on the Disk to sort the drive usage by processes.
2. Is it safe to disable the Microsoft Compatibility Telemetry service?
Yes, it is safe to disable this service. You will not face any system error after disabling it. Though if the first method is working for you, then you don’t need to disable it completely.
3. What type of data does this service collect from the device?
This service collects and sends diagnostic data events (websites you browse, how apps and Windows perform, device activity data, and error reports), crash metadata, crash dumps (full & triage memory dumps), diagnostic logs, and data collection of sampling applies.
4. Is this service harmful to my privacy?
Well, all diagnostic data is encrypted using Transport Layer Security. And while transferring the data from your device to Microsoft servers, Microsoft uses certificate pinning. Also, the service is not harmful to your privacy. If you are concerned about your privacy, then you can disable it without any problem.
5. Can I end the task Microsoft Compatibility Telemetry from the task manager?
Yes, you can end this service from the task manager. But the service will restart automatically later, or the next time you turn on your pc.
Conclusion
Now you know how to fix the Microsoft Compatibility Telemetry high disk usage problem. Most people with old Windows devices are suffering from this problem.
However, you can enable Windows to send only the required diagnostic data from settings to reduce the load. But you can also easily disable the service from the task scheduler, group policy editor, and registry editor.
Also, by deleting, you can get rid of this problem permanently. But I’ll not recommend doing this.
Write in the comment section if you have any problems while disabling the CompactTelRunner process or service.
Popular on OTW Right Now!


About The Author
Gagan Bhangu
Founder of otechworld.com and managing editor. He is a tech geek, web-developer, and blogger. He holds a master's degree in computer applications and making money online since 2015.