How to Turn off Background Data Usage in Windows 11
Do you want to turn off background data usage in Windows 11 completely?
Well, in the age of the internet, modern operating systems such as Windows 11 often require an internet connection for many reasons. However, it is not compulsory. But, plenty of Windows OS services require internet connectivity to function fully.
So, the operating system might consume a lot of data in the background. If you have an internet connection with a limited data plan or an unlimited plan with slow speed, you might want to prevent Windows 11 from consuming your data bandwidth in the background.
However, the OS gives some options to track and manage your data usage. You can set the limit according to your data plan. But disabling background data can solve all your problems.
In this article, I’ll show you how to turn off background data usage in Windows 11. Also, you can limit the data usage according to your needs.
Why do you need to Turn off Background Data Usage in Windows 11?
Various reasons might force you to save your data bandwidth. The most common reasons are given below.
- Slow Internet Speed: If you have an internet connection with slow speed, background data consumption can interrupt your connection and create some issues. For example, you might get a slower speed or be unable to open web pages or stream the videos on the web. Also, if you’re playing online games, you might get an error or be unable to play the games.
- Limited Bandwidth: Limited bandwidth is one of the most common reasons that force users to disable background data consumption on their Windows computers. In some countries, the data plans are costly and come with limited bandwidth.
- To Play Games Flawlessly: Most modern games require the internet to run. Sometimes background services and apps interrupt the internet connection or speed while playing the games.
- To Prevent Downloading Windows 11 Updates at Background: Microsoft releases different types of updates for Windows 11 from time to time. However, these updates are required to run the OS efficiently.
- You’re using Mobile Data: Some users use mobile data using a hotspot on their PC. Mobile data plans often come with limited data bandwidth. So, if you’re one of those who uses mobile data on a PC, you might need to turn off background data usage to save your bandwidth.
- Don’t want to Update Apps in the background: Windows 11 automatically updates the installed apps to ensure that users have access to the latest features, improvements, and security patches. App updates consume a lot of data in the background. So, you might want to turn off automatic app updates to save your data.
- To Control Data Usage: If you’re living in an area where internet plans are costly and with limited bandwidth, you might want to control your data usage.
- Increase Internet Performance: When apps or services running in the background consume your bandwidth, then it can reduce the available bandwidth and you’ll get slower internet speeds. Turning off background data usage helps you to increase internet performance.
How to Track or Monitor Data Usage in Windows 11?
Windows 11 allows us to track the data usage from the settings app and task manager.
From the task manager, you can track or monitor live data usage. On the other hand, from the settings app, you can see the usage statistics of each app or software. It helps you to know which software or app consumes how much data. You can also filter the usage statistics by 30 days, 7 days, or 24 hours.
The step-by-step guide is given below to track data usage using the settings app and task manager.
Method 1. Monitor Data Usage in Windows 11 from Settings
- Open Settings App on your computer by pressing the Windows Key + I keyboard shortcut. Otherwise, click on the Start Menu icon from the taskbar and go to All Apps » Settings.
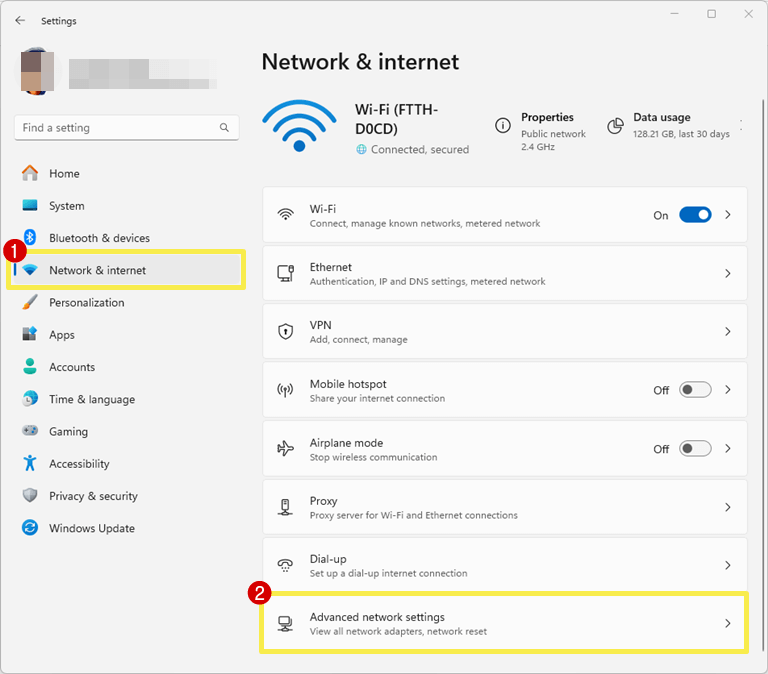
- Now click on the Network & Internet option from the left navigation pane and you’ll see the network options on the right side of the window. After that, Open Advanced network settings.

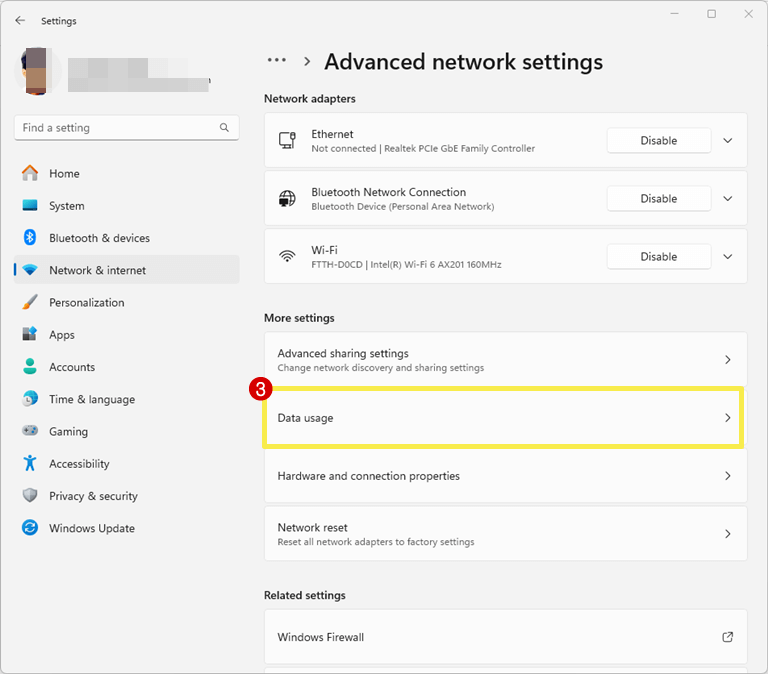
- Click on the Data Usage option.
Otherwise, Click on the Data Usage option from the top right to open the Data Usage page. - Now you’ll see the total data usage from the last 30 days with each app usage statistics.
Click on the Wi-Fi or Ethernet drop-down option from the top right to see the data usage of the Wi-Fi or Ethernet connection.
To filter the usage statistics of apps click on the Last 30 Days drop-down option next to the Filter by and select the Last 24 Hours or Last 7 Days option.
 Otherwise, Click on the Data Usage option from the top right to open the Data Usage page.
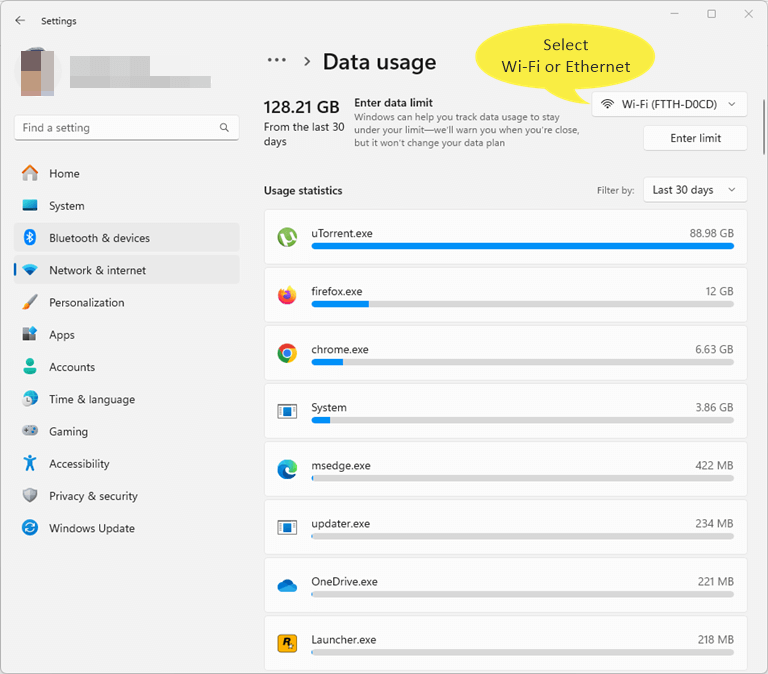
Method 2: Monitor Data Usage in Windows 11 from Task Manager
From Task Manager, you can monitor or track the installed app’s data usage or live data usage to know which program, service, or app eats up your network bandwidth.
Steps to monitor live data usage in Windows 11 from Task Manager:
- Open Task Manager by pressing Ctrl + Shift + Esc keyboard shortcut.
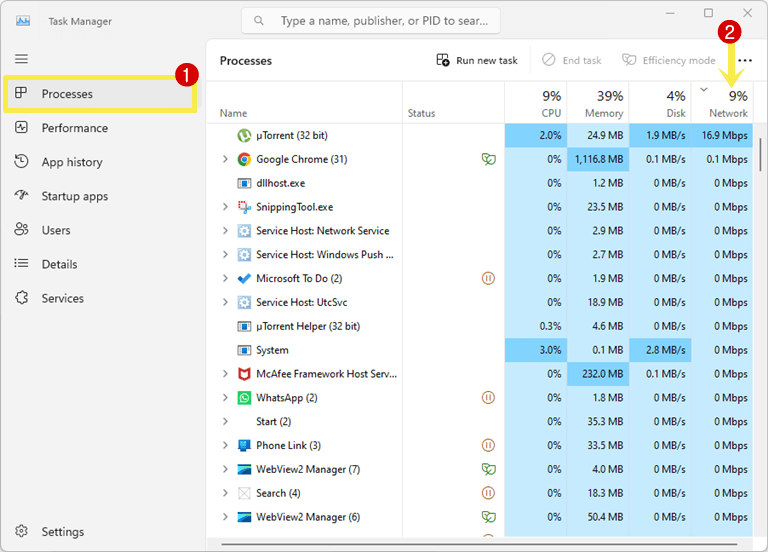
- From the Processes tab click on the Network option and you’ll see the Down arrow icon on the top left of the Network option.

- Now you’ll see the live network usage.
Steps to monitor the apps data usage in Windows 11 from Task Manager:
- Open Task Manager by pressing Ctrl + Shift + Esc.
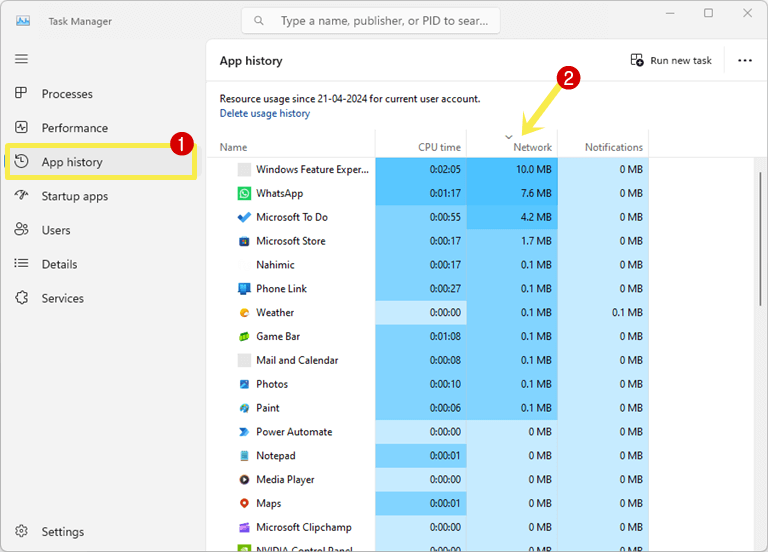
- From the task manager, click on the App History option from the left navigation tab.
- Now click on the Network option to check the app’s network usage.
How to Turn off Background Data Usage in Windows 11
To turn off background data in Windows 11, you need to set your Wi-Fi or Ethernet connection as a metered connection. Microsoft introduced this option to reduce data usage. When you turn on the metered connection option, apps and services running in the background won’t eat your network resources. Also, the operating system defers the downloads of its updates.
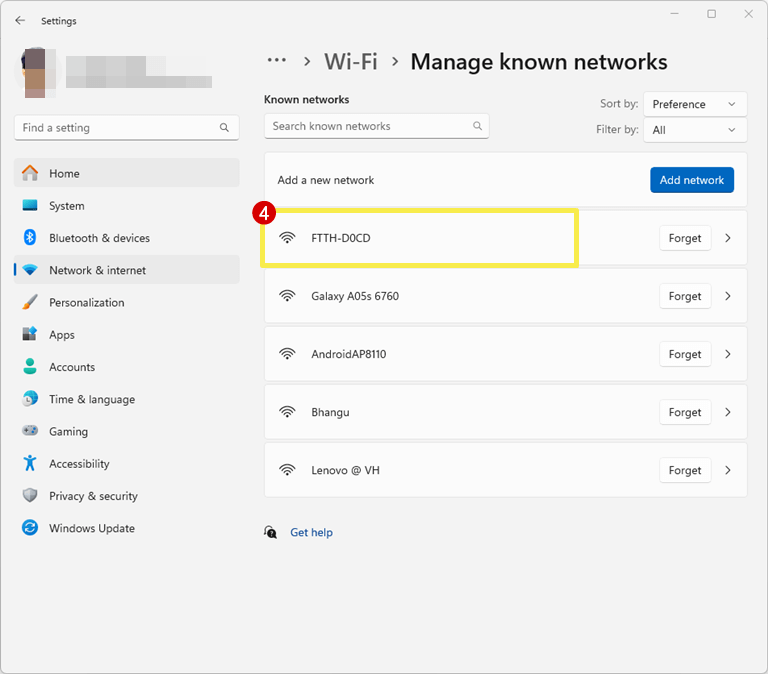
1. Set Wi-Fi Connection as Metered Connection
The steps are given below to set a Wi-Fi connection as a metered connection in Windows 11:
- Open the Settings app by pressing Windows Key + I from the keyboard. Otherwise, you can open Settings from Start Menu » All Apps.
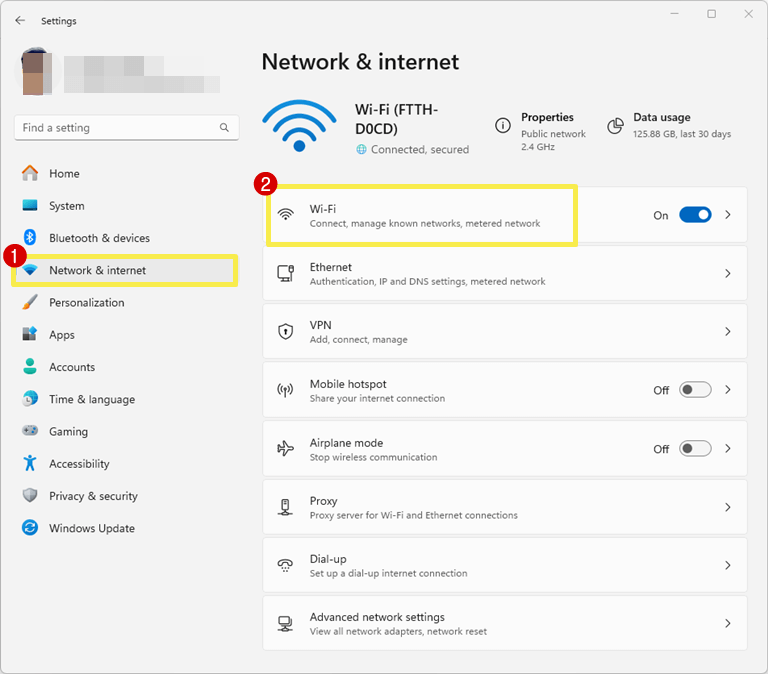
- From the Settings page, click on the Network & Internet option from the left pane.
- Now Click on the Wi-Fi Option.
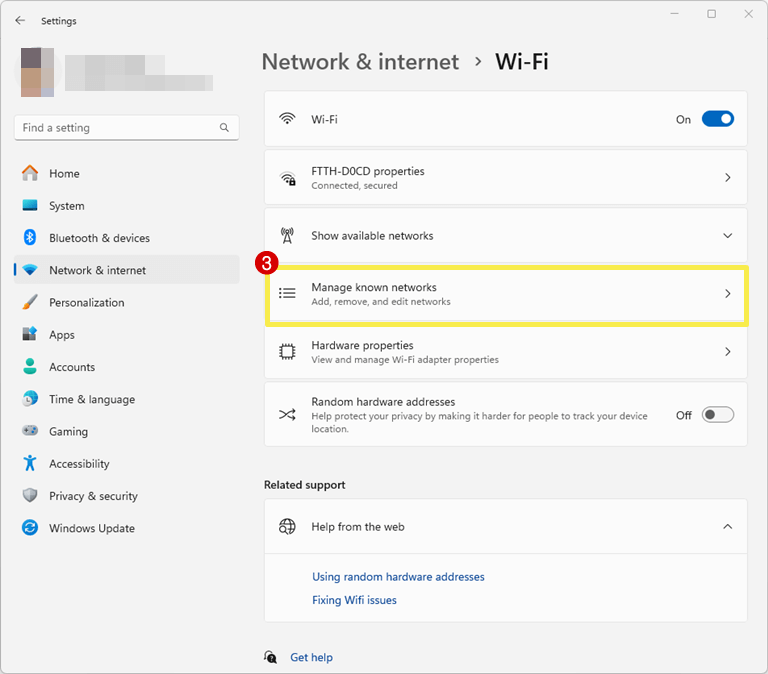
- Go to Manage Known Networks and you’ll see the list of all known Wi-Fi networks.
- Click on your connected Wi-Fi network or other known network that you want to set as metered.
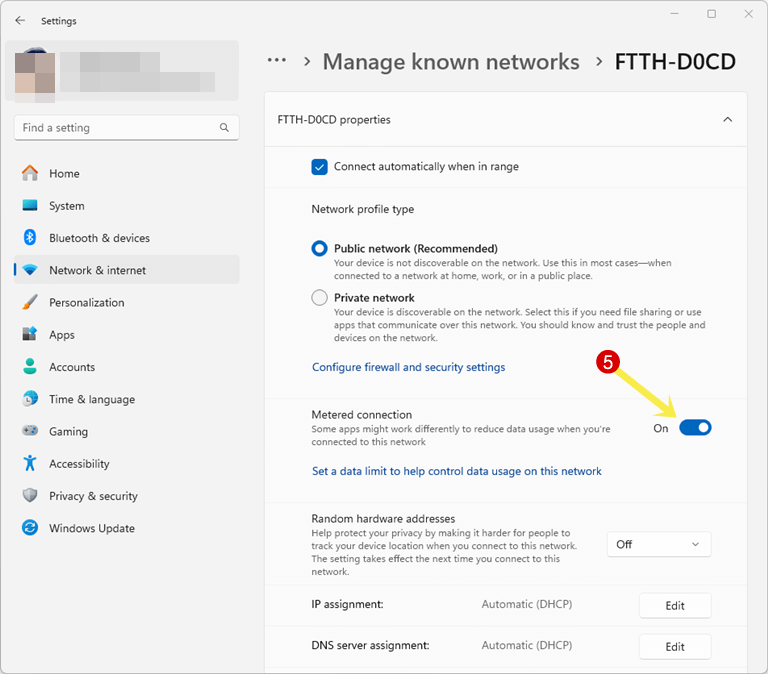
- Toggle On the button next to the Metered Connection option.
- That’s it.
2. Set Ethernet Connection as Metered Connection
You can also set your ethernet connection as a metered connection. The steps are given below:
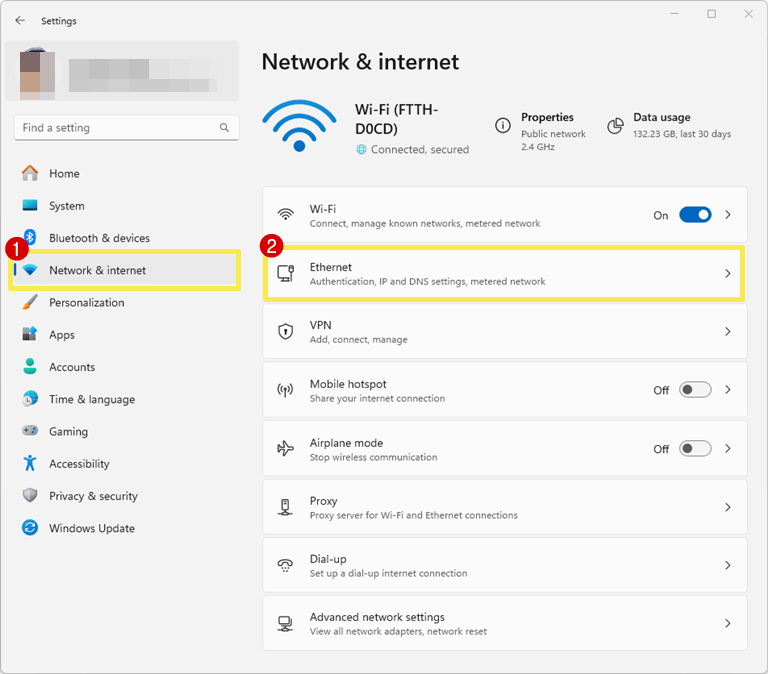
- Open the Settings app on your Windows 11 PC by pressing the Windows key + I keyboard shortcut. Otherwise, go to Start Menu » All Apps » Settings.
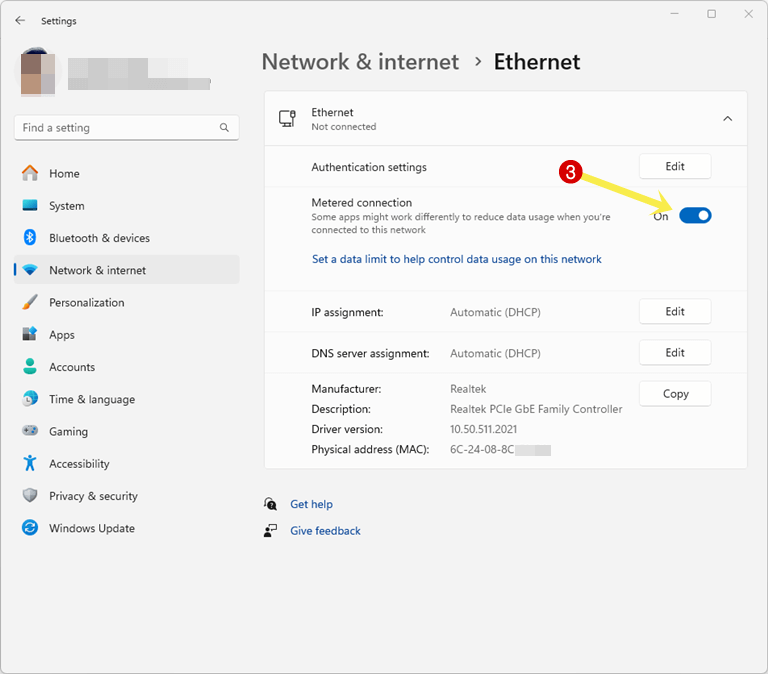
- Select the Network & Internet option from the left navigation pane from the settings app page and open the Ethernet option from the right side of the page.
- Toggle On the button next to the Metered Connection option.
- That’s all.
How to Reduce Background Data Usage in Windows 11
However, turning on a metered connection can turn off background data usage, save your network bandwidth, and improve network performance. But there are plenty of other options also available that help you to reduce the data usage.
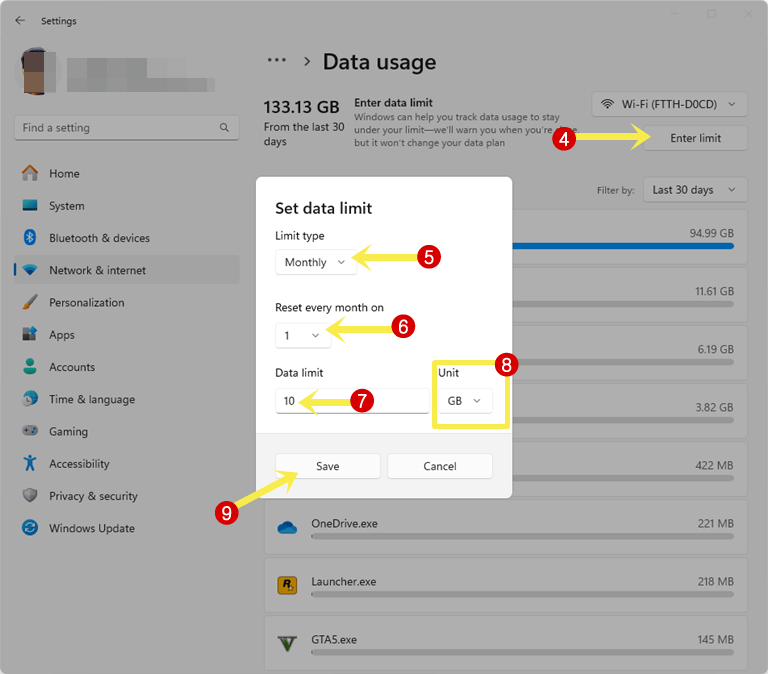
1. Set Data Limit
If you have a metered data plan, you can set the data limit in Windows 11 according to your plan. A data limit refers to the maximum amount of data that can be used within a specified period. You’ll get the warning before the data limit is exceeded.
So, it helps you to avoid extra charges. Because you can manage your data usage according to your plan.
Steps to set the Data limit are given below:
- Open Settings by pressing the Windows key + I from the keyboard.
- Click on the Network & Internet from the left navigation pane. After that, click on the Advanced Network Settings option from the right side of the page.
- Now open the Data usage option.
- Click on the Enter Limit button and the popup will open.
- From the popup, select your Limit type. By default, the Monthly option is selected. But you can also select Daily, Weekly, One Time, and Unlimited options.
Now from the Reset Every Month option, select the reset date.
Type your data limit in the required field and select the MB or GB from the Unit. - Click on Save and that’s it.
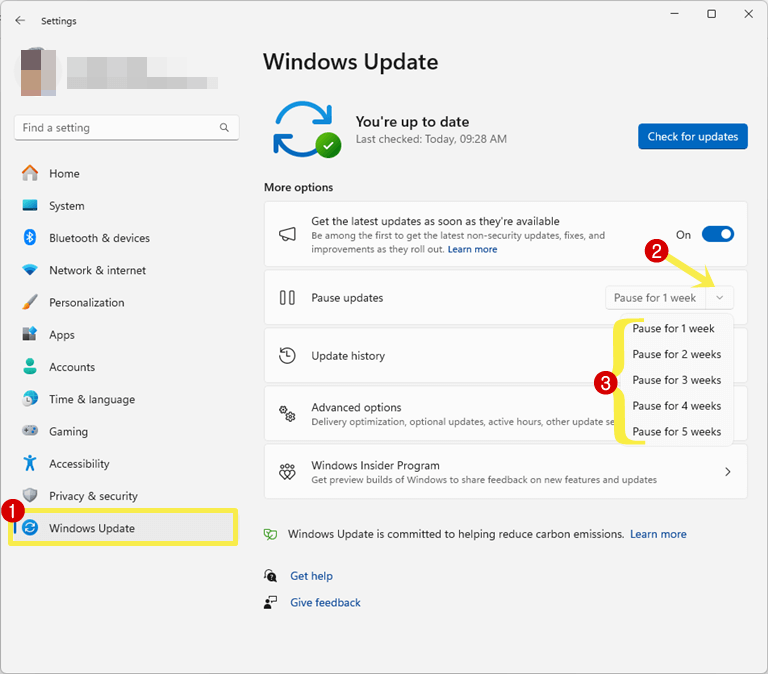
2. Pause Windows Updates
If you have a limited internet bandwidth or unreliable internet connection, you might need to pause Windows updates.
- Open the Settings app and click on the Windows Update option from the left navigation pane.
- Click on the Drop-down menu next to the Pause Updates option and select the option from Pause from 1 week to 5 weeks.
Optional: Click on the Advanced option and toggle off the “Receive updates from other Microsoft products” option.
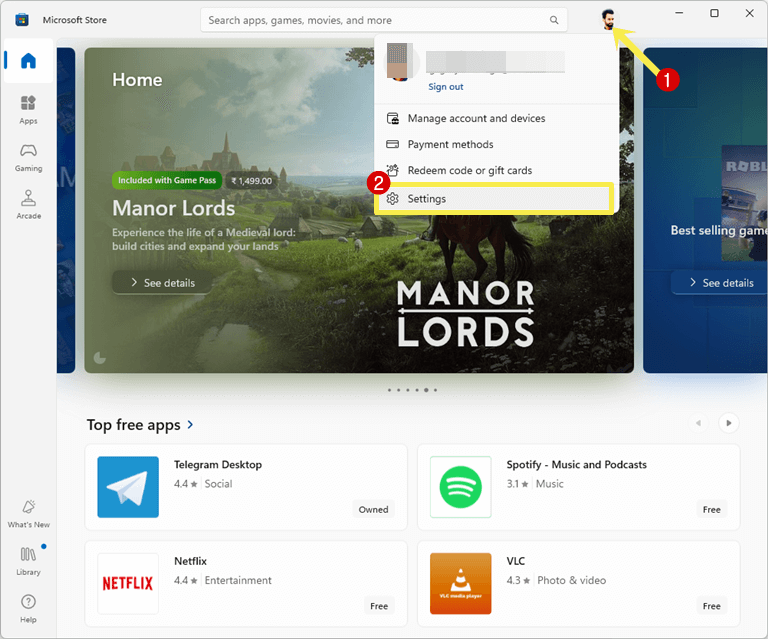
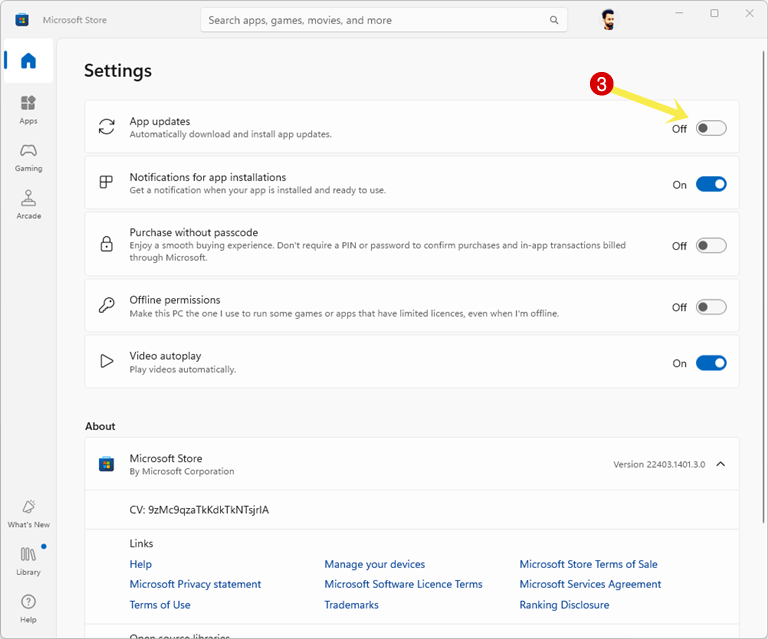
3. Turn off Automatic Apps Updates in the Microsoft Store
By default, Microsoft Store automatically downloads and installs the app updates. You can turn off automatic app updates to save your bandwidth.
- Open Microsoft Store from Start Menu » All Apps.
- Click on the profile icon from the top and select Settings from the context menu.

- Toggle off the button next to the App Updates.
- That’s all.
4. Disable OneDrive on Startup or SYNC
Windows offers built-in OneDrive functionality to backup and restore data or files. This service also eats up your bandwidth. So, you can disable OneDrive completely or pause synchronization for a specific time.
Steps to disable OneDrive:
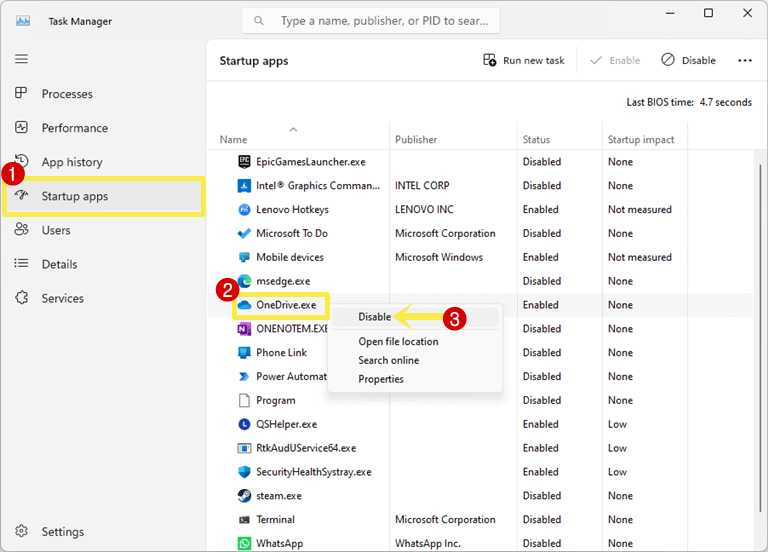
- Open Task Manager by pressing Ctrl + Shift + Esc keyboard shortcut. Otherwise, right-click on the Windows icon and select the Task Manage option.
- From the task manager, click on the Startup Apps option from the left side and you’ll see the list of all startup apps with their status.
- Right-click on the OneDrive.exe from the list of startup apps and select the Disable option from the context menu.
- That’s all.
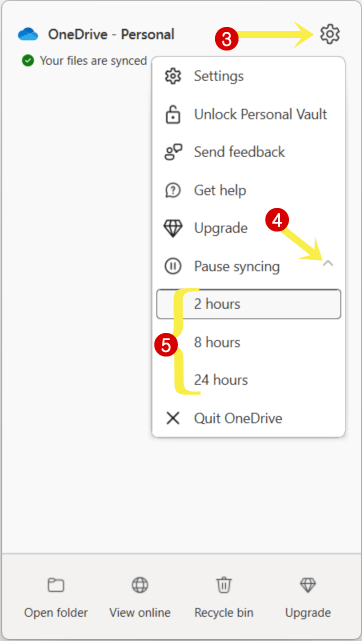
Steps to Pause One Drive SYNC Temporarily:
- Open OneDrive if not opening or running and click on the up-arrow icon from the taskbar. Click on the OneDrive icon from the system tray.

- Select the Gear icon (Settings icon) from the top right of the OneDrive popup.
- Now click on the Down arrow icon next to the Pause Syncing option and select the 2 hours, 8 hours, or 24-hour option.

- That’s all.
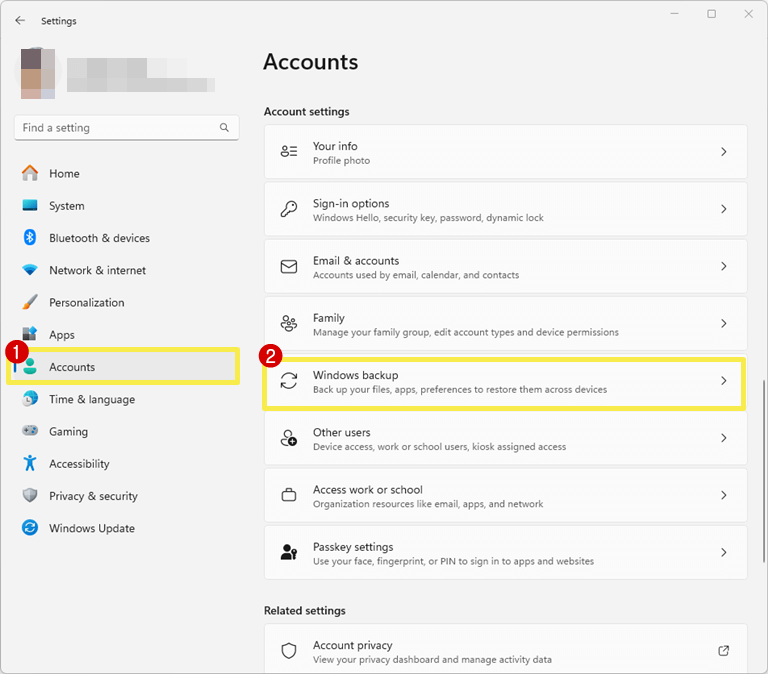
5. Turn Off Apps and Preferences Synchronization
Windows 11 syncs your apps and preferences which helps you to quickly access your apps and preferences on any device.
To disable these synchronization options, follow the following steps:
- Open the Settings app and click on the Accounts option from the left navigation pane.
- Scroll down and open the Windows backup option from under the Account Settings.
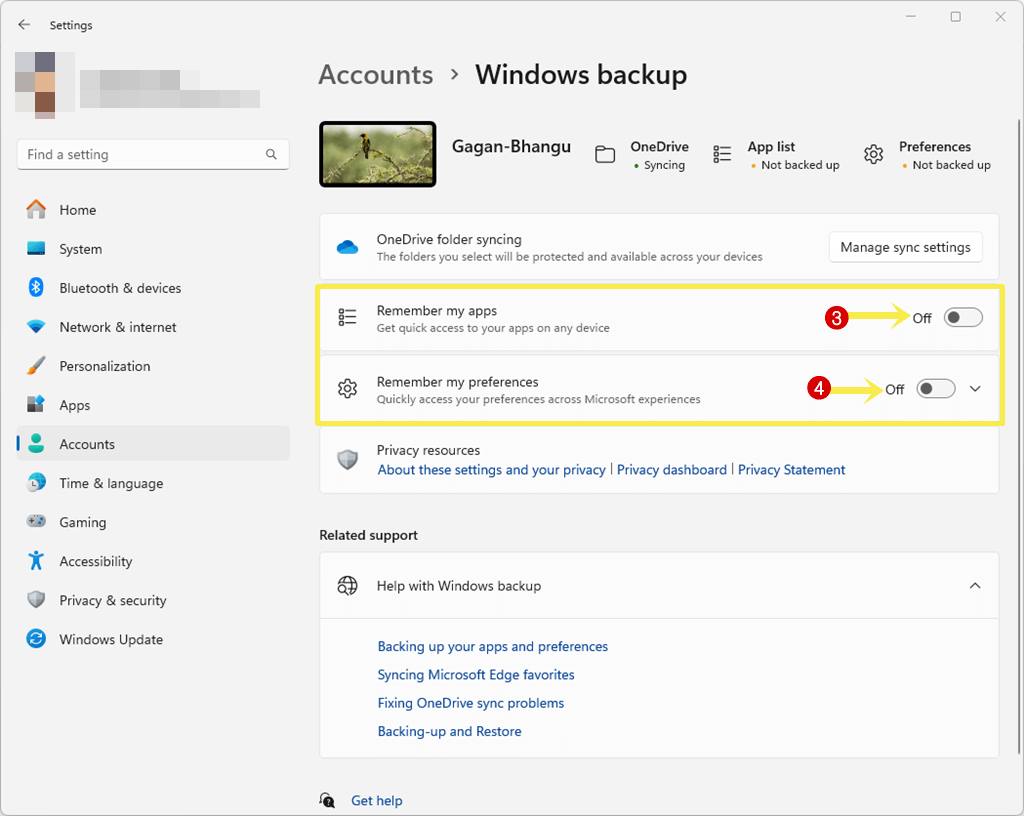
- Toggle off the Remember My Apps and Remember My Preferences options.

- That’s it.
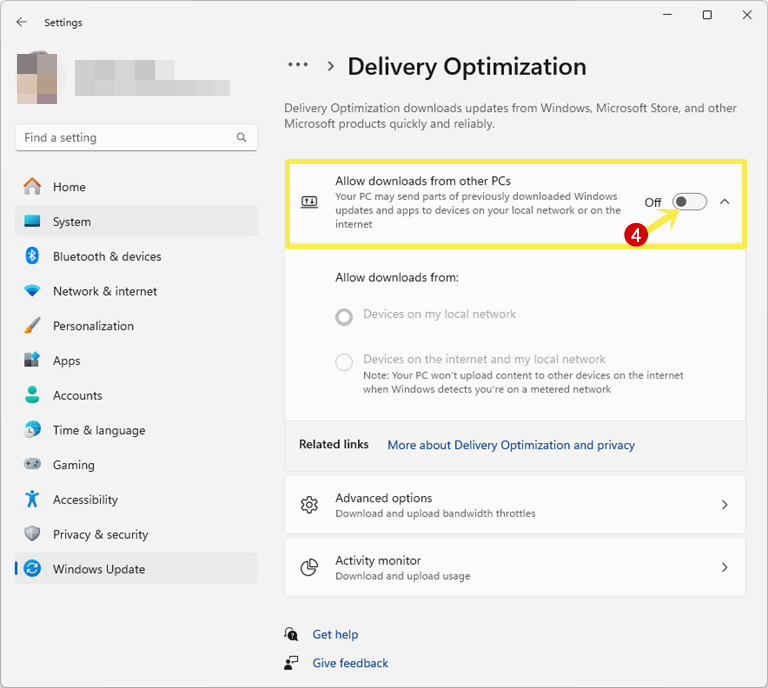
6. Disable Delivery Optimization
Delivery Optimization uses peer-to-peer networking to distribute updates across devices on the same network. Well, it helps to reduce strain on Microsoft’s servers, but consumes your bandwidth.
So, disabling Delivery Optimization can help you save our bandwidth and prevent unexpected data usage.
The steps are given below to disable Delivery Optimization in Windows 11:
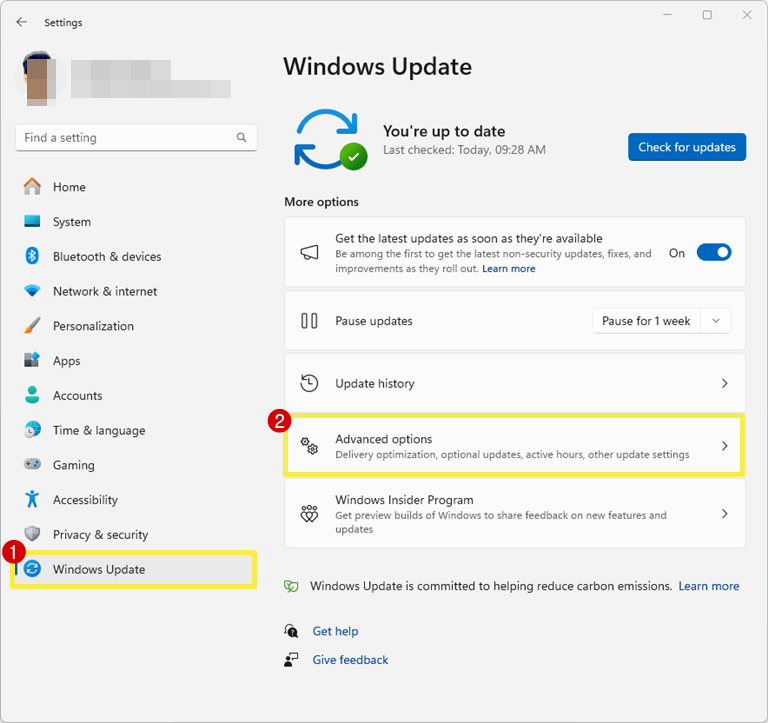
- Open the Settings app on your PC and click on the Windows Update option from the left pane.
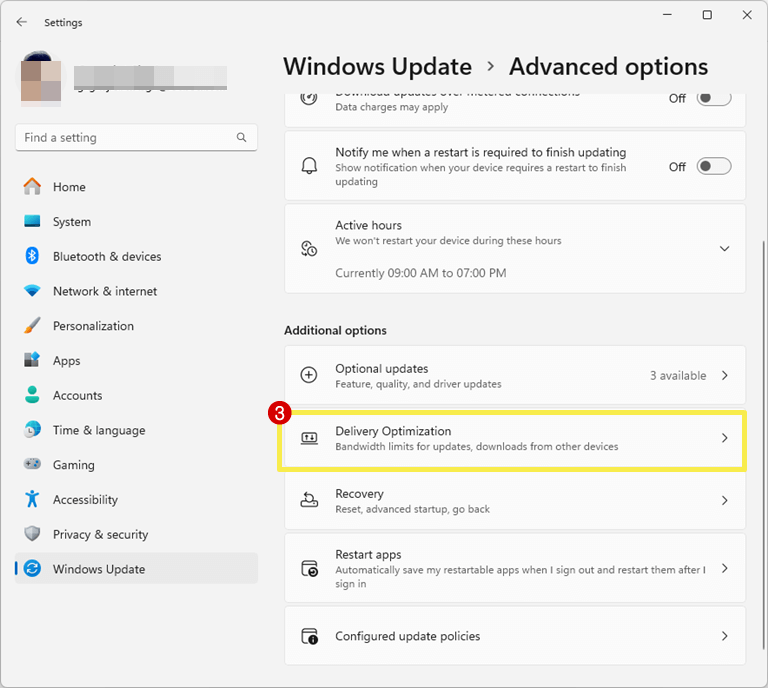
- Click on Advanced Options.

- Open Delivery Optimization option.

- Toggle off the button next to Allow downloads from other PCs.
- That’s it.
7. Prevent Apps from Running at Background
You can prevent apps from running in the background that are installed from Microsoft Store. If you find any app that eats up your bandwidth in the background, you can prevent that app from running in the background to save your data.
Note: Monitor your data usage before doing this.
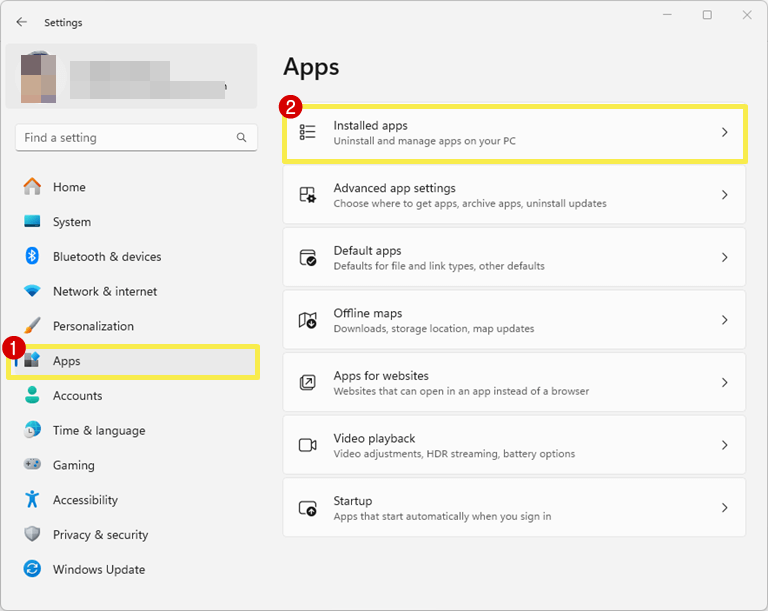
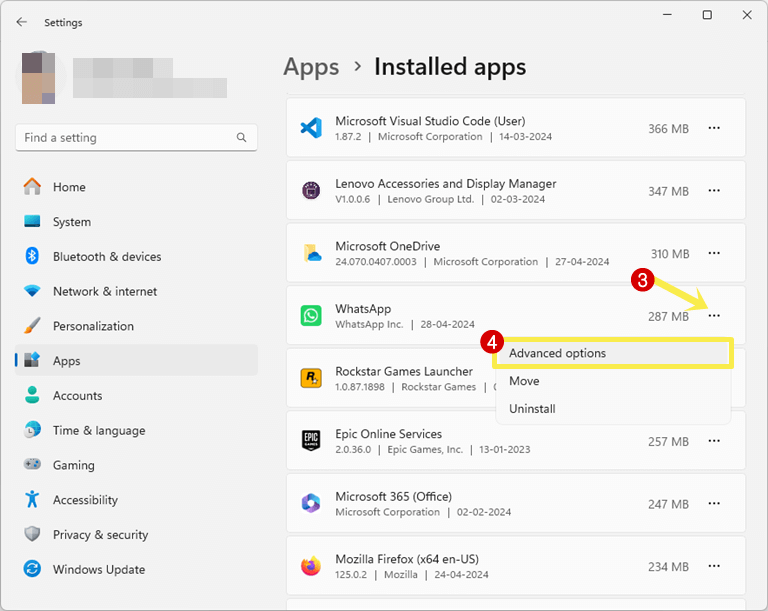
- Open the Settings app and click on the Apps option from the left navigation pane.
- After that, open Installed Apps from the right side of the page.

- Now you’ll see the list of all installed apps and software. Click on the three horizontal dots next to the app that you want to stop running in the background.
- After clicking on the three dots, select Advanced Options.
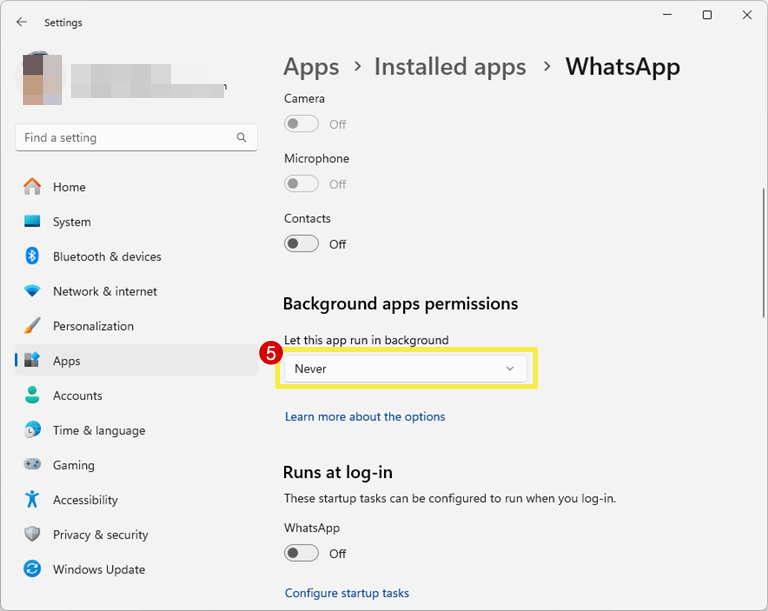
Note: If the app or software is not installed from the Microsoft Store, you’ll not see the Advanced options in the context menu. - Now from under the Background Permissions, you’ll see the “Let this app run in background option”, click on the “Power optimized (recommended)” drop-down option and select the “Never” option.
- That’s it.
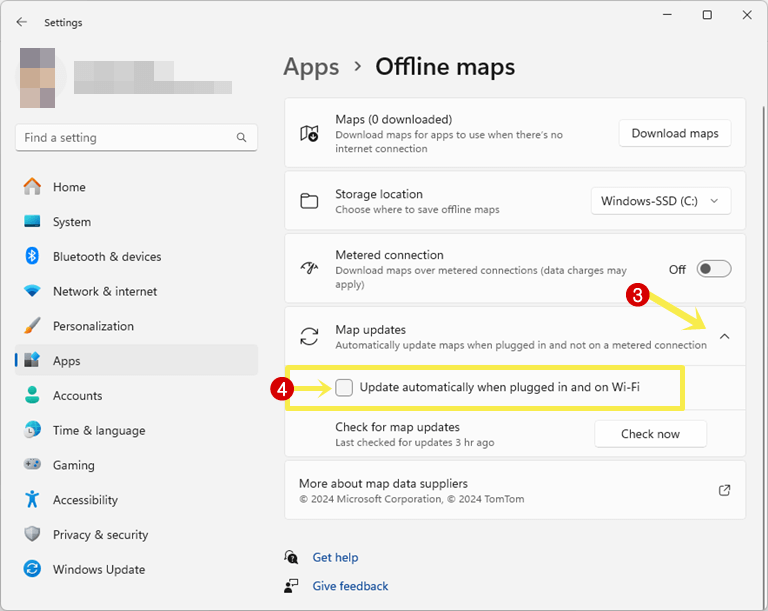
8. Turn off Offline Maps Updates
If you downloaded the offline maps, then Windows 11 automatically updates the maps in the background to ensure that users always have access to the latest map data.
The operating system gives an option to turn off the auto offline maps updates, which helps you to save your bandwidth.
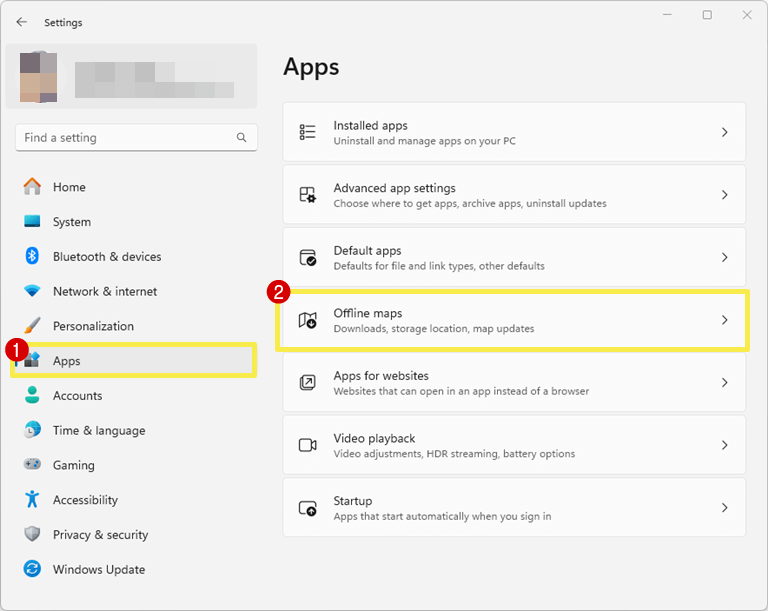
- Open the Settings app and click on the Apps option from the left navigation pane.
- Now open the Offline Maps option from the right side of the page.
- Click on the Maps Updates option and uncheck the “Update automatically when plugged in and on Wi-Fi”.
- That’s it.
Conclusion
I hope this article helped you learn how to turn off background data usage in Windows 11. You just need to set your internet connection as a metered connection to prevent background data usage. Otherwise, plenty of other options are available to reduce the data usage according to your requirements.
Popular on OTW Right Now!


About The Author
Gagan Bhangu
Founder of otechworld.com and managing editor. He is a tech geek, web-developer, and blogger. He holds a master's degree in computer applications and making money online since 2015.