How to Get Help in Windows 11 (12 Ways)
Looking for different ways to get help in Windows 11? If yes, then you’re on the right page.
While using the Windows 11 operating system, you may encounter errors or technical issues due to some reasons.
If you’re a non-technical person, you might need troubleshooting guides and solutions to solve these errors or issues.
Well, the simple way is to search on the web for errors or problems, and you’ll get the solutions.
However, the latest version of Microsoft Windows OS (Windows 11) offers a built-in “Get Help” app that provides support for users. Users can simply search for their problems regarding the operating system and it shows the solutions (including articles, tutorials, and troubleshooting guides) to resolve issues with their Windows 11 operating system.
Moreover, users can submit feedback or report a problem directly to Microsoft Support. But sometimes the app isn’t enough to solve the problems. There are high chance that you might fail to find the solution to your problem.
So, in this article, I’ll show you the 10 different methods to get help in Windows 11.
How to Get Help in Windows 11 (12 Ways)
1. Search for Help from the Web (Taskbar or Browser)
One of the best methods is to get help in Windows 11 to find the solution or problem on the web.
Web search offers to get help or solutions from different platforms or websites such as Microsoft support, technology websites, forums, or YouTube videos.
Popular blogs and websites are continuously updated with new information and solutions. So, you can access the latest troubleshooting guides, tips, and solutions for Windows 11 issues.
Well, you can directly search the web using the taskbar search bar. However, you can open the web browser and search for the error or problem.
From the search results, open the websites and find the solutions.
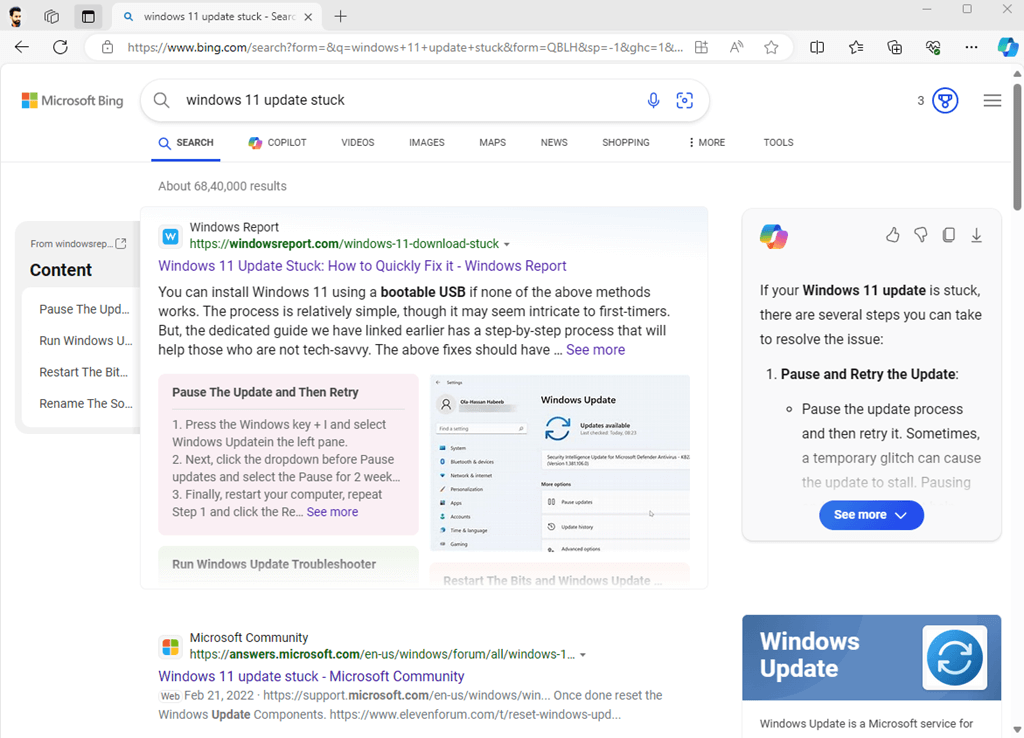
If you directly search from the taskbar, you’ll get the result from the Microsoft Bing search engine on the Edge browser. However, you can also use Google to find the best result.
How to get help in Windows 11 using Web Search:
- Open a web browser on your PC and open any preferred search engine using the address bar. After opening the search engine, type the query in the required field and click on the search button.

Alternatively, you can directly type the query in the taskbar or start the menu search box and press the enter button. - Now look for results that seem to address your issue and open the website.
- Follow the given instructions to solve the problem.
Note that, you can open multiple sources or websites to find the best solutions.
Also Read: How to Disable Startup Programs in Windows 11
2. Use Get Help App
The built-in “Get Help” app in Windows 11 also gives the best solutions. If the problem or issue is common, you’ll see the solution within the app, otherwise, you’ll see the results of Microsoft support forums. Also, it gives a “Contact Support” option to start a chat with a support agent in your web browser.
The app also provides an option to submit feedback to Microsoft.
How to use the Get Help app in Windows 11:
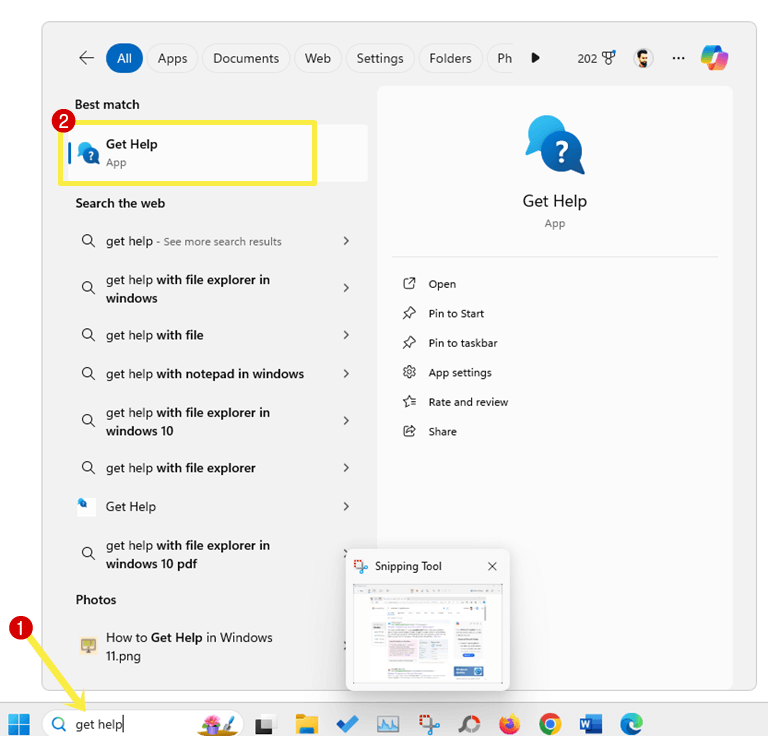
- Click on the Start icon and go to All Apps. Find and open the Get Help app from the list.
Alternatively, you can also use the search to open the app.
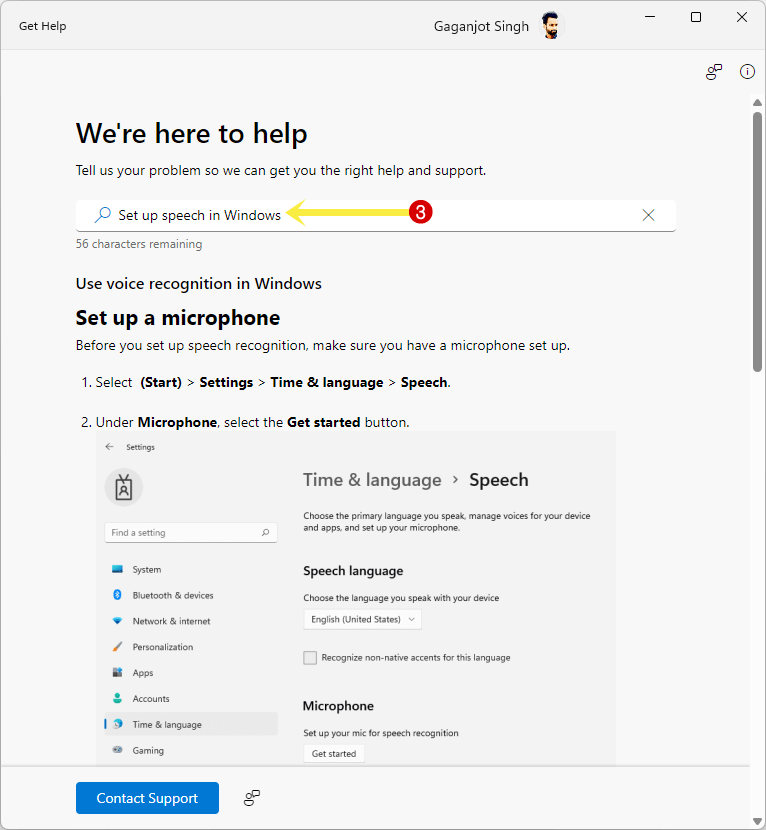
- Type your issue or problem in the required field and press the Enter button.
Keep in mind that, you have to describe your problem within 80 characters.
- Now the app shows you the solution with steps. Otherwise, you’ll see the results from the Microsoft Community. Just open the results to find your solution.
How to Contact Microsoft Support using the Get Help app:
- Open Get Help app from Start » All Apps.
- Type the problem query in the required field and press the Enter button.
- Click on the Contact Support button from the bottom left of the app.
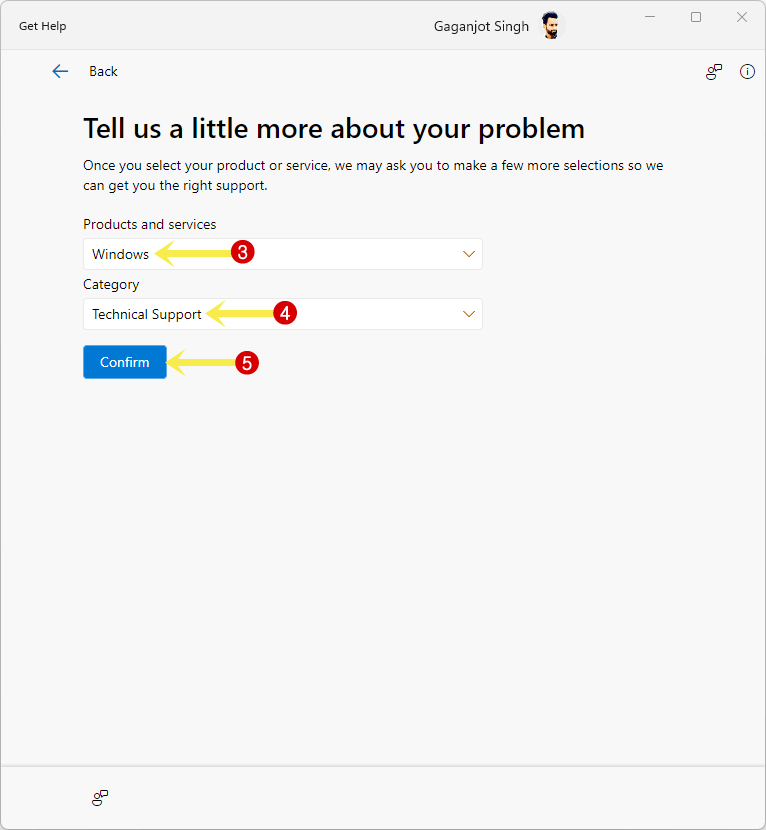
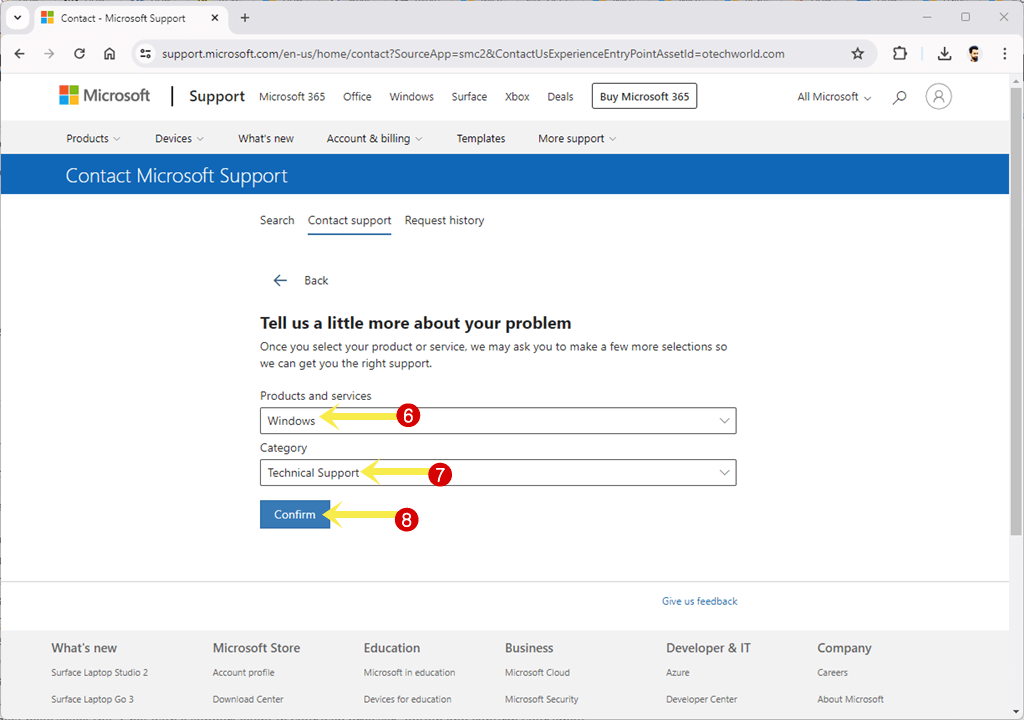
- Now click on the drop-down menu from under the Products and Services option and select the Windows option.
- After selecting the product or service, you’ll see the Category option. Select the required category according to your issue. For errors and issues, you can choose the Technical Support option.
- Click on the Confirm to proceed.
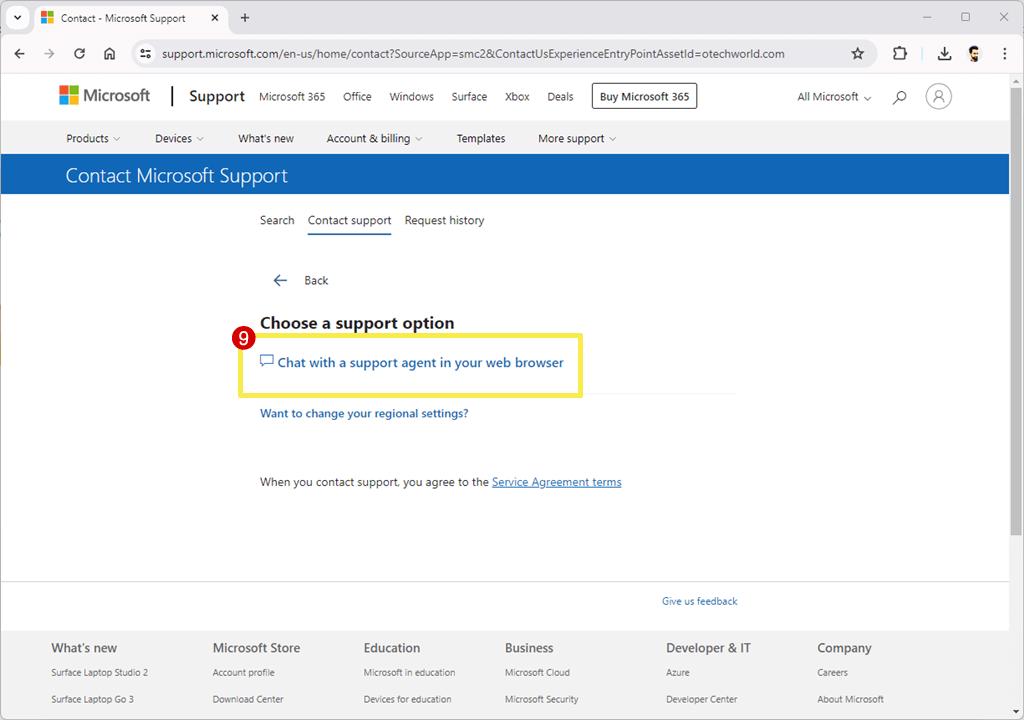
- From the next window, select the “Chat with a support agent in your web browser” option and click on the Confirm button.
- Now the live chat support will open in the web browser.


3. Run Troubleshooter
Windows 11 provides various built-in troubleshooters that automatically solve specific problems or issues with a few clicks.
Well, troubleshooters are built-in tools or programs that can identify and resolve common issues related to the Windows operating system.
You can run the specific troubleshooter from the Settings app. Just select the Run button next to the troubleshooter and follow the steps as shown on the screen.
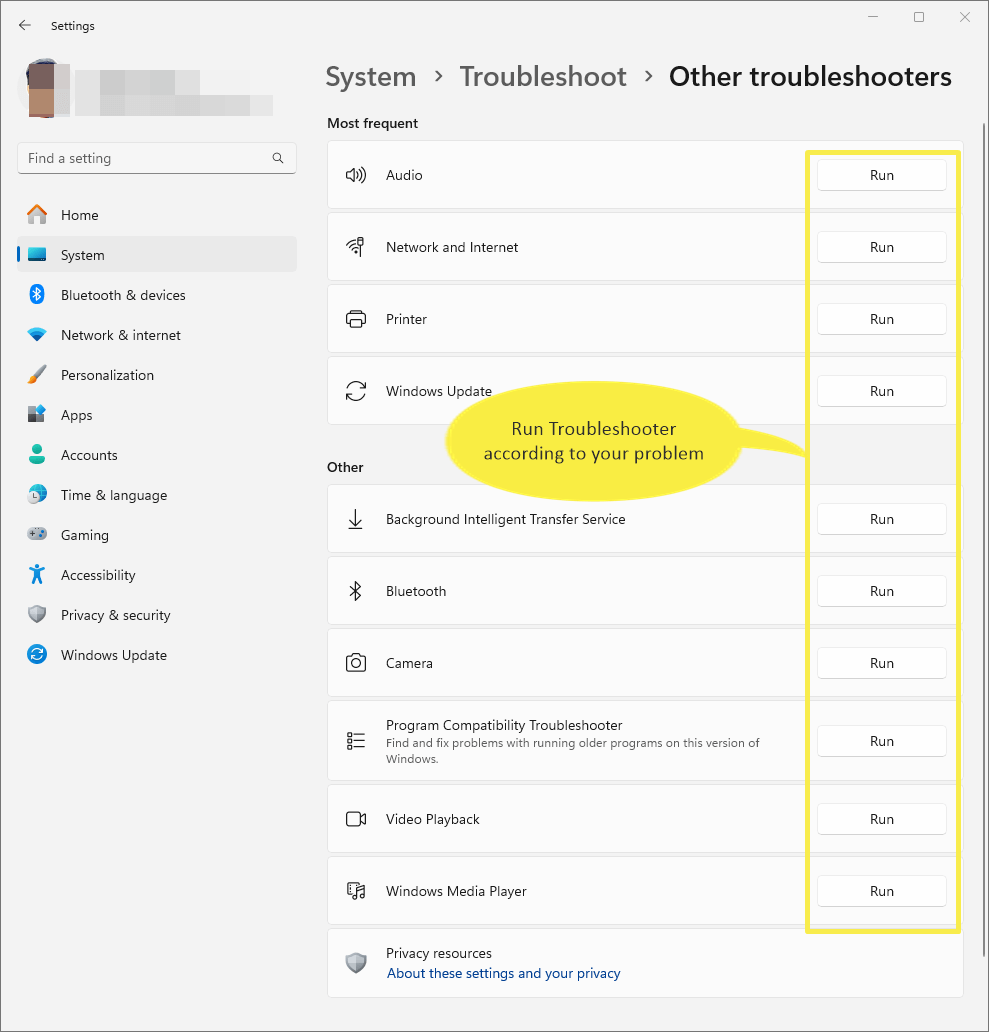
List of available troubleshooters in Windows 11:
- Audio
- Network and Internet
- Printer
- Windows Update
- Background Intelligent Transfer Service
- Bluetooth
- Camera
- Program Compatibility Troubleshooter
- Video Playback
- Windows Media Player
How to run troubleshooter in Windows 11:
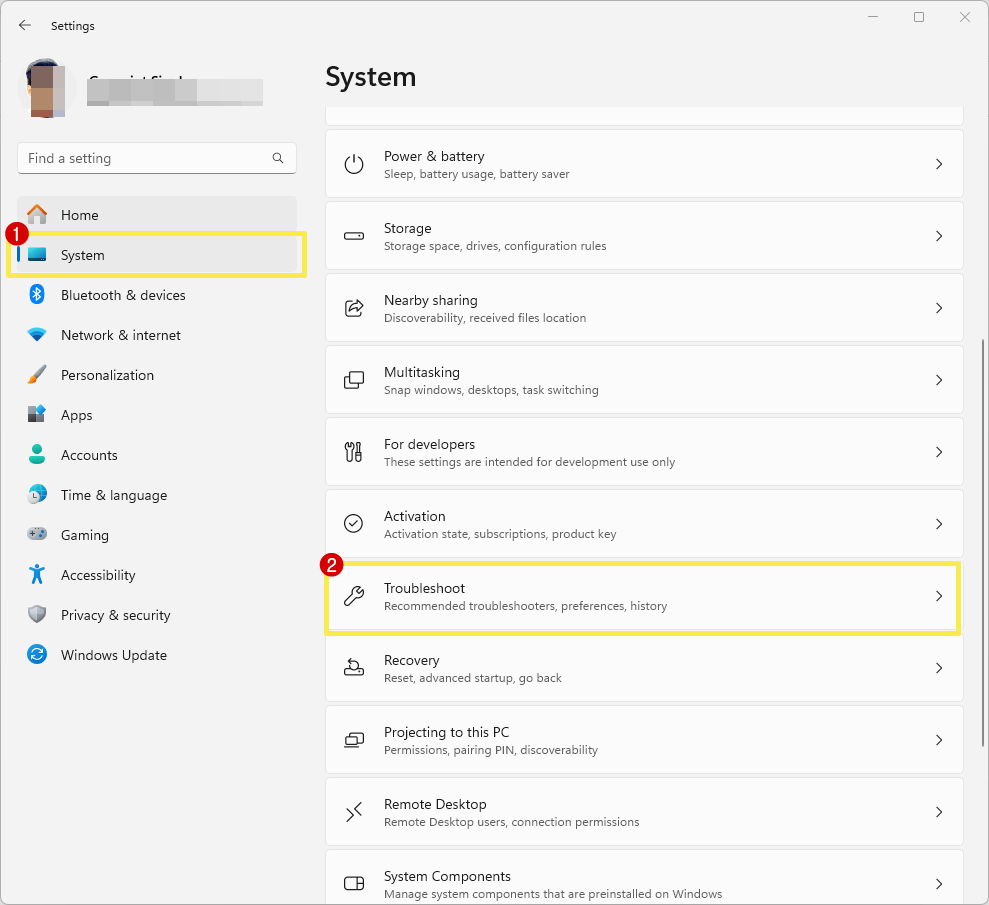
- Open the Settings app on a Windows computer by pressing the Windows Key + I keyboard shortcut.
Alternatively, go to Start Menu » All Apps » Settings. - From the left navigation pane, select the System, option. After that, open the Troubleshoot option from the list of options on the right side.

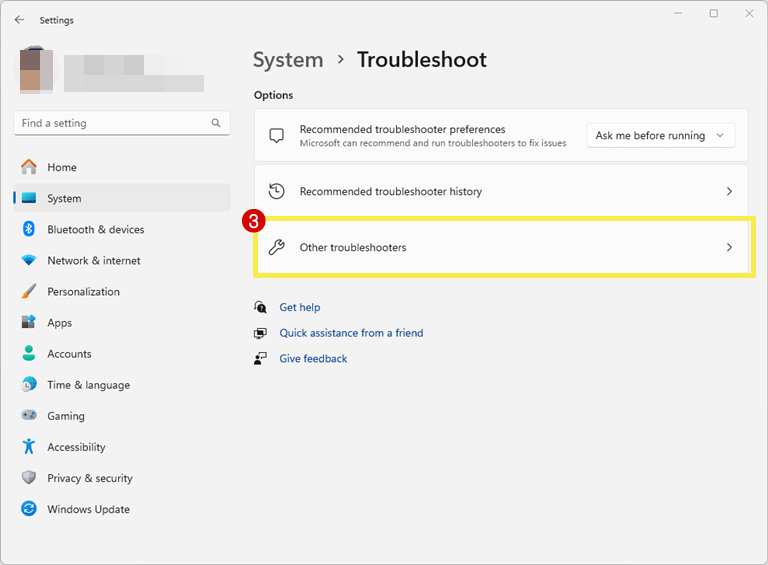
- Now open the Other Troubleshooters option and you’ll see the list of all available troubleshooters.

- Select the Run button next to the troubleshooter and follow the on-screen commands or steps to solve the issues.

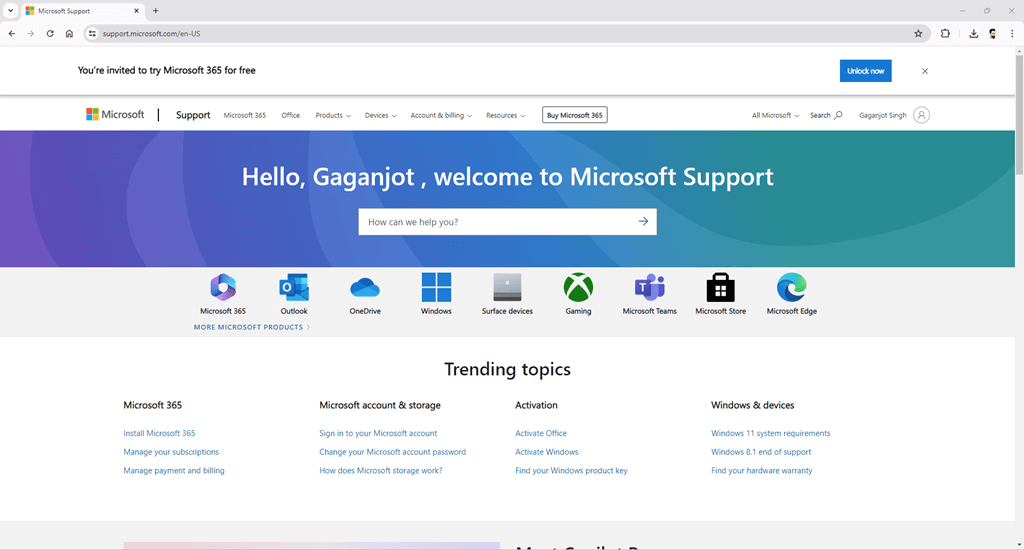
4. Use support.microsoft.com to Find Solutions
https://support.microsoft.com/ is the official Microsoft Support website where you can get guides (how-to and troubleshooting guides) on Windows operating systems and other Microsoft products.
For Windows 11, you can easily get help and guides on installation & updates, drivers & devices, network & internet, file & storage, security & privacy, troubleshoot & repair, and accessibility.
How to get help from support.microsoft.com:
- Open a web browser and open the https://support.microsoft.com/ windows URL.
- Write your query in the “How can we help you?” field and press the Enter button.

- You’ll see the results on screen. Open the result that seems to solve your problem.
Alternatively, you can use the directly available option from the webpage after opening the URL.
5. Contact to Microsoft Support via Chat
However, you can contact Microsoft support via the Get Help app on Windows 11, but you can also do this task directly via a web browser.
So, you can chat with a Microsoft support agent in your web browser to get help in Windows 11.
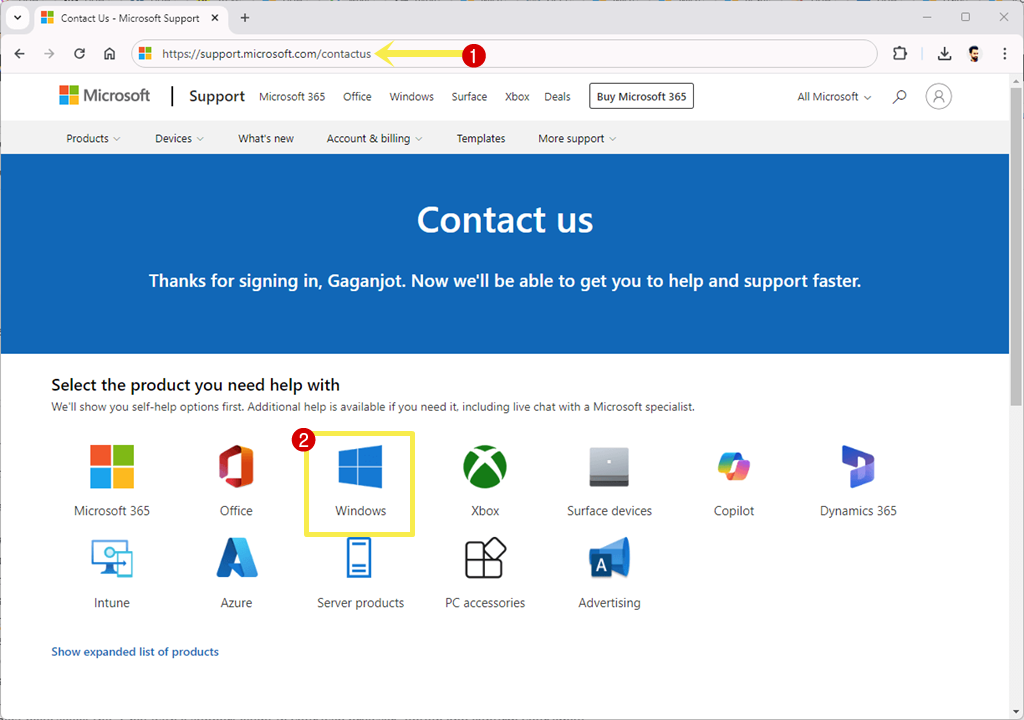
How to start a chat with a Microsoft support agent to receive real-time assistance:
- Open a web browser on your PC and open the https://support.microsoft.com/contactus URL.
Make sure you’re logged in to your Microsoft account. - Select the Windows option from the given Microsoft products.

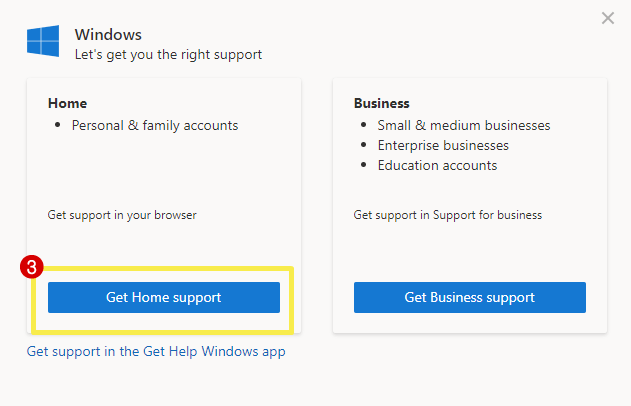
- After that, you’ll see the popup to select the options from Home or Business. If you’re not using Windows for business, choose the Get Home Support button.

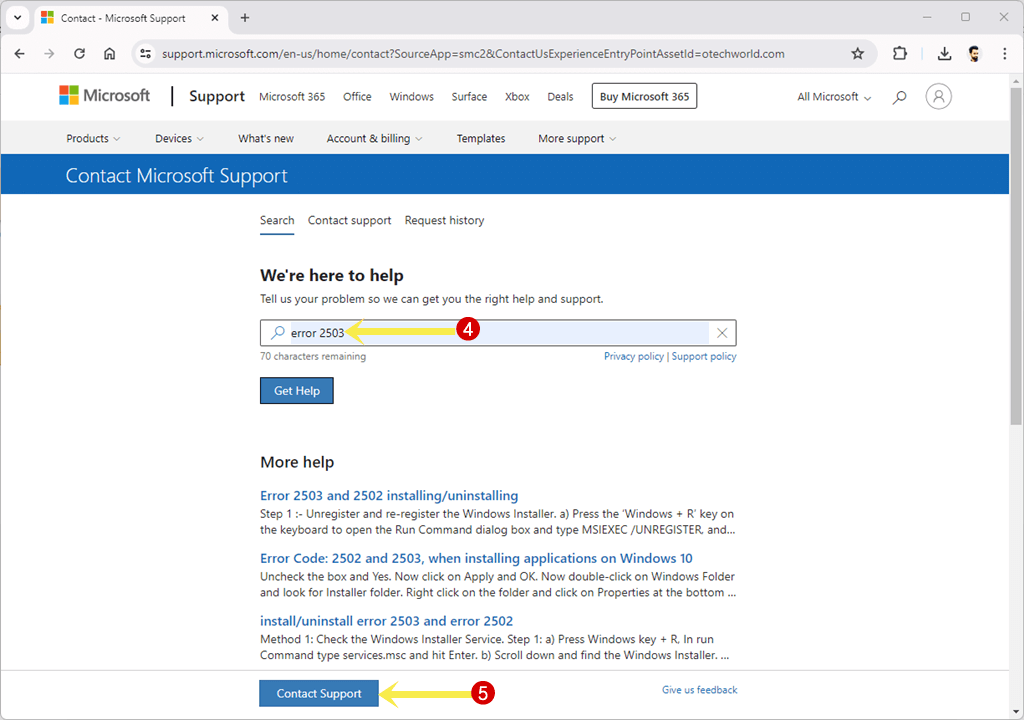
- On the next page, type your problem in the given field and press the enter button.
- You’ll see the results with the Contact Support button. Click on the Contact Support button.
- Now from the Products and Services option, select the Windows option.
- After that, select the Category according to your problem. You can choose Technical support.
- Click on the Confirm button to proceed.
- On the next page select the “Chat with a support agent in your web browser” option and confirm your email.
- After that, a live chat support will open. You can get help from a Microsoft support agent.
6. Get help by contacting Microsoft via Phone
Microsoft’s offices are available around the world, and you can directly contact the Microsoft office in your country to get help for their products.
The official Microsoft website provides worldwide office locations with physical addresses, phone numbers, and email addresses.
Just open the https://www.microsoft.com/en-us/worldwide.aspx URL and select your country to find the phone number.
In some countries, toll-free numbers are also available.
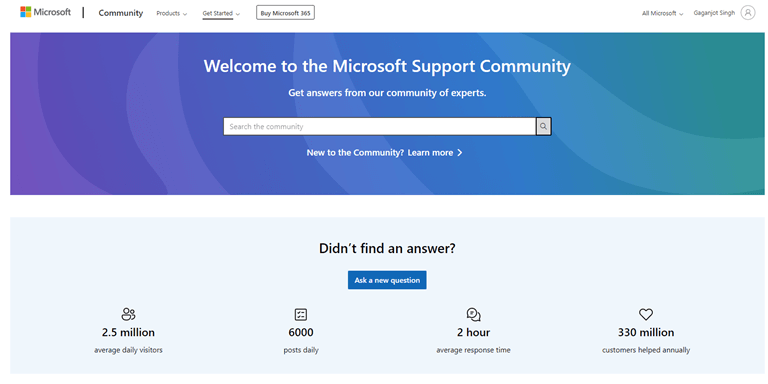
7. Ask Questions in Microsoft Community
Microsoft also provides a support community website where you can get answers from their community of experts.
You can simply search for the answer by typing your problem or issue. If you’re not able to find your answer, you can ask a question on the website.
To join the community, just open the https://answers.microsoft.com/ URL from a web browser and log in to your Microsoft account.
What you can do on answers.microsoft.com:
- Ask Questions: You can ask questions about issues you’re getting with Microsoft products such as Windows or Microsoft Office etc.
- Provide Answers: Community members including you and Microsoft support staff can respond to questions posted by other users and provide solutions.
- Browse Topics: You can search or explore existing discussions to find answers to common questions.
- Vote: You and other users can upvote helpful answers or comments that help to highlight the most useful solutions.
8. Update the Windows 11
Updating Windows 11 to the latest version can also solve most issues or problems. The new updates fix the bugs, issues, and errors within the OS. These fixes can solve various problems such as software glitches, crashes, freezes, and other issues
How to update Windows 11:
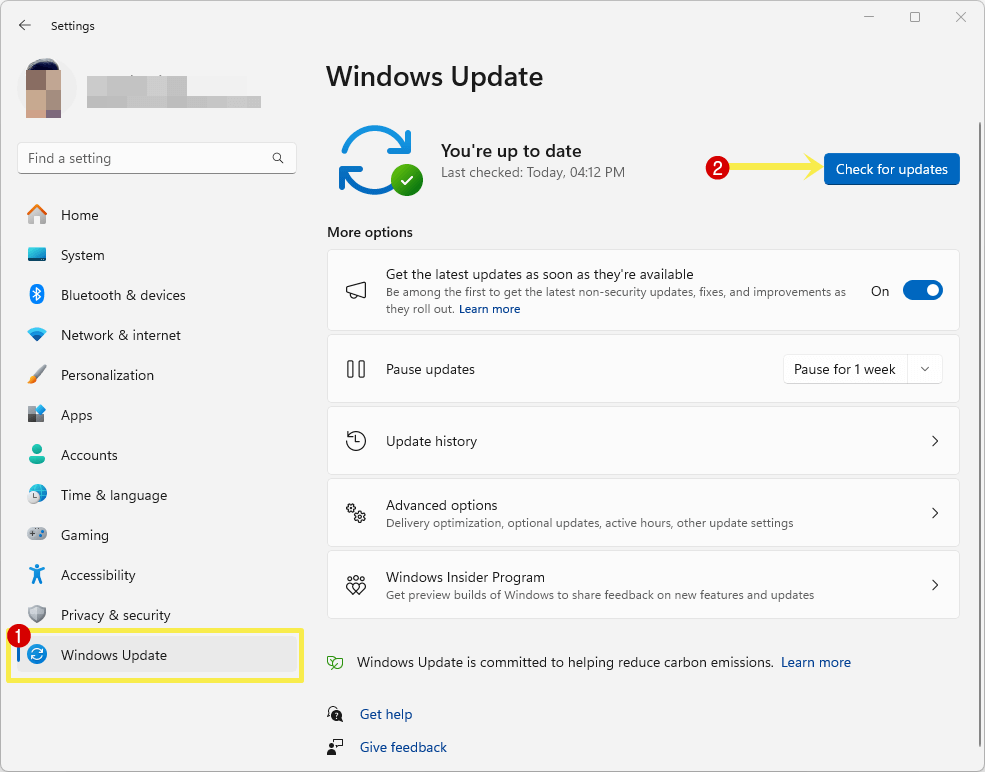
- Open the Settings app by pressing the Windows key + I keyboard shortcut.
- From the left navigation pane, select the Windows Update option.
- Now check for the available updates and install the updates.

- That’s all.
9. Roll back the Windows Update
If you have problems after updating the Windows 11 update, you can roll back to the previous version of the OS to solve your problems.
Sometimes users encounter compatibility issues (issues with certain hardware devices, software applications, or drivers) or performance problems (problems such as slowdowns, crashes, or instability) after installing the new version of the OS.
So, rolling back the update can help you to revert to a more stable OS version according to your hardware configuration and improve system performance.
You can uninstall or roll back both quality updates and feature updates. The step-by-step guide is given below.
How to Uninstall Quality Updates on Windows 11:
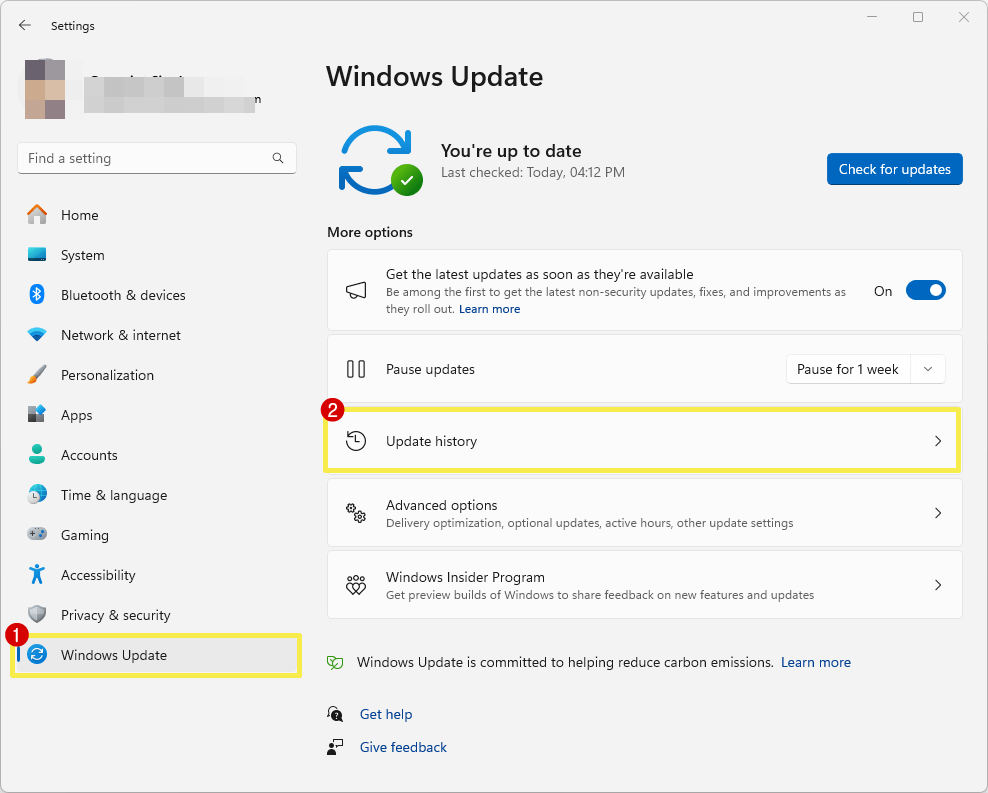
- Open the Settings app and click on the Windows Update option from the left navigation pane. Select the Update History option from the right side.

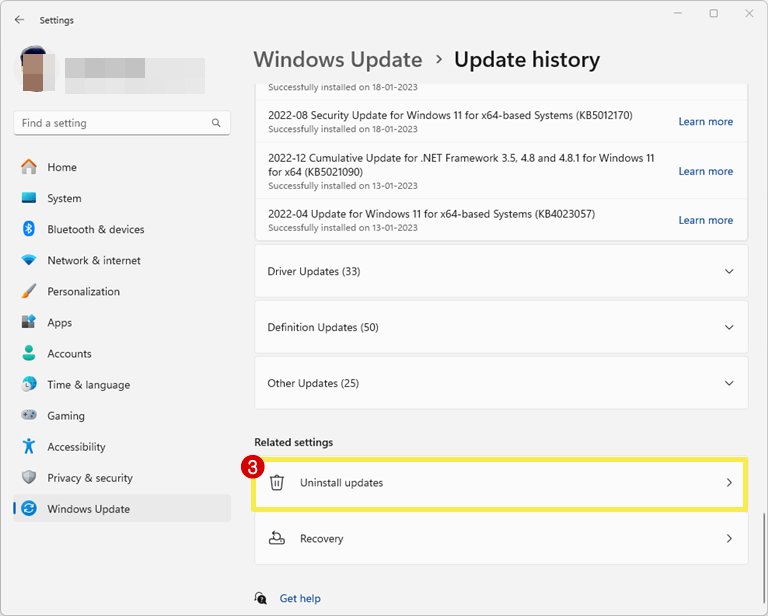
- Scroll down to the end on the update history page and choose the Uninstall Updates option from under the Related Settings.

- Click on the Uninstall button next to the update.
- That’s all.

How to roll back the feature update of Windows 11:
Note: This option is not available on all PC’s.
- Open the Settings app by pressing the Windows key + I from the keyboard or from the Start Menu » All Apps » Settings.
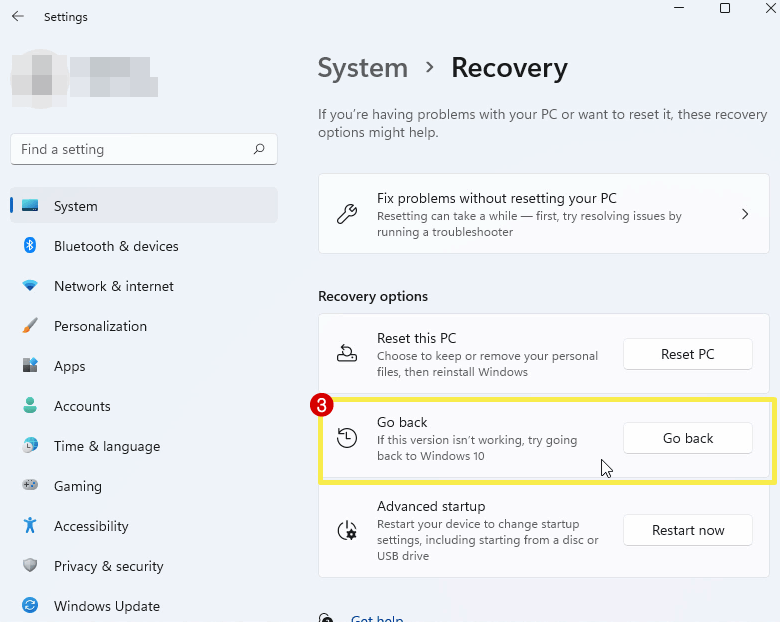
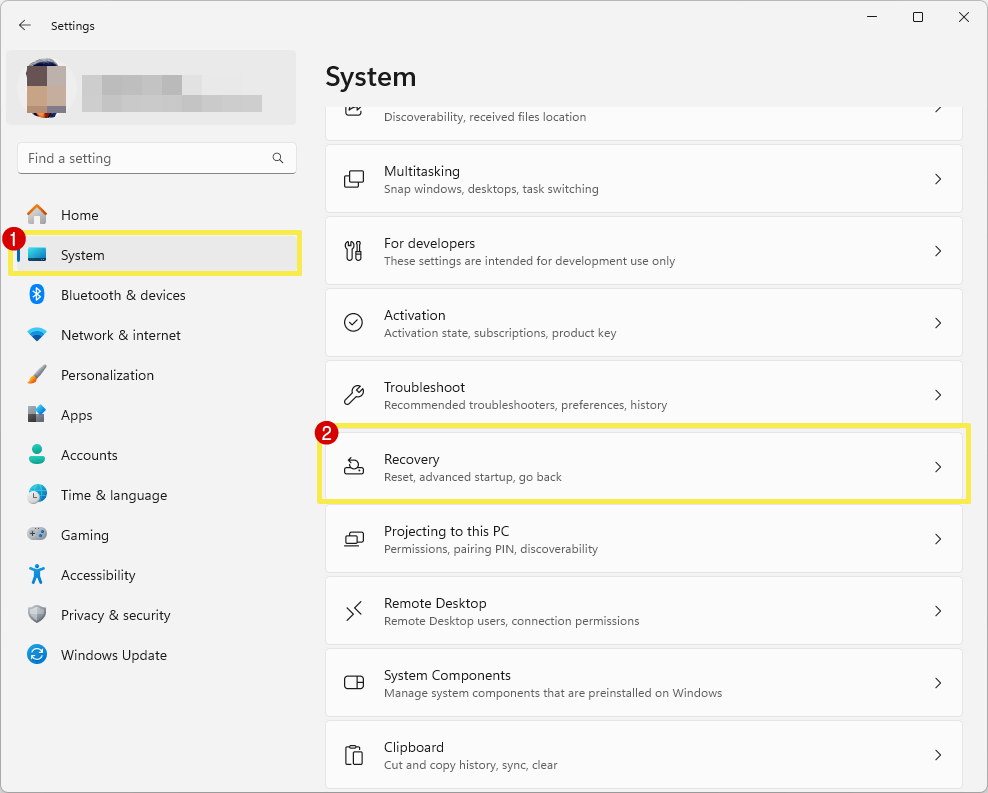
- Click on the System option from the left navigation pane and open the Recovery option from the right side.
- Now click on the Go Back button from under the Recovery options.

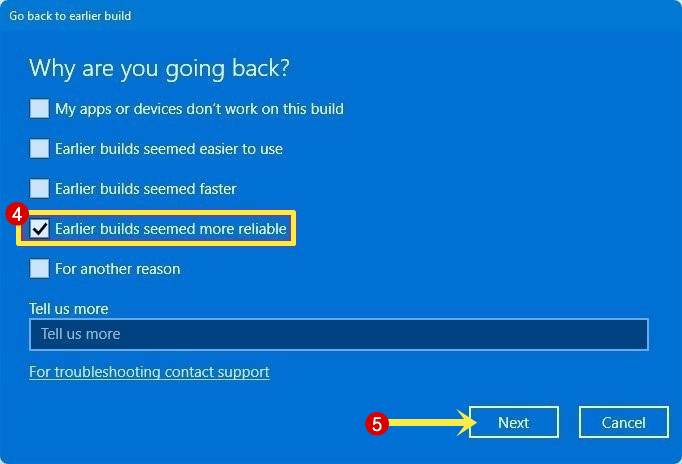
If the option is greyed out or not clickable, it means this option is not available on your computer. - From the popup, select the reason and click on the Next button.
You can select the “Earlier builds seemed more reliable” reason.
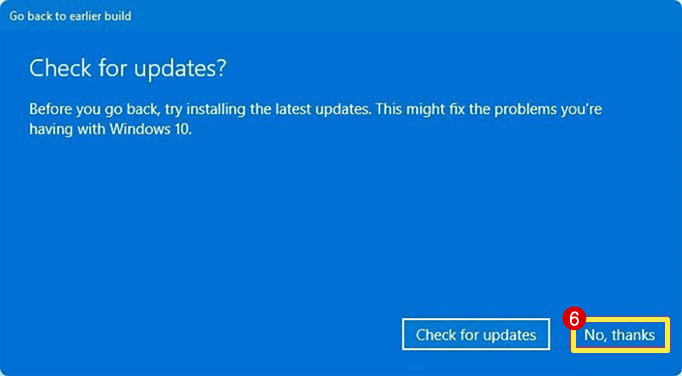
- On the next window, you’ll be asked to check for updates to solve your problem. Just select the No thanks button to proceed.

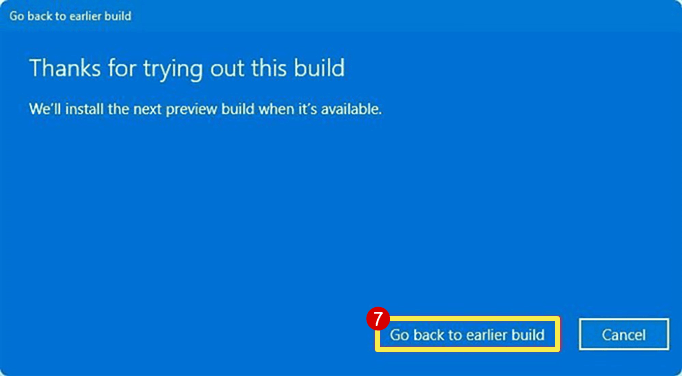
- After that, click on the Next button and then “Go back to earlier build” button.
- That’s it.
10. Reinstall Windows 11 without Losing Files
Sometimes Windows 11 system files become corrupted due to malware infections or software conflicts.
If you often get errors or issues while using your computer and you’re unable to get help, you can reset or reinstall Windows 11 without losing your files to solve your most problems.
How to reinstall Windows 11 without losing files:
- Open the Settings app by pressing the Windows key + I from the keyboard.
- Click on the System option from the left pane and select the Recovery option from the right side of the page.
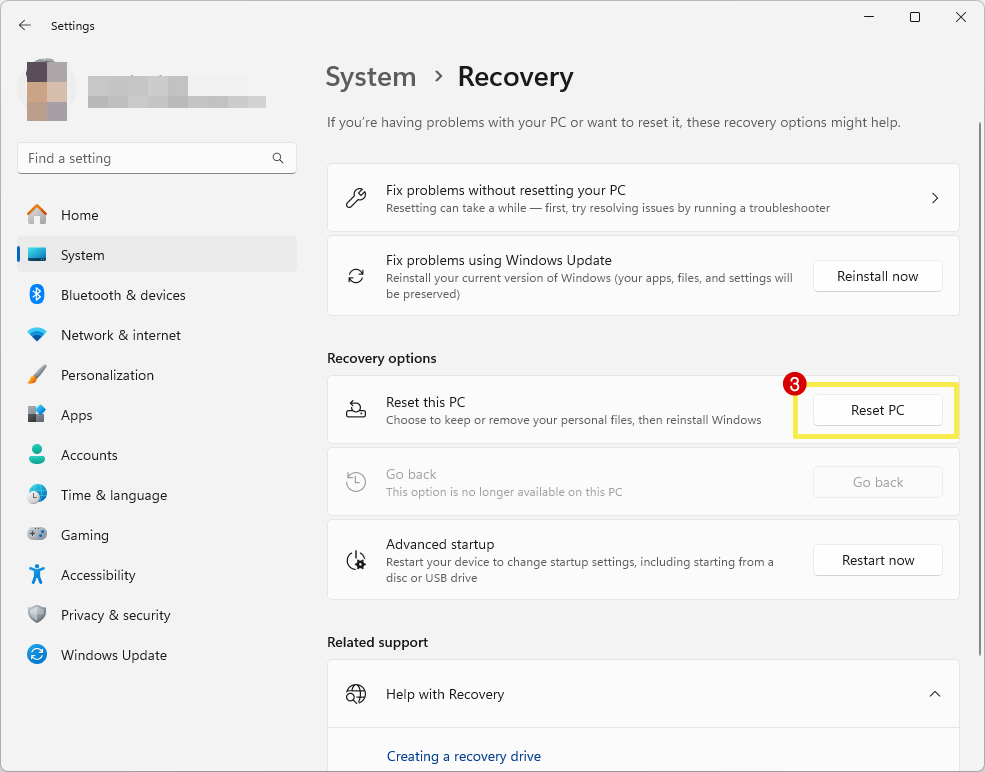
- Select the Reset PC option from under the Recovery options.
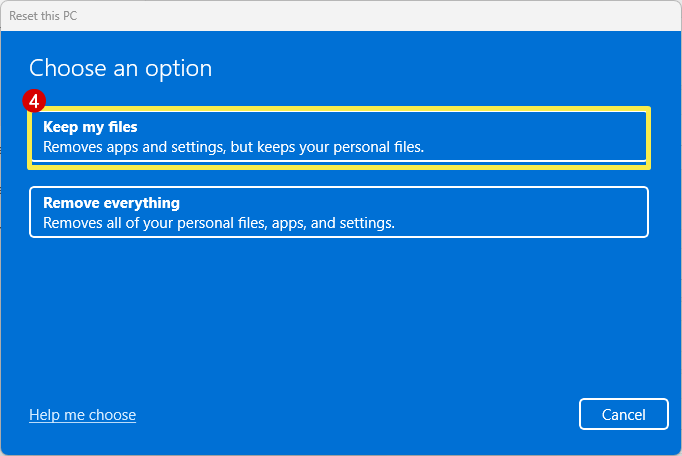
- From the popup window choose the “Keep My Files” option.

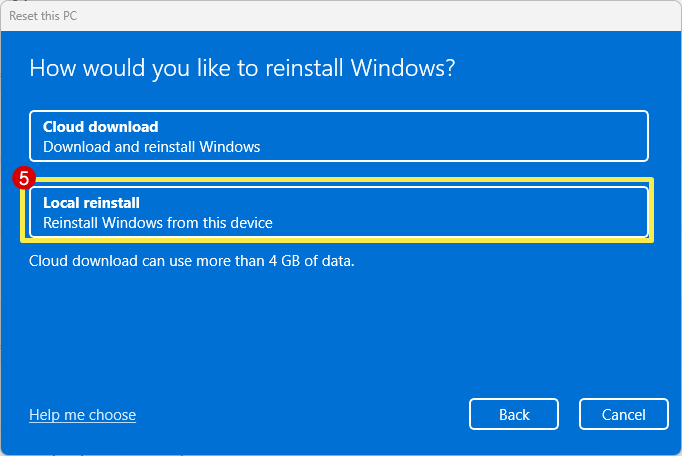
- From the next window, select the “Local Reinstall” option and then click on the Next button.
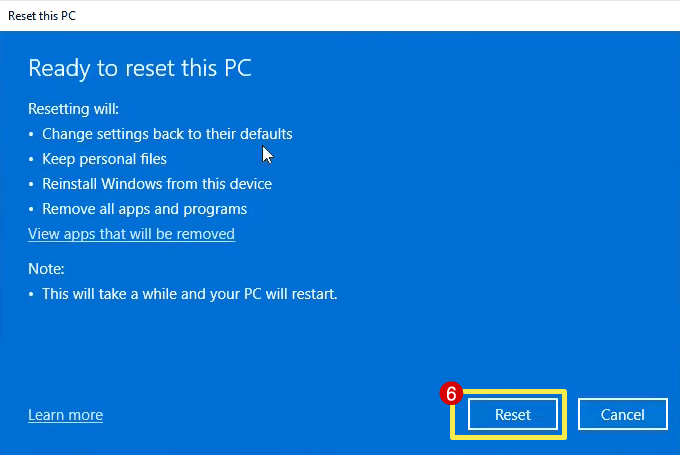
- Now click on the Reset button. Keep in mind that your PC will restart and it will take time to reinstall the OS again.

11. Use the Get Started App
If you’re new to Windows OS, you can use Get Started app to discover what’s new in Windows 11 and learn about new features and apps.
Well, the app is only for beginners who are not familiar with Windows OS.
12. Run System File Checker
Windows 11 has a built-in utility that can check the problems with operating system files. The utility is designed to scan and repair corrupted or missing system files.
How to run System File Checker in Windows 11:
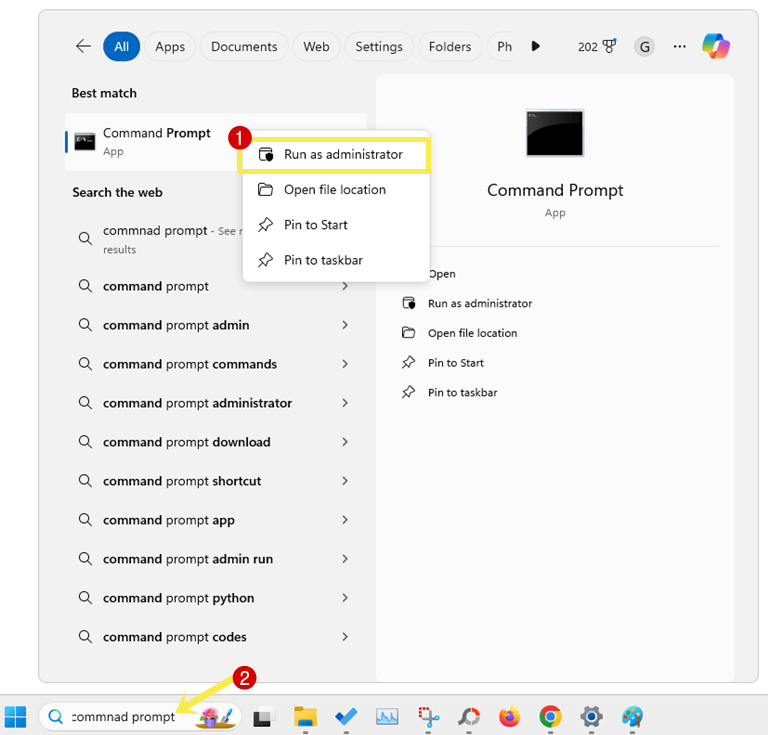
- Click on the search box from the taskbar or start menu and search for Command Prompt.
- Right-click on the Command Prompt from the result and select the “Run as Administrator” option from the context menu.

From the User Account Control popup, select the Yes button. - Now copy and paste the following command line and press the Enter button.
DISM.exe /Online /Cleanup-image /Restorehealth
This will take a few minutes to complete the process.
- After completing the process, you’ll see the “The operation completed successfully” message.
- Now copy and paste the following command and press the Enter button.
sfc /scannow
- After completing the process, you’ll see the “Verification 100% complete” message.

- Close the Command prompt.

Why do you Encounter Errors or Issues on Windows 11?
Various reasons lead to errors in Windows 11. The most common 5 reasons are given below. Let’s get started.
1. Configuration Changes: Sometimes users or third-party programs make the changes in operating system files, system settings, or Windows registry files. So, users may encounter errors or issues because of these changes.
2. User Configuration: Improper changes in settings or configurations in the system by the user can cause some technical issues. However, the user can revert the changes.
3. Windows Updates: Sometimes new updates (system or driver updates) introduce new bugs or compatibility issues that may cause errors. So, you might need to uninstall the recent updates. Also, a failed or not properly installed update causes the issues.
4. Software or Hardware Compatibility: Some software, hardware, or drivers may not be fully compatible with Windows 11, and you’ll get errors.
5. Malware or Viruses: Malware or Viruses can corrupt the system files or modify them and you’ll get issues on your computer.
Conclusion
I hope this article helped you know how to get help in Windows 11. I’ve discussed 12 methods that can help you to solve your problems.
However, you can find every solution on the web by searching. But for a non-technical person, it might be hard to find the solution. So, you can try any method according to your requirements.
Write in the comment section, if you’ve any problem regarding Windows 11 operating system.
Popular on OTW Right Now!


About The Author
Gagan Bhangu
Founder of otechworld.com and managing editor. He is a tech geek, web-developer, and blogger. He holds a master's degree in computer applications and making money online since 2015.