How to Enable Auto Delete Browsing History in Microsoft Edge
Do you want to enable auto delete browsing history on exit in Microsoft Edge browser?
There are various reasons to clear browsing history when closing the browser. Well, the main reason is privacy and security. If you share the computer with others, clearing browsing data can prevent unauthorized access to sensitive information.
If you’re using the Microsoft Edge browser, then you don’t need to clear the browsing data manually every time you close the browser. Because Microsoft Edge gives a built-in option to do this task.
So, in this article, I’ll show you how to enable auto delete browsing history in Microsoft Edge browser.

Well, clearing browsing history every time before closing the browser is an arduous task. That’s why browsers offer Incognito or InPrivate modes to browse the web more privately without storing the browsing history. However, some people still do not prefer the Incognito or InPrivate mode for some reasons.
To solve all these problems, you might want to enable your Edge browser to clear your browsing history when you close the browser.
Well, unlike Google Chrome browser, which gives the option to clear cookies on exit, Microsoft Edge allows us to clear all browsing data such as Browsing history, Download history, Cookies and other site data, Cached images and files, Passwords, Autofill form data (includes forms and cards), and Site permissions.
Although, you can manually select the data category that you want to clear on exit. For example, if you enable the ‘Browsing history’ option, then only browsing history will be deleted when you close the browser.
So, Microsoft Edge provides the options to customize how browsing data is cleared, which helps you to strike a balance between privacy and convenience.
What is Auto Delete Browsing History in Microsoft Edge?
Well, the Chromium-based Edge browser is fast, secure, and rich in features. It offers some advanced features as compared to its competitors.
So, the “Clear browsing data on close” feature is one of the best and unique features of the Microsoft Edge browser that allows its users to automatically clear different types of browsing data every time they close the browser.
This feature enhances privacy and security by removing traces of your online activities.
The list of browsing data that you can enable to delete on exit is given below.
- Browsing history
- Download history
- Cookies and other site data
- Cached images and files
- Passwords
- Autofill form data (includes forms and cards)
- Site permissions.
You can select any or all of these options from the list.
Also Read: How to Clear Cache for One Site in Microsoft Edge
How to Enable Auto Delete Browsing History in Microsoft Edge
However, Microsoft Edge gives a built-in option to clear browsing data on close. But there are three other methods also available to do this task. So, I’ll discuss all methods with a step by step guide. Let’s get started.
Method 1. Enable “Clear browsing data on close” from Settings
The steps are given below to enable “Clear browsing data on close” in the Microsoft Edge browser.
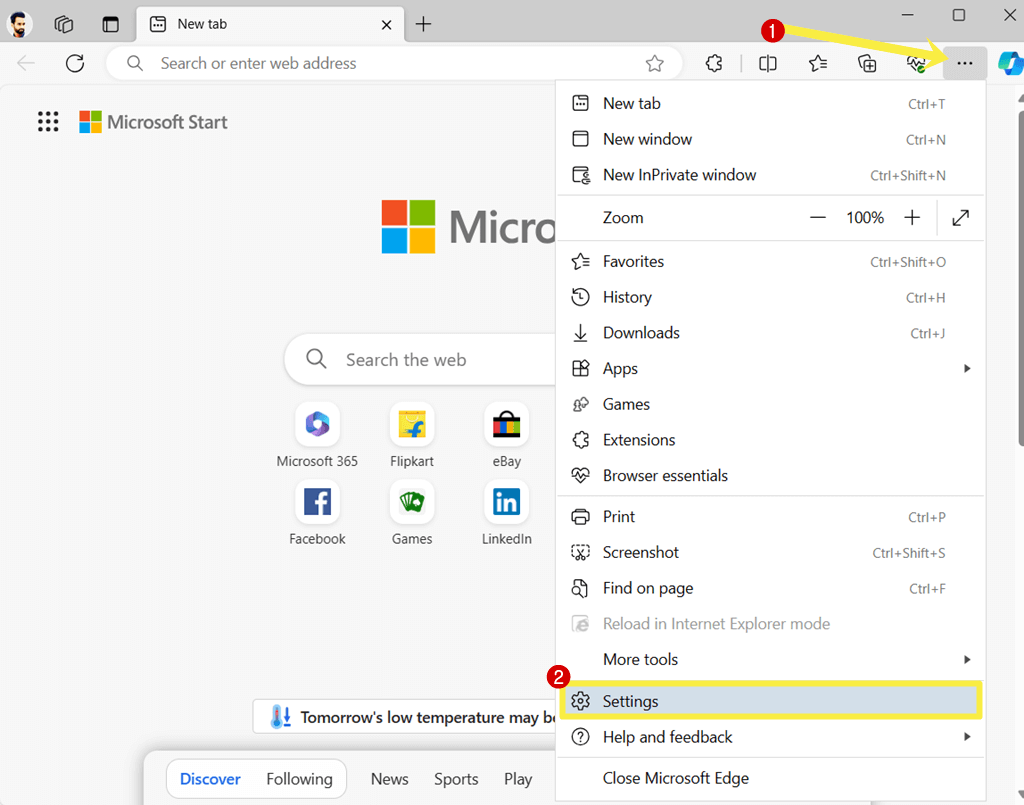
- Open the Microsoft Edge browser on your computer and click on Settings and More (three horizontal dots) from the top right. After that, open Settings from the list.

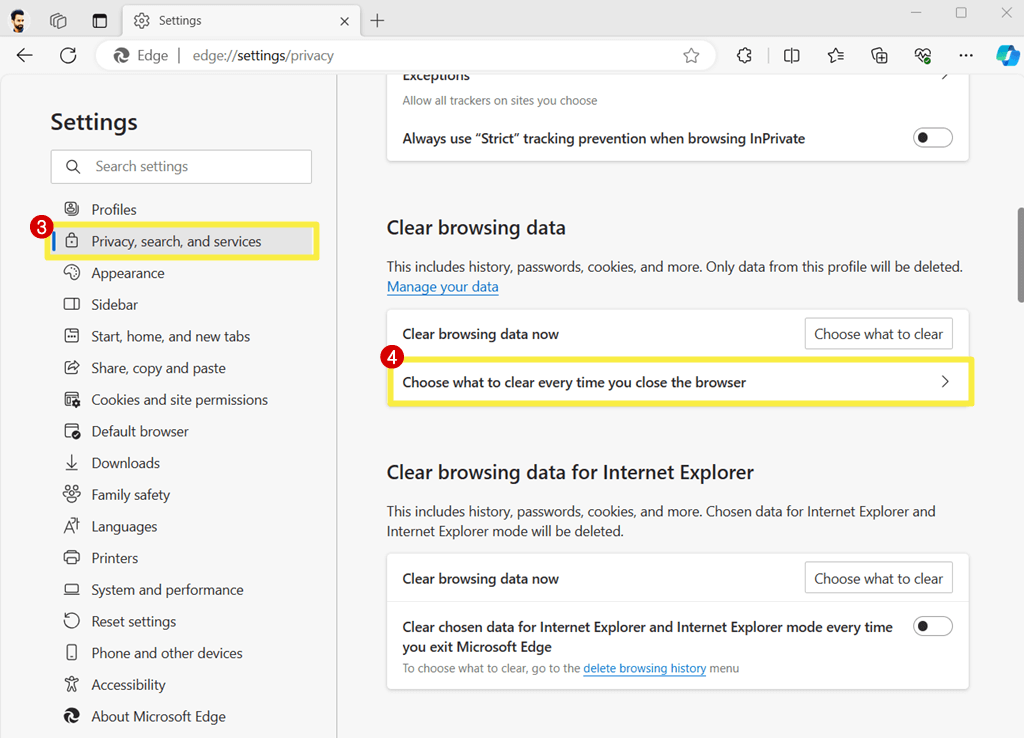
- Now click on the “Privacy, search, and services” option from the left navigation pane, and the privacy settings page will open.
- Scroll down and open “Choose what to clear every time you close the browser” from under the Clear browsing data.

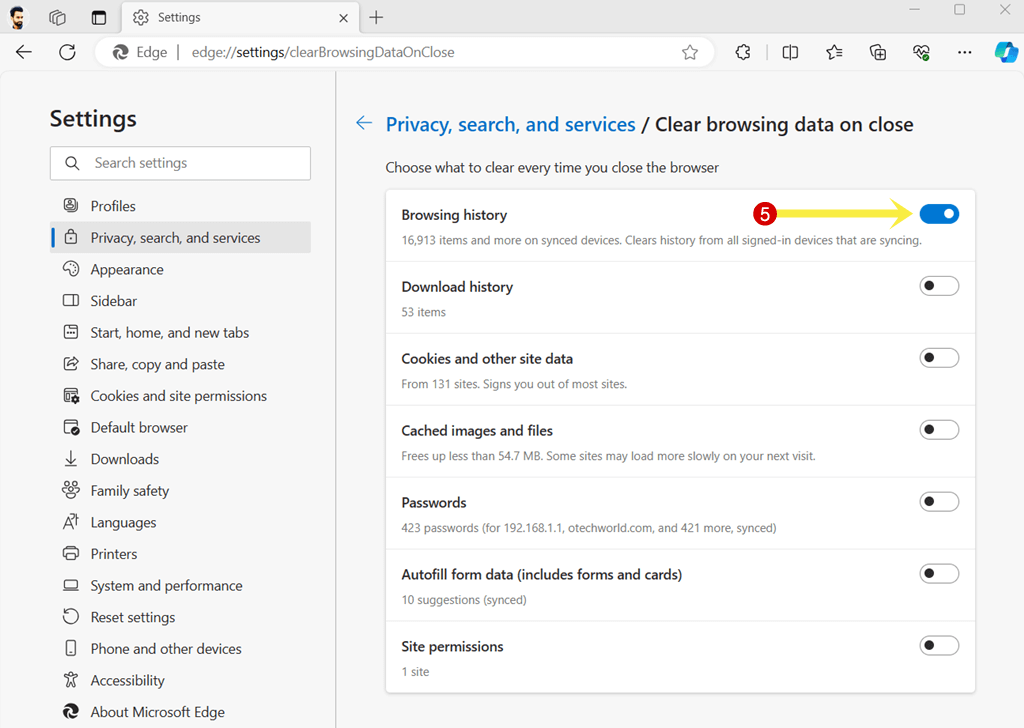
- Now the “Clear browsing data on close” page will be open and you’ll see the list of options such as Browsing history, Download history, Cookies and other site data, Cached images and files, Passwords, Autofill form data (includes forms and cards), and Site permissions.
Note: You can directly open this page by using the Edge Internal Settings URL. Just type edge://settings/clearBrowsingDataOnClose in the address bar and press the Enter button to open this settings page. - Toggle On the button next to the option or data category (for example, Browsing history to delete history) that you want to clear on exit.

- That’s all.
Method 2. Using Registry Editor
However, there is no need to use a registry editor to do this job. Because Edge gives a built-in option for this. But, sometimes on shared computers, the built-in option might be disabled by others.
So, in that case, you can use this method. The steps are given below.
Note: Use this method carefully, because unwanted changes in registry files affect the system. If you’re not familiar with a registry editor, then do not try this method.
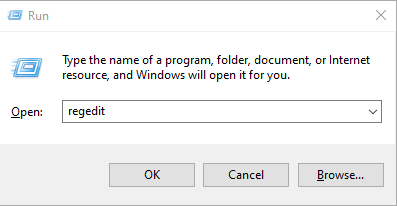
- Open the Registry editor on your Windows computer. For this, press the Windows key + R from the keyboard to open the Run command prompt. After that, type “regedit” (without quotes) in the run command prompt. Click on the OK button.

From the User Account Control prompt, click on the Yes button. - Now the Registry Editor window will be open.
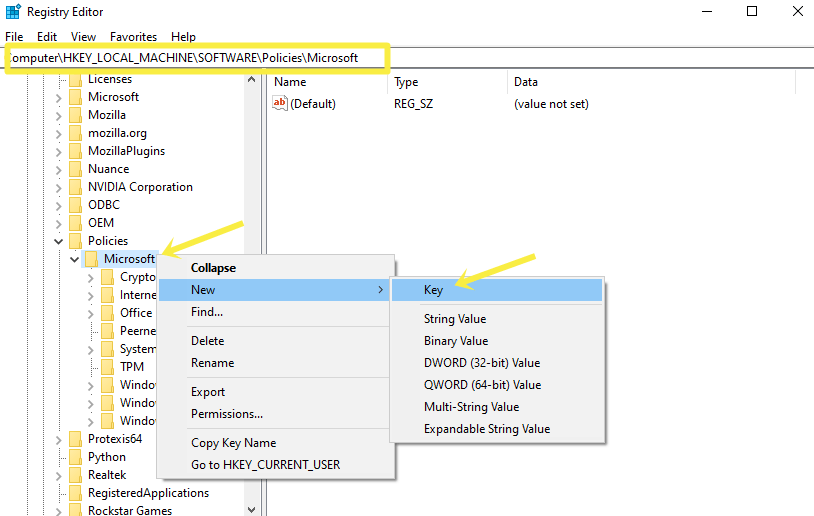
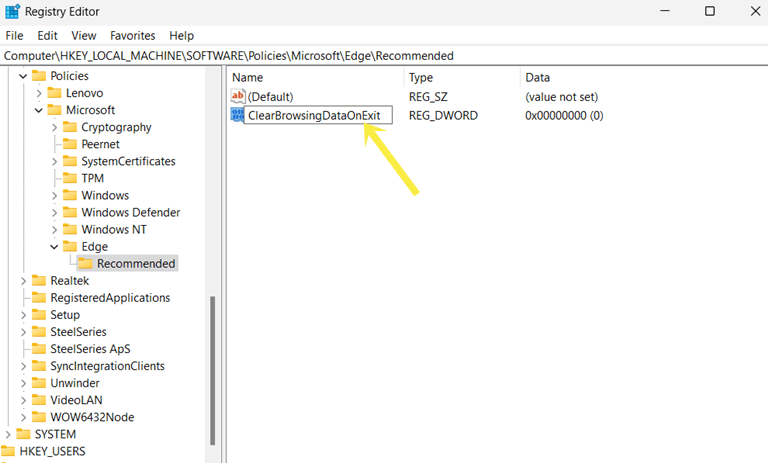
Go to the Computer\HKEY_LOCAL_MACHINE\SOFTWARE\Policies\Microsoft path. - Right-click on the Microsoft Folder and select New » Key.

- Name the key (folder) as Edge.

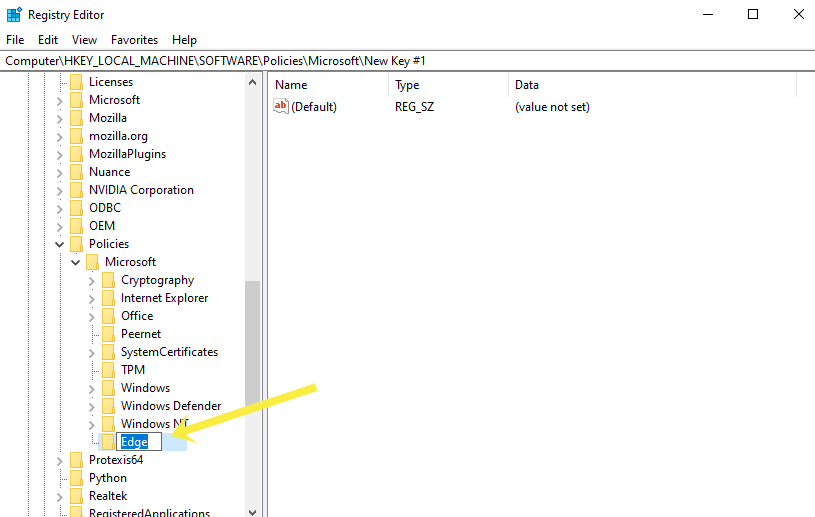
Note: If the Edge folder already exists, then skip the 3rd and 4th step. - Now right-click on the Edge Folder that you created and select the New » Key.
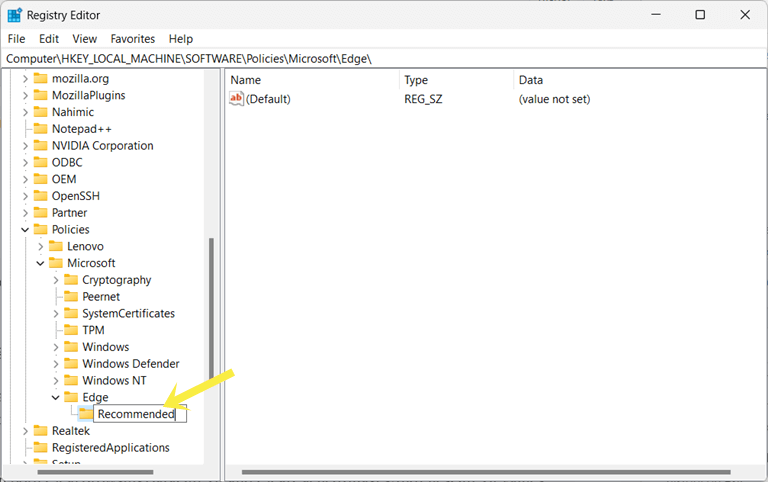
- Name the key (folder) as Recommended.

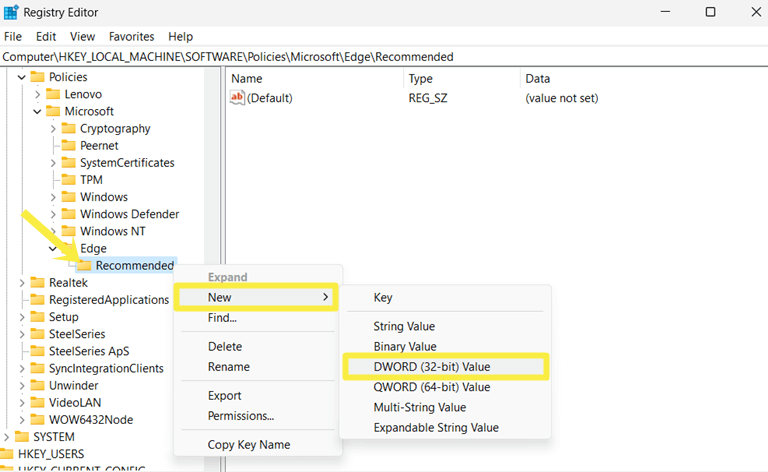
- Right-click on the Recommended folder and go to New » DWORD (32-bit) Value.

- Name the value as ClearBrowsingDataOnExit.

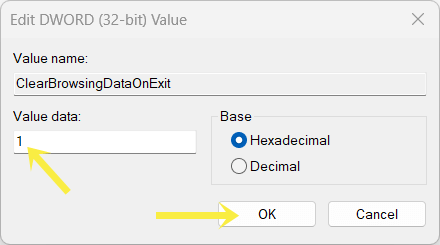
After that, double-click on the ClearBrowsingDataOnExit value and type 1 in the Value data field. Click on OK.
Optional: To clear cached images and files, create another value. For this, right-click on the Recommended folder and go to New » DWORD (32-bit) Value. Name the value as ClearCachedImagesAndFilesOnExit. After that, double-click on the ClearCachedImagesAndFilesOnExit value and type 1 in the Value data field. Click on OK. - Restart the browser and that’s it.
To disable this functionality, type 0 in value data in both ClearBrowsingDataOnExit and ClearCachedImagesAndFilesOnExit values.
Method 3. Manual Clearing Browsing History or Data before Closing the Browser
This is the common method that most users use. The steps are given below to clear browsing data manually in the Edge browser.
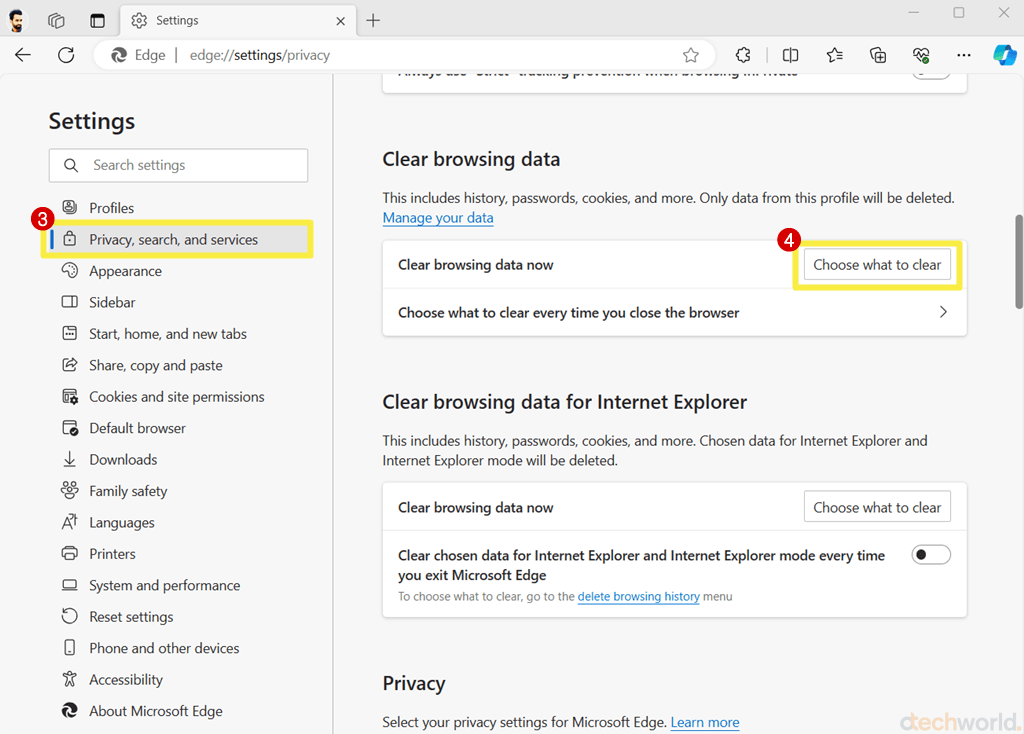
- Open the Microsoft Edge browser and click on Settings and more (three dots) from the top right. After that, open Settings from the list of options.
- From the settings page, click on the “Privacy, search, and services” option from the left pane.
- Scroll down and click on the “Choose what to clear” button next to the Clear browsing data now option.

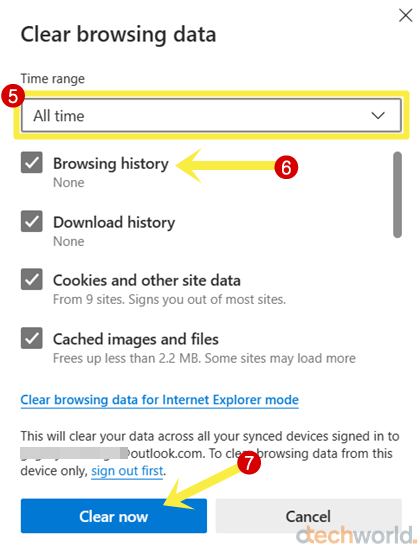
- Now the Clear browsing data popup window will be open.
Note: You can directly open the Clear browsing data popup window by using keyboard shortcuts. On Windows, press Ctrl + Shift + Delete keys from the keyboard, and on macOS, use Command + Shift + Delete keyboard shortcut. - From the popup window select the Time range from Last hour, Last 24 hours, Last 7 days, Last 4 weeks, and All time.
After selecting the time range, select the browsing data from the list of options Browsing history, Download history, Cookies and other site data, Cached images and files, Passwords, Autofill form data (includes forms and cards), Site permissions, All data from the previous version of Microsoft Edge, and Media Foundation data. - Click on the “Clear now” button to proceed.

- That’s all.
Method 4. Using Group Policy Editor
If you’re using Windows Pro/Enterprise editions, you can also use Group Policy Editor to enable auto-delete browsing history in the Microsoft Edge browser.
However, Windows Home users can also enable Group Policy Editor with a few tweaks.
The Group Policy Editor is a Windows administration tool or system utility that allows you to configure your computer’s group policy settings.
Please note that you need to download and add the Edge Policy Templates manually. You can download Policy Files from the Microsoft website. The link is given below.
Get Microsoft Edge Policy Templates
The steps are given below. Let’s get started.
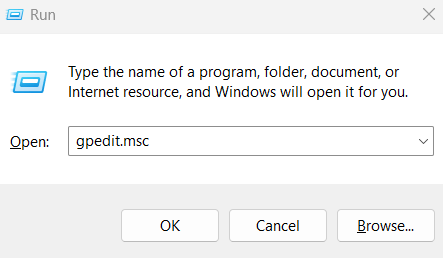
- Open Local Group Policy Editor on your Windows device. For this, press the Windows key + R to open the Run command prompt. After that, type “gpedit.msc” in the run command prompt. Click on OK to proceed.

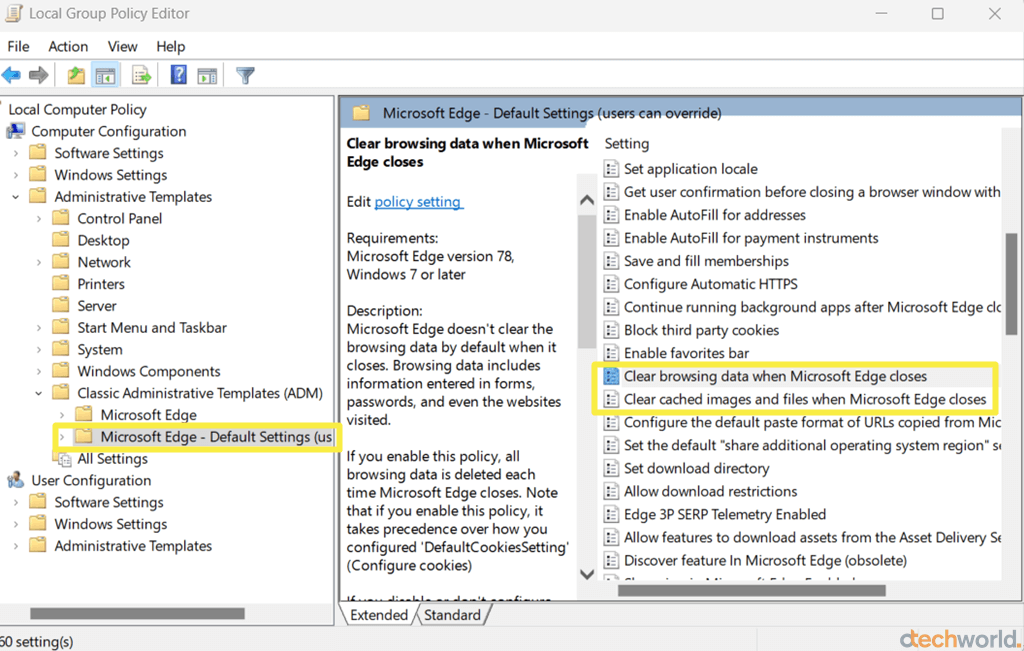
If the User Account Control warning pops up, select the Yes button to proceed. - After clicking on the Yes button, the Local Group Policy Editor will be open. Navigate to the following path from the left pane.
Computer Configuration » Administrative Templates » Classic Administrative Templates » Microsoft Edge – Default Setting (users can override) - When you select the Microsoft Edge – Default Setting (users can override) folder, you’ll see the settings list on the right side.
- Find the “Clear browsing data when Microsoft Edge closes” setting and double-click on it to open it.

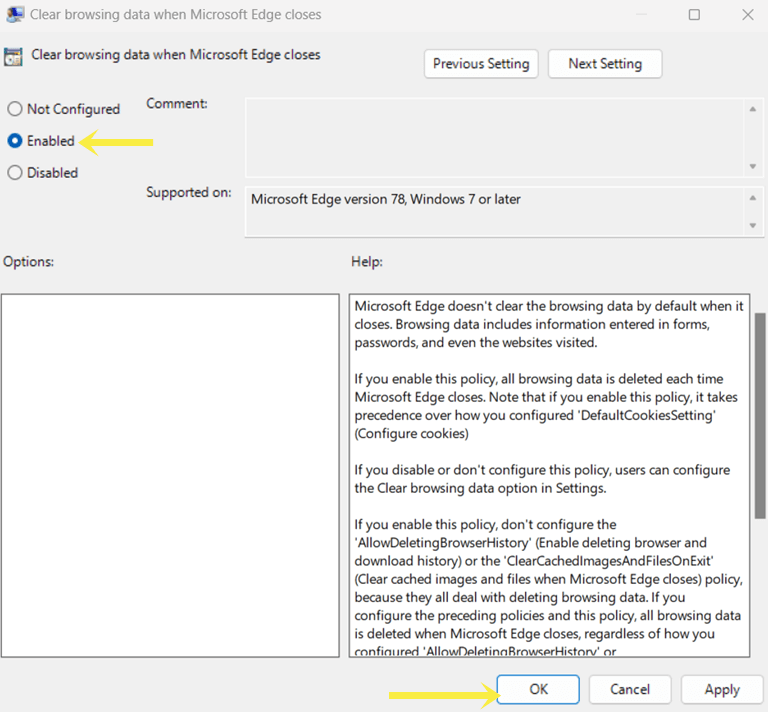
- After that, select “Enabled” and click on the Apply and OK buttons.
Again find the “Clear cached images and files when Microsoft Edge closes” setting and double-click on it to open it. After that, select “Enabled” and click on the Apply and OK buttons.
- Restart your computer and that’s all.
Why do you need to Clear Microsoft Edge Browsing History on Exit?
However, clearing browsing history on exit can be done for various reasons, but it also depends on the individual preferences and concerns. The most common reasons are given below.
1. Privacy: If you share your computer with others, you might want to remove traces of websites visited, search queries, and other online activities. Because browsers save your browsing history.
2. Security: On shared computers, you might want to prevent unauthorized access to sensitive information, such as login credentials and personal details.
3. Preventing Tracking: Almost all websites use cookies and other tracking mechanisms to track users’ online behavior. You might want to remove tracking cookies and other elements.
4. Speed and Performance: A large browsing data can slow down the browser. So, clearing browsing data can help to speed up the browser performance.
5. Storage Space: Browsing data (such as cache, cookies, and other site data) can take up storage space on your computer. So, clearing them can free up some space.
Final Words
I hope this article helped you learn how to enable auto delete browsing history in Microsoft Edge browser. However, Edge gives a built-in option that enables you to clear your browsing history on exit. But there are some additional methods also available that you can use if your computer is shared by others.
Popular on OTW Right Now!


About The Author
Gagan Bhangu
Founder of otechworld.com and managing editor. He is a tech geek, web-developer, and blogger. He holds a master's degree in computer applications and making money online since 2015.