How To Change Your WiFi Name (With Pictures)
How To Change Your WiFi Name? When you turn on WiFi on your device, you see the WiFi names that are broadcast by routers to identify the network. Routers broadcast the WiFi name (SSID – Service Set Identifier) that helps to connect the users to the router. Nowadays, most people have WiFi at their home and offices. So, some people love to change their WiFi names for fun. There are so many reasons to change the name of WiFi network.
Reasons to change your WiFi name:
- You want to change the default name of your WiFi network.
- Your neighbor uses the same WiFi name and you are confused when you connect your device.
- You love to change WiFi network name for fun.
Sometimes, it is a bit difficult to do this for non-techie guys. But, this is not a difficult task. For security reasons, you may also need to change the WiFi password and name.
Nowadays, people also love to set a funny name of their WiFi network. So, here is the complete guide to doing this. If you want to change your WiFi password, then, here is how to change WiFi password.
How To Change Your WiFi Name
1. Open Router Settings
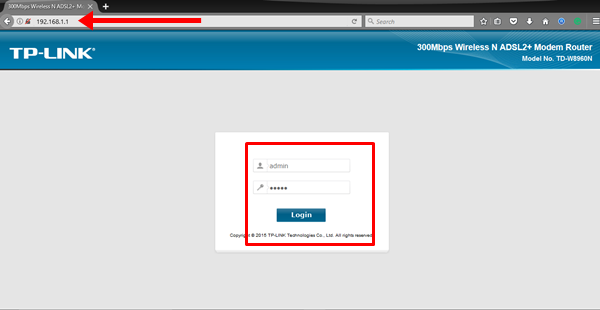
First of all, you need to open your router settings. Connect your device to the WiFi router and Type the IP address of the router in browser URL. The default IP address of the most routers is 192.168.1.1, 192.168.0.1, or 192.168.2.1. If these IP addresses are not working, then, you can search online for your router model.
After, type the IP address, log in with username and password. The default username is admin and password is password or admin (In some routers, there is no need to enter the password). You can also search username and password online for your router model. After type the username and password, you will see the router settings.
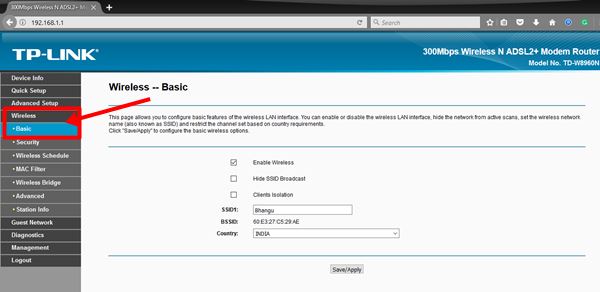
2. Open Wireless Settings
After that, Click on the Wireless option and click on the Basic wireless settings (Go to Wireless > Basic Wireless Settings).
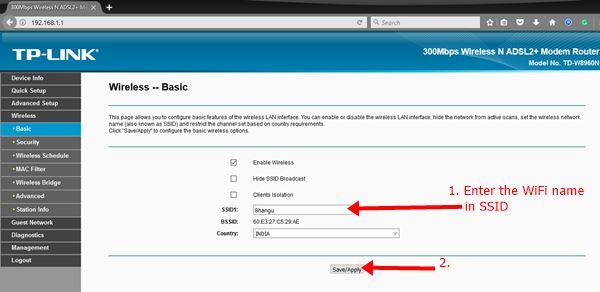
3. Set New WiFi Name and Save It
After that, Change the WiFi name from SSID (Wireless Network Name). By default, you can set name up to 32 characters (Case sensitive). After entering the new WiFi network name, Click on the Save/Apply button to save the settings.
After doing this, you may need to reconnect your devices to your WiFi router.
Final Words
So, guys, these are the guide on ‘How to change your WiFi name’. It is not a difficult task. But, for new WiFi users and non-techie guys, it may a bit difficult for the first time. You may also need to change WiFi password for security reasons. When you enter the new name in SSID and click on the Save button, then, the router immediately shows the new SSID name.
Popular on OTW Right Now!


About The Author
Gagan Bhangu
Founder of otechworld.com and managing editor. He is a tech geek, web-developer, and blogger. He holds a master's degree in computer applications and making money online since 2015.