[Solved] Mouse Not Working in GTA Vice City
Do you want to fix the mouse not working problem in the GTA Vice City game on Windows 11/10? Then, you are on the right page.
Well, Grand Theft Auto Vice City is an open-world game released in 2002 and developed by Rockstar North. GTA Vice City was the best-selling game of 2002. Rockstar Games sold over 17 million copies worldwide within one year of release.
This iconic video game is still popular and most users install it on Windows 11/10 platforms. But, they face many problems. Mouse and audio are two major problems that most users reported. However, these problems aren’t new because Windows 7 and 8 users also faced them.

If you download and install Vice City from official and authentic sources, you may face fewer issues. However, some users reported that the mouse and audio not working even after buying the original copy.
What is the Mouse Problem in GTA Vice City?
When you open the game, the mouse will not work properly i.e. it will spin or the click button will not work. Sometimes, the game may fail to detect the mouse.
- The click button is not working.
- You are unable to move the mouse.
- The mouse stops working randomly or when you press the resume key.
On the internet, you may find tons of solutions, but most of the solutions are not working. If you are a non-techie guy, it may be hard for you to solve this problem. So, here are multiple solutions that I tested and work perfectly.
Let’s get started.
How to Fix the Mouse Not Working Problem in GTA Vice City on Windows 11/10
The list of methods is given below to solve the problem. All methods may not work for some users. But, the first solution is enough to solve the mice issue.
Method 1. Install or Add DINPUT8.DLL File
Adding the DINPUT8.DLL file into the game directory can solve your issue. DirectInput (DINPUT8.DLL ) is an API for input devices like mouse and keyboards.
You need to download the older version (4.8.0.400) of this DLL file version. However, the latest version of the DINPUT8.DLL file is 10.0.15063.608.
Steps:
- Download the DINPUT8.DLL Version 4.8.0.400 file.
- Copy the file and paste it into the game directory.
The downloaded file will be a ZIP file. You’ll need to extract the DLL file from the ZIP file. - Run and play the game.
That’s all.
Method 2. Use Only One Core of the Processor
Modern processors have multiple cores and each core reads and executes program instructions. When you launch the Vice City game, all cores work simultaneously. But, playing the game using a single core can solve your mouse problem. Thanks to Windows OS to gives an option to run the program on manually selected cores and gives an affinity option.
So, you can select a single core or CPU of the processor to play the hassle-free game. Also, this solution works for 9 out of 10 users.
Steps:
- Open and launch the Vice City Game to run it.
- After launching, open the task manager app by pressing Ctrl + Shift + Esc from the keyboard. The game will be minimized when you open the task manager app.
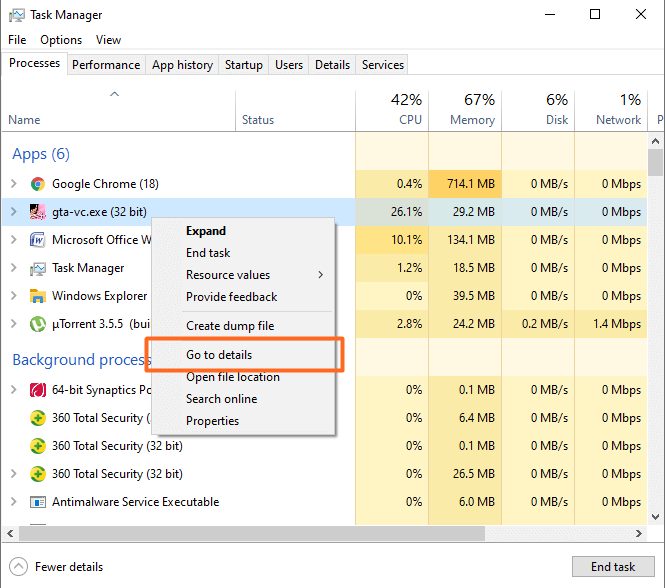
- Now right-click on the “gta-vc.exe” file from the task manager app and open the “Go to details” option. This will open the Details tab.

- Again right-click on the “gta-vc.exe” from the Details tab and click on the “Set affinity” option.

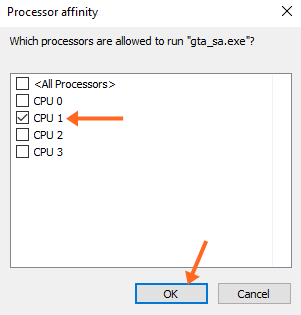
- Now you will see the Processor affinity windows on the screen to select the processors or cores to run gta-vc.exe. Unselect all cores by clicking on the “All processors” checkmark. After that select and enable the “CPU 1” from the list. Click on the OK button.

- Click on the Vice City icon from the taskbar to restore the game and the mouse problem will be resolved.

Well, one of the main disadvantages of this method is that you need to follow these steps every time you launch the game.
Also Read: Fix Mouse not working in GTA San Andreas
Method 3. Use SilentPatchVC
Silent Patch is a third-party tool for GTA Vice City that can solve most problems and issues. This tool supports GTA Vice City 1.0 (all versions) and GTA Vice City 1.1 (all versions, including Steam and Rockstar Games Launcher versions). Steps are given below to use SilentPatchVC.
- Search the “Silent Patch for GTA Vice City” in Google and open the GTA Forums website with the “SilentPatch – Scripts & Plugins” title.
- Now click on the DOWNLOAD SilentPatchVC to download the tool. The downloaded file will be in ZIP format.

- Open the download ZIP file and extract the files. After that, copy and paste the files to the game directory. So, SilentPatchVC.asi ends up in the main game directory and map folders end up in ‘data\maps’.
You can also directly extract the files to your VC directory.
- Now run the game.


If the problem still occurs, download a ddraw.dll SilentPatch component together with this plugin. From the GTA Forums website page, click on the DOWNLOAD DDraw Component to download the ZIP file. After that, extract the DLL file to your game directory.
Method 4. Using “Run program in compatibility mode”
Microsoft gives a Compatibility option in Windows OS. If the program is not running on the newer version of Windows, you can run a program in compatibility mode for older versions of Windows.
The Vice City game was developed for the older versions of Windows. So, you can resolve your problem by running gta-vc.exe file in compatibility mode for Windows XP.
Steps:
- Open the folder, where you installed the Grand Theft Auto Vice City. Generally, the default path is “C:\Program Files\Rockstar Games\Grand Theft Auto Vice City”.
- From the folder, right-click on the “gta-vc.exe” and open Properties from the menu.
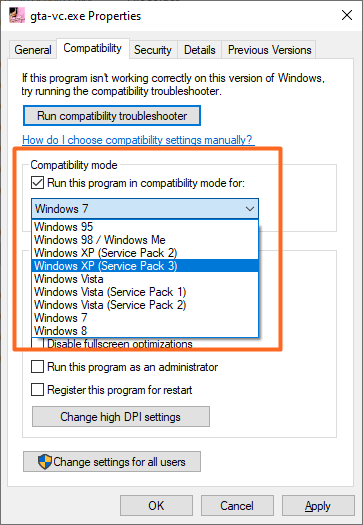
- Now Open the “Compatibility” tab and enable the checkmark for the “Run this program in compatibility mode for” option.
- Select the Windows version from the drop-down menu. You can select XP service pack 3.

- Click on Apply and OK to apply the changes.
- Open and launch the game and see the changes.
Method 5. Buy and Use Original Game
A Pirated copy of the game may have many issues. So, you can get rid of all problems by buying an original copy of GTA Vice City.
You can buy and download it from the official Rockstar Launcher and Steam.
First, you need to download Rockstar or Steam launcher. After that, sign up for the account, otherwise log in to your account if you have already registered.
Buy and download the title, and play the game.
Method 6. Run the Game as an Administrator
You can solve the mouse not working problem by running GTA Vice City as Administrator. However, this solution isn’t as useful as the first one, but some users claim that this method solved their problem.
For this, open the folder where you install the game and right-click on the “gta-vc.exe” file, and select “Run as administrator”.
Note that, click on the Yes button, if a user account control warning is prompted.
Final Words
Now you know how to fix the mouse not working in GTA Vice City game on Windows 10. I mentioned five methods, but the first method is the most successful in which you need to add the DINPUT8.DLL file into the game directory.
Write in the comment section if you have any problems regarding this.
Popular on OTW Right Now!


About The Author
Gagan Bhangu
Founder of otechworld.com and managing editor. He is a tech geek, web-developer, and blogger. He holds a master's degree in computer applications and making money online since 2015.
I love you for this man I was tired looking for a fix, finally found this article and disabled my 7 other cores and left one on, it’s working perfectly now
First method works just fine. From the first try.
Thanks a lot for this solution.
By the way, I have an original installation of the game, from Rockstar and the mouse issue is still there. I’ve even opened a ticket to the Rockstar support guys, without any working solution provided. Maybe they should read your solution and learn something.
Solution 3 worked. disabling other cores
Setting the code option worked thanks