How to Reinstall the Photos App in Windows 10
Do you want to reinstall the Photos app in Windows 10?
Sometimes Microsoft Photos app is not working due to some reasons. The app may not respond or shows some errors. By reinstalling the app, you can easily resolve most of the problems.
In this guide, I’ll show you how to reinstall the Photos app in Windows 10.
Windows 10 comes with some universal pre-installed apps. And Microsoft Photos app is one of them. You can view and edit photos using this app. Well, Microsoft Photos is more than just an image viewer.
Moreover, this app allows you to edit videos, make movies, and create albums with basic editing features. You can add text, music, filters, camera motions, and other adjustments. Also, it offers to add 3D effects to the video.
Well, the Photos app replaces Windows Photo Viewer. But, Windows Photo Viewer is also available in Windows 10, and you can easily select the classic photo viewer from default apps.
Microsoft Photos app is slower than the classic Windows Photo Viewer program and it uses high resources of the system. If you have a low-end machine, you may need to use a classic photo viewer program to quickly access it.
Well, when it comes to the pre-installed apps on Windows 10, there is no uninstall option available by default. That’s why most people face problems when the default app is not responding and shows errors.
Below are the three methods to reinstall the Photos app. Let’s get started.
How to Reinstall the Photos App in Windows 10
You can restart and update
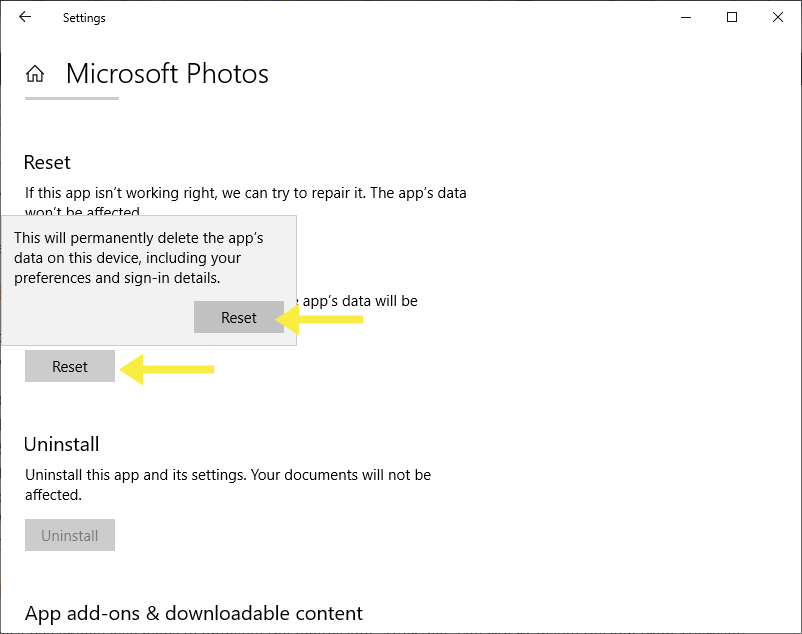
Method 1. Using Reset
Windows 10 offers the Reset option for apps. If any app isn’t working, you can use the reset option. This will reinstall the app and all app’s data will be deleted. The steps are given below.
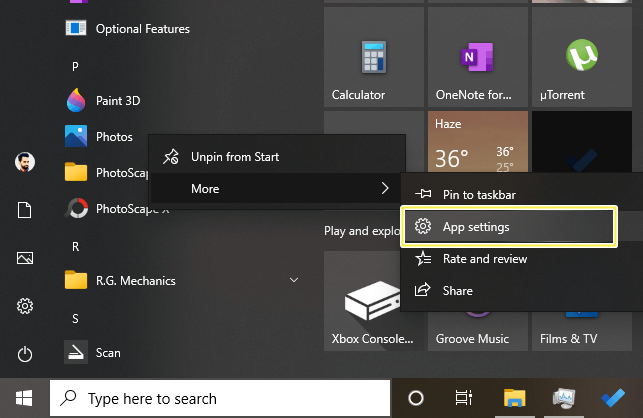
- Click on the Start menu and navigate to the Photos app from the programs list.
- Right-click on the Photos app and click on More » App Settings.

- Scroll down and click on the Reset button. You’ll see the confirmation message “This will permanently delete the app’s data on this device, including your preferences and sign-in details” with a Reset button. Click again on the Reset button.

- Wait for a few seconds and you’ll see the tick mark button when the progress will be completed.
- That’s it. Open the app from the Start menu or by clicking on the image.
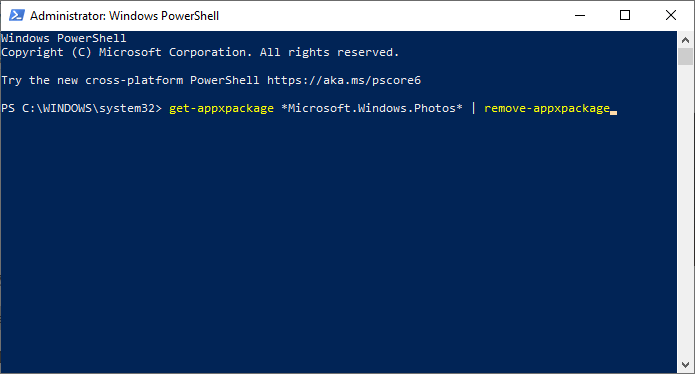
Method 2. Reinstall Photos app Using Powershell
Windows Powershell also helps to uninstall the Photos app. After that, you can re-install the app from Microsoft Store.
- At first, Run Windows Powershell as administrator. For this, click on the start menu and navigate to Windows Powershell from the programs list. After that, expand the folder and right-click on the Windows Powershell, and click on the “Run as administrator” option.
Click on the Yes button when you see the user account control pop-up window.
- Type or copy & paste the following command in Powershell and press the Enter button.
get-appxpackage *Microsoft.Windows.Photos* | remove-appxpackage
- Close the PowerShell and restart your PC to complete the process.

- After that, Open Microsoft Store and search for the Microsoft Photos app. Click on the Get button to install the app.

That’s all.
Fix if the Powershell command is not working
Sometimes, the PowerShell command may be unable to execute due to some reasons. To solve this problem, you need to know the app package’s full name.
To know the app package’s full name execute the following command in Powershell.
Get-AppxPackage Microsoft.Windows.Photos -allusers | select PackageFullName
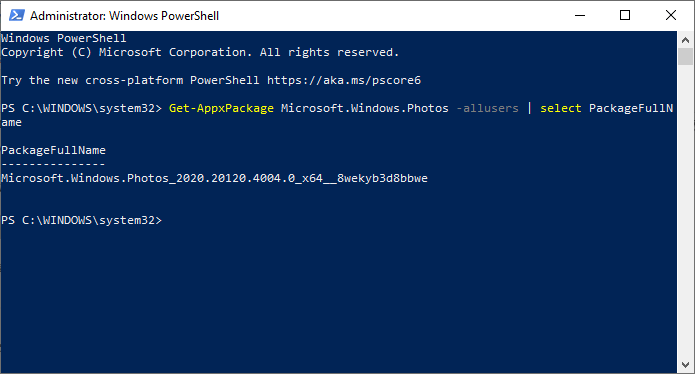
After executing, copy the App PackageFullName and execute the following command.
remove-AppxPackage PackageFullName
(Replace PackageFullName with the package name you copied from PowerShell)
After that, reinstall the app from Microsoft Store.
Method 3. Using Ccleaner
Ccleaner is one of the most popular PC Cleaner software to remove temporary/unwanted files, tracking files and cookies, invalid windows registries, system junk files, and more.
Well, you can also uninstall the Photos app using Ccleaner. The steps are given below.
- At first, download and install Ccleaner on your PC. After that, open the Ccleaner.
- Click on the Tools option from the left menu and click on the Uninstall option.
- Now you’ll see the apps and programs list that are installed on your PC. Navigate to the Photos app and right-click on it. Click on the Uninstall option from the context menu and select Ok to confirm.

- After uninstalling, Open Microsoft Store and search for the Microsoft Photos app and click on the Get or Free button to reinstall it.

That’s it.
Other Ways to fix if Photos App is not working
If the Photos app is not working and you don’t want to reinstall the app, then you can try other fixes.
1. Update the Photos app
If you’re getting trouble with any app, you should check for app updates from Microsoft Store. Every update adds a new feature and removes some bugs.
To update the app, Open Microsoft Store and click on the three horizontal dots from the top right of the window. After that, open the Downloads and Updates option.
Click on the Get Updates option. All available updates will be added to the download queue.
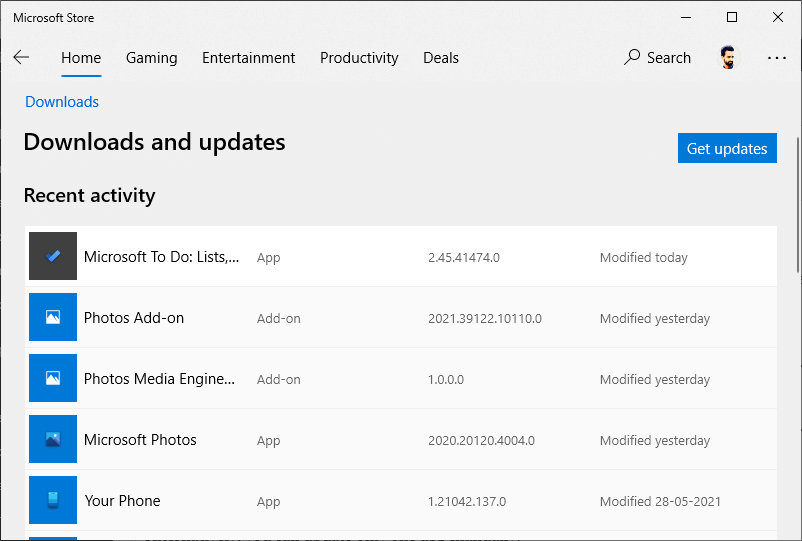
Alternatively, you can update only one app manually.
2. Run Windows Store Apps Troubleshooter
Windows 10 offers troubleshooting options. You can find and fix problems on your device with the help of a troubleshooter.
To run apps troubleshoot, follow the following steps.
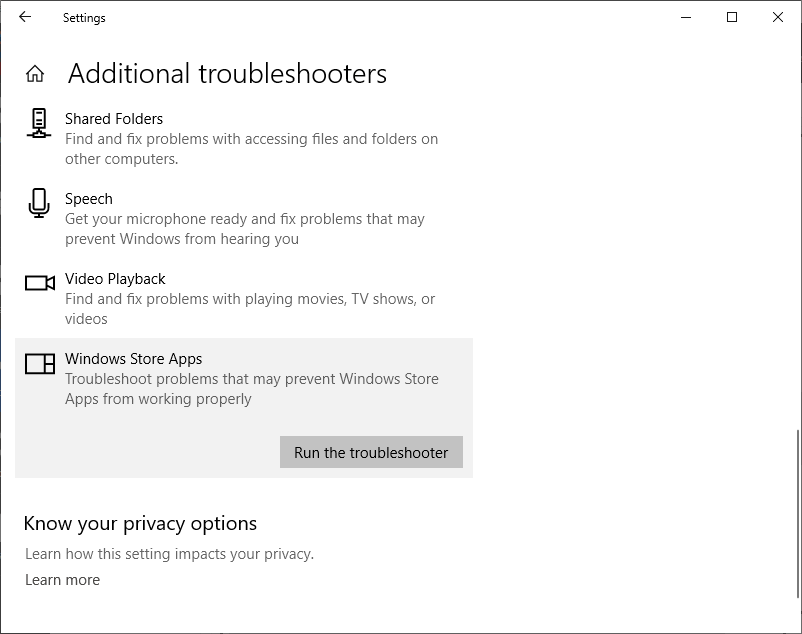
- Open the Settings app by pressing Windows Key + I from the keyboard.
- Open Update and Security and click on the Troubleshoot option from the left menu.
- Click on the Additional Troubleshooters. After that, Scroll down to the end of the page, and open the Windows Store Apps option. Click on the Run the troubleshooter button. This option troubleshoots problems that may prevent windows store apps from working properly.
- Wait for a while it detects problems. After that, it shows the suggestions to solve the problem. Click on the Next button.
- That’s it.
3. Update Windows OS
Keep your Windows 10 updated to prevent most of the problems. If you haven’t installed the latest updates, you should need to install them.
For this, Open Settings by pressing Windows key + I and open Update and Security. Click on the check for updates button and download & install all available updates.
4. Switch to Windows Photo Viewer
Classic Windows Photo Viewer is quick than the Photos app because it is lightweight and uses fewer system resources.
However, this program is disabled by default but still exists in Windows 10. You can add it to the default photo viewer from settings. The steps are given below.
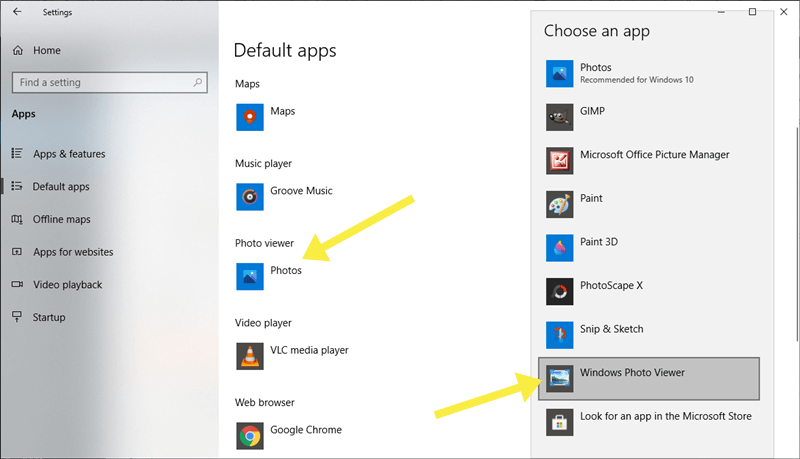
- Open the Settings app on your PC. Press the Windows key + I keyboard shortcut to open it.
- Click on the Apps option. After that, click on the Default apps from the left menu.
- Now click on the select app from the photo viewer and select Windows Photo Viewer from the list.

Final Words
Now you know how to reinstall the photos app in Windows 10. Uninstalling the app using PowerShell is a convenient method. But, non-techy guys may not be friendly with this method. However, the Reset option may solve most of the problems. But, there are other fixes also available to solve the problems.
Popular on OTW Right Now!


About The Author
Gagan Bhangu
Founder of otechworld.com and managing editor. He is a tech geek, web-developer, and blogger. He holds a master's degree in computer applications and making money online since 2015.