How to use Speedfan to Control Computer Fan Speed
Do you want to know how to use SpeedFan to control fan speed on Windows 11/10 laptop or PC?
Well, Speedfan is a hardware monitoring tool for Windows OS that can be used to read the Laptop/PC’s voltage and fan speed, and temperature of CPU, motherboard, and hard disk. Although, it allows to change the fan speed.
In this guide, I’ll show you how to use SpeedFan on Windows 10 to control fan speed.

Most people are often worried about their PC/Laptop temperature when it goes high. Though, Windows doesn’t provide any option to see the system fan speed and temperature. But, there are plenty of tools available on the web for free.
When it comes to the CPU temperature monitor tools, Speedfan is coming in the first position because of its popularity and features.
However, nowadays you don’t need to control your computer’s fans manually with software or tools because almost all computers have inbuilt fan controls.
But still, if you want to control the fans manually, you can use SpeedFan software on your Windows machine.
Inbuilt fan controls automatically adjust the fan speed according to the system heat. When the system generates more heat (obviously under high load), fans speed will be increase automatically. Similarly, when the CPU is idle and system temperature is reduced, fans speed will also be reduced.
The auto adjustable fan speed reduces the noise and power consumption.
What is Speedfan?
Speedfan is software to monitor computer temperatures. It can monitor the CPU temperature of each core, Hard Disk temperature (SATA and SCSI), fan speed, and voltages.
Every computer system has an inbuilt hardware monitoring system. The hardware monitoring system works with digital temperature sensors. Speedfan can access these sensors and provides the information to see the status of your system.
Most people are using this tool to just see the status of the computer. But, you can do a lot more with it. If your PC often hangs under heavy load, then this tool may help to let you know what happens when your computer is under heavy load. So, you can easily find the problem.
Moreover, you can control the fan speed of your PC with it. You can select the manual or automatic speed. The automatic fan speed option will control the fan speed according to the PC temperature. However, this feature is inbuilt in all modern systems.
Apart from this, you can access the hard disk drives status with it. It uses S.M.A.R.T (Self-Monitoring Analysis and Reporting Technology) to diagnose hard disk failures.
Features of Speedfan software
The main features of SpeedFan are given below:
- Temperatures – This tool can access the temperature sensors available on the motherboard, graphic cards, chipset, CPU, and power supply.
- CPU Temperature – Nowadays all CPUs come with multiple cores and all cores can provide the internal temperature. Speedfan reads and provides the information from each core.
- System Fans – Fans are used to reduce the computer’s internal temperature by circulating air. CPU under load needs more power and more power leads to more heat. So, fans flow hot air out of the system. Speedfan allows us to read the fan speed in RPM and can change the speed according to the real-time temperature.
- Voltages – The software is also able to read the system voltages. You can find the problems regarding the voltage.
- Hard Disk Drives Status – Hard Disks (SATA and SCSI) can report their status, temperature, and health to the systems with S.M.A.R.T (Self-Monitoring Analysis and Reporting Technology). This status information helps to identify future hard disk failures. Speedfan can also access the hard disk status and health information. It also offers to perform an in-depth online analysis of the hard disk.
How to Use Speedfan in Wndows
To use Speedfan you need to install it on your PC. Click here to download it from the official website. After that, install it on your PC. The installer file size is less than 3 MB.
After installing it, you can use it in various ways.
How to Read Fans Speed and System Temperature
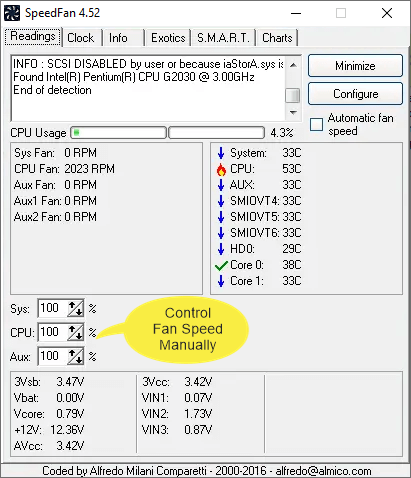
Open the Speedfan from the desktop icon or start menu. After that, it will scan the system sensors and shows you the parameters. The reading tab will be opened by default.
The software will show you real-time CPU usage. On the left side, you’ll see the fan names or numbers and their speed in RPM. On the right side, you’ll see the system, hard disk, and CPU temperatures.
You can also see the parameters of the voltage on the bottom box of the tool.
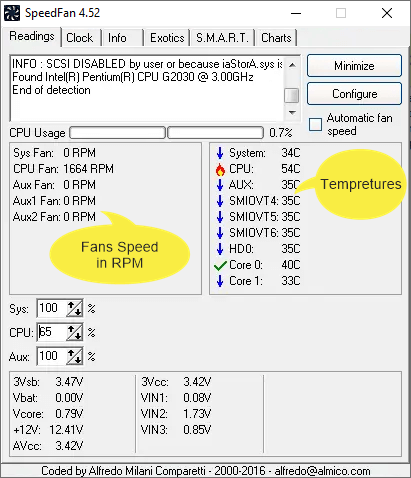
Temperature symbols and meaning
- Tick – The system is running under normal temperature.
- Down Arrow – Blue color down arrow indicates that the system is running at a low temperature.
- Up Arrow – Red color up arrow indicates that the system is running at high than normal temperature.
- Flame – The flame icon indicates that the system is running at a hot temperature. However, you don’t need to worried about if the temperature is less than 85 degrees Celsius.
How to use Speedfan to Control Fan Speed
Speedfan offers automatic and manual fan speed options. However, an automatic fan speed feature is inbuilt in all modern PCs. But, SpeedFan also offers this option as well.
Automatic fan speed helps to reduce fan noise and power consumption. Because the fan speed will be changed according to the temperature.
Fan speed will be increase automatically when the system heat up. And the speed will be reduced when the system is cool.
Before using this option, you need to check whether your motherboard is compatible with Speedfan software or not. Open http://www.almico.com/forummotherboards.php link to see the list of the motherboards supported by the software.
Note: Disable inbuilt automatic fan controls on your PC/Laptop from BIOS to avoid conflicts between the system program and SpeedFan.
Steps to control automatic fan speed using SpeedFan:
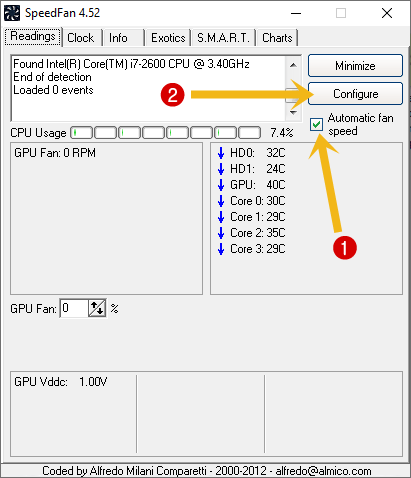
- Open Speedfan from the start menu or desktop icon.
- From the Readings tab enable the “Automatic fan speed” option. For this, enable the tick mark on this option.
- Now you need to configure the fan speed. Click on the Configure button.

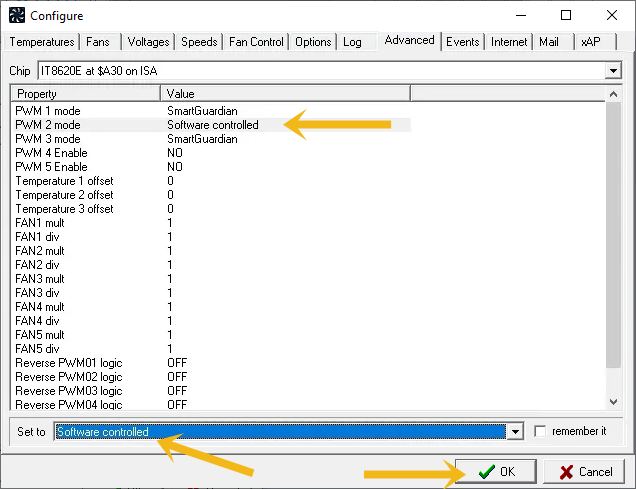
- Now open the Advanced tab and select the motherboard chip from the drop-down menu.
- After selecting the chip, select PWM mode and set the value to Software Controlled from SmartGuardian. After that, click on the OK button to apply the changes.

- Now check the fan speed from the readings tab.
That’s it. You can also select the minimum and maximum PWM values from the speeds tab. For this open the Speeds tab by clicking on the Configure button. Select the PWM modes and select the minimum and maximum values. Also, enable the Automatically variated option.
Steps to set manual fan speed using SpeedFan:
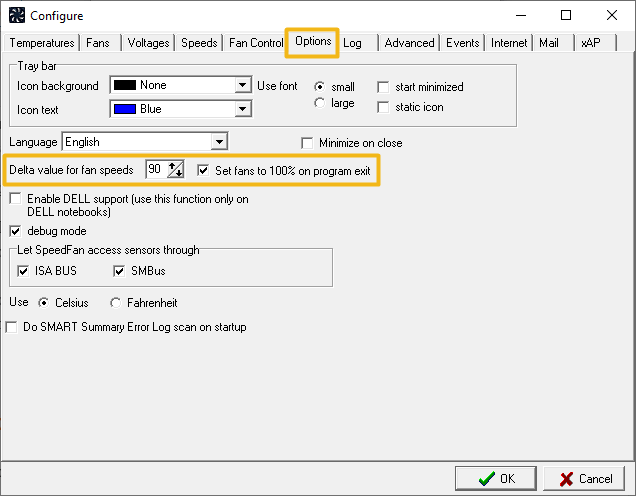
- Open Speedfan and click on the Configure button.
- Click on the Options tab and enable Set fans to 100% on program exit and set delta value for fan speed to 90.

- Open the Advanced tab and select the chip from the drop-down menu.
- Now select the PWM mode and set the value to Manual. Click on the OK button to make it permanent.

- Check the speed from the readings tab. You can also change the fan speed by clicking on the up and down arrows.
- That’s all.

Frequently Asked Questions
1. Is it necessary to use SpeedFan to control fan speed?
No, it is not necessary to install Speedfan software. All PCs have an inbuilt fan monitoring feature. However, you can install it to see the real-time temperature of your system. Because there is no inbuilt option available in Windows to see the temperature of the system.
2. SpeedFan not detecting fans on my PC, What should I do?
Speedfan doesn’t support all chips. You can update the software and check whether it detects the motherboard or not. Otherwise, you can’t do anything.
3. Is Speedfan harmful for my PC?
Speedfan is a powerful tool. Wrong configurations affect the computer cooling system. So, configure it carefully. You can use it to check the temperature of the machine without any problem.
4. How to perform hard disk in-depth online analysis?
This tool can access S.M.A.R.T (Self-Monitoring Analysis and Reporting Technology) of the hard disk drives. S.M.A.R.T technology provides the health and status of the hard disks. You can test and check the drive status to check the errors. For this open the Speedfan software and click on the S.M.A.R.T tab. Click on the Short test button to check the status and you’ll see the detailed information with attributes and values. Moreover, you can check the hard disk in-depth online analysis.
Conclusion
Now you know how to use Speedfan to control fan speed on laptop and PC. Well, this is a powerful tool that accesses the system sensors and provides information about temperatures, voltages, and hard disk health.
However, the tool is built to control the fan speed automatically or manually. But, modern PCs and laptops have inbuilt functionality for this. So, you may don’t need to control fan speed with it.
Popular on OTW Right Now!


About The Author
Gagan Bhangu
Founder of otechworld.com and managing editor. He is a tech geek, web-developer, and blogger. He holds a master's degree in computer applications and making money online since 2015.