How To Add Signature In Gmail (Complete Guide)
Are you using the Gmail or another email service? You would know the email signature. Well, Most of the people are using a Gmail. So, Here is the complete guide on how to add and change the signature in Gmail. Almost all email services provide this option.
What is Signature in Gmail?
Well, email/Gmail signature is a text or an image, that contains your name, contact information (Name, website link, mobile number, address), and your favorite quote. This text or image appended to the end of all outgoing messages. Gmail allows us to write 10,000 characters in the signature. Also, it provides the basic text formatting options.
It doesn’t matter whether you are using Gmail from a computer or mobile phone app (Android & iPhone). You can add a signature from any device.
Note: The signature added from the computer, will be added to the emails that will be sent from the Computer, Mobile Gmail Website, and iOS Gmail app (Not from Android App). But, you can set a separate signature for a mobile website, iOS app, and Android App.
How To Add Signature In Gmail From Computer
1. At first, Open Gmail.com or mail.google.com on your PC from any web browser and log in to your Google account.
2. Now Click on the Gear icon from (below the profile pic) the top right of the screen. You will see the list of options. After that, Click on the Settings option. 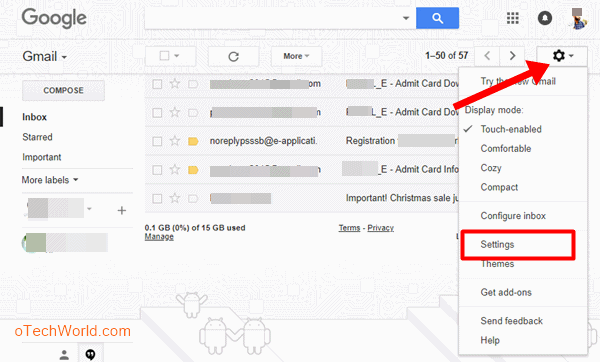
3. From the General tab (When you click on the settings, General tab will be open by default), scroll down and you will see the Signature option. (If you are using another email account in your Gmail account, then you need to select the account)
4. Now type your signature in the signature text field (If the old signature exists, you can change it from here). You can also add the signature image. Also, you will see the text formatting options (With Keyboard shortcuts), that are useful for creating a stunning and professional email signature. 
Below is the list of Text Formatting options:
- Font – There are total 11 fonts available for creating a signature.
- Font Size – In font size option, you will see the 4 sizes – small, medium, large, and huge. You can change the font size from small to huge.
- Bold, Italic, and Underline – These are the basic text format option and you can use it in your signature.
- Text Color – You can change the text color with this option.
- Link – This option is used to put a website link and email address in your Gmail signature.
- Insert Image – If you have your signature image, then you can upload with this option.
- Align – Align your text to left, center, or right.
- Numbered and Bullet List – These two options are available to create a list.
- Indent Less and Indent More – You can set the left or right margin of the text.
- Quote – Set your text as a quote.
5. [Optional] – Below the text area of Gmail Signature, you will see the “Insert this signature before quoted text in replies and remove the “–” line that precedes it.” option. If you want to insert your signature above quoted text in replies, then enable this option.
6. After that, Scroll down and click on the Save Changes button. After that, when you compose the new email, you will see the signature in email composer.

Read Also: Undo Sent Email In Gmail
How To Change Signature In Gmail
The steps are same to add or change the signature. You can change it any time.
How To Add Signature In Gmail App For Android
On Android phone, Gmail app also provides an option to do this. You can set your signature only in plain text. Because there is no text formatting option is available.
Note: The signature added from the Gmail app will be added to the emails that will be sent from the Android Gmail App only.
1. First of all, Open the Gmail app from your Android smartphone.
2. Tap on the three horizontal lines fro the top left of the screen, or swipe a finger on the screen from the left to right.
3. Now, you will see the options. Scroll to the bottom and tap on the Settings option. 
4. Now tap on your Gmail account. After that, scroll down and tap on the Mobile signature from the General. 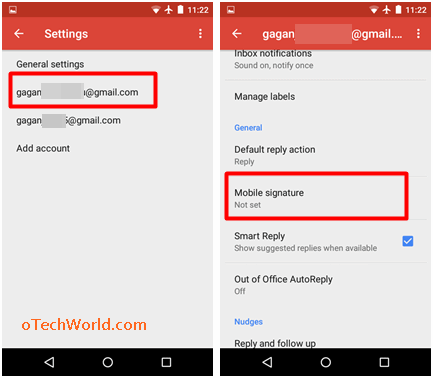
5. Write your signature and tap on an OK Button. 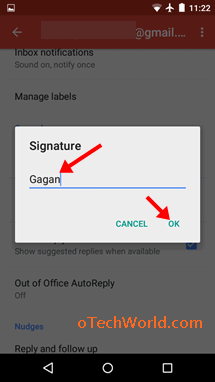
How To Add Signature In Gmail App For iOS (iPhone & iPad)
Like an Android Phone, Gmail app for iOS also gives this option. But, in iOS app, if you don’t set your signature, then when you compose a new email, it shows the signature you created from the web version.
1. Open Gmail App from iOS (iPhone or iPad) device.
2. Now tap on the three horizontal lines.
3. Scroll down and open Settings.
4. Tap on your Gmail account and tap on the signature settings.
5. Toggle on the “Signature” option.
4. Now write and add an email signature in the text area.
5. Tap on the back to save it.
How To Add Gmail Signature In Mobile Website
If you have already set the signature from a PC, then you don’t need to add again on Mobile website. But, if you want to add the separate signature for a mobile website, then you can do this from the mobile website.
1. Open Gmail from a mobile web browser on your smartphone and log in to your account.
2. Now Tap on the three horizontal lines from the top left of the screen. After that, tap on the Gear icon from the top right of the screen. ![]()
3. Toggle On the “Mobile Signature” option, and type the text in the text field. After that, tap on the Apply button from the top right of the screen. 
Final Words
So, guys, this is the guide on How to Add Signature in Gmail. The steps are same for Add, change, and delete it. However, The PC version allows us to use text formatting options, that are useful to create a professional signature. But, Gmail provides this feature in all its versions.
Popular on OTW Right Now!


About The Author
Gagan Bhangu
Founder of otechworld.com and managing editor. He is a tech geek, web-developer, and blogger. He holds a master's degree in computer applications and making money online since 2015.
good information gmail related
thanks for sharing this post