
How to Invert Image Colors Without Photoshop
You might end up inverting an image in the browser and then not see the downloaded image in your phone’s photo library. Or you might select a number of images and end up with a ZIP file rather than the individual files. These are all situations which will confuse people using browser-based image tools.
This guide walks through the complete job: choosing a supported file, reviewing the result, selecting an output format, finding the download, and handling a batch on a computer or phone. The steps use an image color inverter that processes the transformation locally in the browser.
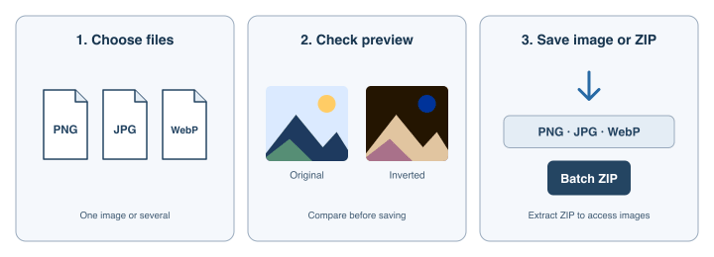
Choose files, check the preview, and save the output. Extract a batch ZIP before opening its individual images. Original workflow illustration, not a screenshot of the tool.
1. Choose a File the Tool Can Open
Open ImageInverter.app and select ‘Choose Images’. On a computer, you can also just drag a file into the input area. On a phone the picker you’re presented with may give you the option of your photo library, your stored files or both.
The tool works with PNG, JPG, and WebP files. If your phone photo is in HEIC format, you’ll need to convert it to a JPG or PNG using a conversion tool (just changing the file extension won’t actually convert the file).
If your picture is in a cloud service, then be sure it’s downloaded to your device before you select it. If in any doubt, just try opening it from your file manager first.
Start with a single image as you’re learning how the tool works. Once you’ve seen that the first file opens and downloads correctly, you can go ahead and add more.
2. Check the Original and Inverted Previews
After processing, compare the Original and Inverted previews. The picture should keep its orientation while the colors reverse. This is a color change, not a horizontal flip or rotation.
Check the whole image before you save it, as the color inversion will affect everything in the image (text, backgrounds, and any colored areas). If you just want to invert part of the image, then you’ll need an editor that allows you to select areas.
If your file has any transparent areas, then check those out carefully. When you export as PNG or WebP the transparent areas should remain transparent. If you have a solid white background, it will become solid black after the inversion. If you don’t want a background at all, then either remove it before you export or use a transparent original.
3. Choose the Download Format
Use the arrow next to the download button to open the format options.
| Output | Choose it when |
| PNG | You need transparency or want a lossless format for graphics and screenshots. |
| JPG | You need a widely supported photo file and do not need transparency. |
| WebP | Your destination accepts WebP and you want that format, including support for transparency. |
If you need transparency in your image, then PNG is your format. JPG doesn’t support transparency so the tool will fill the transparent areas with white in a JPG. White artwork would just get lost against that white background.
Before you go for WebP, just make sure the app you’re using will accept that format. If it won’t, then go ahead and download your image as a PNG or JPG instead.
Choosing a different format won’t make your image any bigger and won’t restore any details that were missing from the original small image.
4. Download and Locate a Single Image
Click or tap Download PNG, Download JPG, or Download WEBP, depending on your selected format.
On a computer, you can check your browser’s download list or the folder you’ve set in its settings. If the browser asks you where to save it then just pick a project folder that you’ll remember.
On a phone, your file may end up in the browser’s download list or in a file manager rather than immediately in Photos or Gallery. Open the download from there. If you want it in your photo library, then use the share or save option for that file and app.
Make sure you’re opening the new file rather than the original. If you can, give it a distinct name particularly if you’re going to be sharing both versions.
5. Process Several Images and Extract the ZIP
On a computer, you can select multiple supported files at once or drag a group into the tool. On a phone, it depends on the picker as to whether you can select multiple files. You can also tap Add More Images after you’ve loaded your first image.
Click on each item in the batch list to view its preview. Select your output format prior to clicking Download All ZIP, and then just wait for the ZIP archive to download.
The zip contains all your processed images. You’ll need to extract it using your computer’s file manager or a file manager app on your phone prior to opening or importing the images. Even if an app will accept PNGs, it may not be able to open the ZIP directly.
If you’ve got loads of images, then start off with a small batch. It all happens on your device, and high-res images can be quite memory intensive. If your browser is getting slow or is even reloading then just try a smaller batch and close any other tabs that are using up a lot of memory.
Troubleshooting the Saved Result
The downloaded picture looks blank
A white transparent image may appear blank if your viewer is using a white background. Try putting it over a dark background in another app to see if the artwork is actually there.
If your PNG looks fine but the JPG doesn’t, then check whether your original image had transparency. Re-download the PNG if you need to retain the blank areas.
The colors changed, but the picture did not turn around
That’s normal. Color inversion only changes the colors; it doesn’t change the orientation. If you want to flip or mirror the image, then you’ll need to use a different tool for that.
The download is missing from Photos or Gallery
First check your browser’s completed downloads and your device’s file manager. It may well have saved correctly even if it’s not showing up in your photo library.
If the download doesn’t finish, just try it again with a smaller image. Keep the page open until your browser tells you the download is complete.
Another app cannot open the file
If you’ve downloaded a batch, then be sure you’ve extracted the ZIP file. Check that the app you’re using supports the image format (PNG or JPG files are generally easier to import than WebP).
After your file opens in the app you want, keep the original in a safe place and use the downloaded copy for your project.
Popular on OTW Right Now!


About The Author

Gagan Bhangu
Founder of otechworld.com and managing editor. He is a tech geek, web-developer, and blogger. He holds a master's degree in computer applications and making money online since 2015.