How to Adjust Power and Sleep Settings in Windows 11
Do you want to know how to adjust power and sleep settings in Windows 11?
Windows 11 provides power and sleep options that allow you to manage how your computer uses energy and performs during active and inactive periods.
These settings help you to preserve energy and increase the laptops battery life. Also, it helps you to ensure that the system runs efficiently.
Well, you might need to change or adjust these settings on your computer or laptop according to your requirements.
So, in this guide, I’ll show you how to adjust power and sleep settings in Windows 11.

What are Power and Sleep Settings in Windows 11 and why do you need to Adjust them?
Windows 11 allows you to choose the power mode that optimizes your device based on power use and performance. It is a collection of hardware and system settings that manages how your device or computer uses power.
The Power Mode offers three options as given below that you can select:
- Best Power Efficiency: This mode is designed to reduce power consumption as much as possible. It saves energy by reducing system performance and adjusting the background activities where possible.
Keep in mind that it will slow down the system performance because it throttled down CPU and CPU clock speed. - Balanced: Balanced Mode is the default power mode in Windows 11 that dynamically adjusts the system’s performance and power usage based on the current workload and usage patterns. It offers full performance when needed and saves power when there is no load on the system by scaling the CPU and GPU clock speed.
- Best Performance: Best Performance Mode provides the highest level of performance and responsiveness. The mode forces the system to operate the CPU and GPU at higher power levels and clock speeds to ensure maximum performance.
Note that, if you’re using this mode on a laptop when not plugged in, then you’ll get less battery backup.
Sleep mode puts the computer into a low-power state while preserving the current session in memory. The computer can quickly resume to full power when you press the power button.
When it comes to the Sleep settings, Windows 11 gives the option to specify how long the computer should wait before entering sleep mode. You can choose the sleep time from 1 minute to 3 hours. So, after a specific duration of inactivity, the computer will enter sleep mode automatically.
Note that Sleep mode is different from Hibernate mode. In Sleep mode, the Windows OS saves the current session to system RAM. On the other hand, Hibernate mode saves the current session to the hard disk and completely powers off the computer.
Also Read: How to Turn off Background Data Usage in Windows 11
How to Adjust Power and Sleep Settings in Windows 11
You can change or adjust power and sleep settings from the Settings app or Control Panel. The step-by-step guide for both methods is given below.
Adjust Power and Sleep Settings from Settings App
- Open the Settings app on your Windows 11 Device by pressing the Windows Key + I keyboard shortcut. Otherwise, click on the Windows icon (start) from the taskbar and open Settings from All Apps.
- From the Settings app, click on the System option from the left navigation pane and then open the “Power & battery” option from the right side.

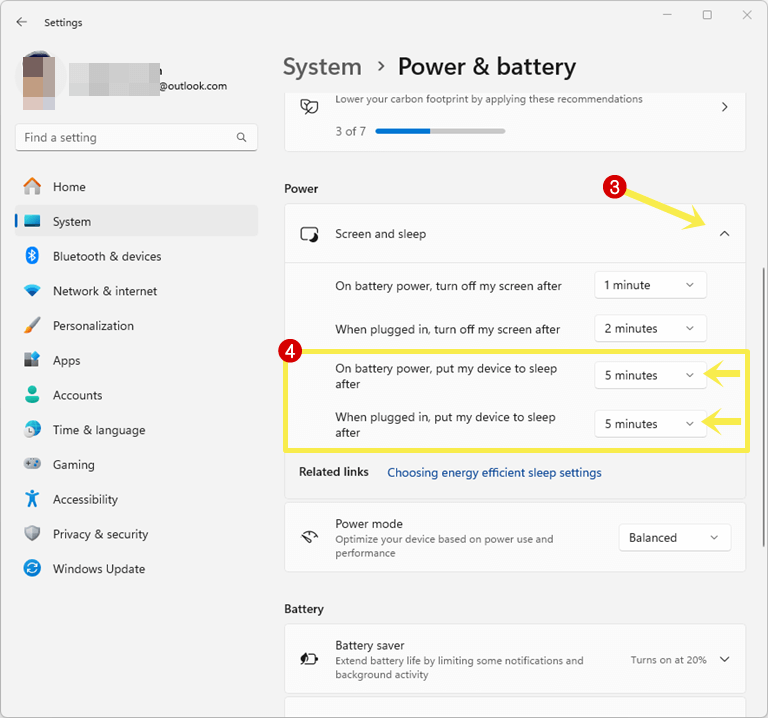
- Now from under the Power option, click on the Screen & Sleep option to expand its options.
- After that, click on the drop-down menus next to “On battery power, put my device to sleep after” and “When plugged in, put my device to sleep after” and select the time.

The time range is 1 minute to 3 hours. If you select the 15 minutes, then your computer will go to sleep mode after 15 minutes of inactivity. - Now you need to adjust the Power settings. From the same page, click on the drop-down menu next to the Power Mode option and select any option from Best Power Efficiency, Balanced, and Best Performance.

- That’s all.
Sometimes, you can’t set power mode and you’ll see the note or warnings “Power mode can’t be set while the high-performance power plan is used” or “Power mode can’t be set while the power saver power plan is used”.
In that situation, you need to adjust the power mode from the control panel.
Adjust Power and Sleep Settings from the Control Panel
- Open the Control Panel by searching from the taskbar search bar. Alternatively, you can search by clicking on the Windows icon from the taskbar and you’ll see the search bar on the start menu.

- From the control panel, click on the System and Security option.

- Now open Power Options from the next page.

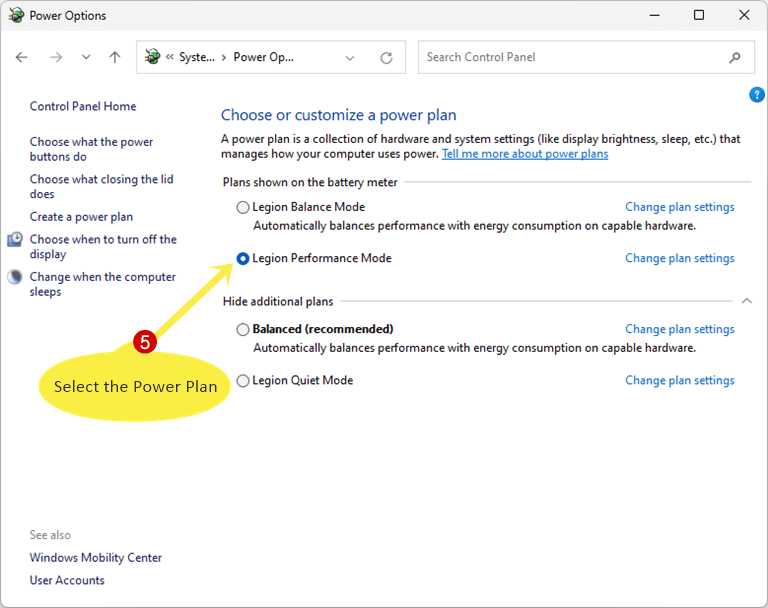
Tip: You can also search for Power Options in the Control Panel using the search bar from the top right. Otherwise, If you select the View by large icons or small icons option, then you’ll see the Power Options directly when you open the control panel. - Now you’ll see the power plans. You can select the options from Performance mode, Balanced Mode, or Quiet mode.

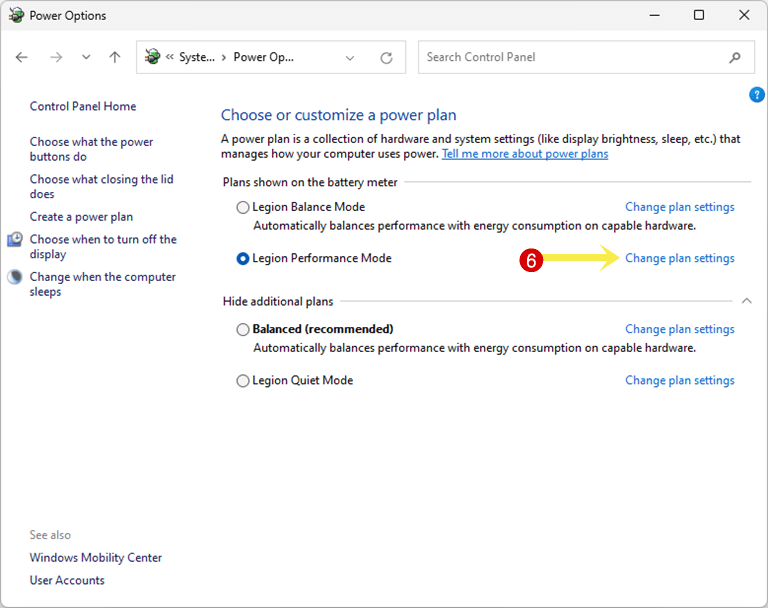
- After selecting the power plan, click on the Change Plan Settings next to the selected power plan.

- Now you can choose the sleep and display settings. Select the time next to the “Put the computer to sleep” option.

Note that, there are two options “On Battery” and “Plugged in” available. You can select different times for both options as you want. - That’s all.
Final Words
I hope this article helped you learn how to adjust power and sleep settings in Windows 11. You must adjust or change these settings according to your requirements because it helps you to optimize your computer’s performance, energy efficiency, and overall user experience.
So, when you’re using your laptop on battery, you can use Best Power Efficiency or Power Saver mode to extend battery life. Or when you plug in your laptop, you can use Performance mode to get high performance or processing power.


