How To Change Mouse Pointer / Text Cursor In Windows 10
Do you want to change the default mouse pointer and text cursor in Windows 10?
By default, the mouse pointer color is white with a black border. But, you can change the mouse pointer size and color in Windows to make it more visible and easier to see.
In this article, I’ll show you how to change the mouse pointer and text cursor in Windows 10.
Well, Windows 10 comes with a lot of customization features than its older versions. Microsoft added a new customization feature in every Windows 10 update to enhance the user experience.
Now Windows 10 allows us to change its complete theme. You can change the taskbar, start menu, tiles, title bar, and action center color.
When it comes to the mouse pointer, Windows 10 also offers some customizations for this. You can change the mouse pointer size and size according to your requirement.

The previous versions of Windows also allow changing the mouse pointer from the Control panel. But, Windows 10 provides the settings app, which provides the options to change Windows settings including mouse settings.
If you’re using Windows PC you know that you can download custom mouse pointers from the internet. No doubt, Custom mouse pointers are eye-catching. But, a new version of Windows 10 has inbuilt options to change cursor size and color.
There are 3 methods to do this in Windows 10. You can do this from the Settings app or control panel. Windows also provide other settings for a mouse i.e. pointer speed, double click speed, adjust scrolling, click lock, and more. You can change mouse settings according to your need. With these settings, you can increase your experience with your Windows PC or Laptop.
How To Change Mouse Pointer In Windows 10
Below are three methods to change the mouse pointer in Windows 10.
Method 1. From Settings App
- Open the “Settings” app on your Windows 10 PC/Laptop. (Keyboard Shortcut: Windows Key + I). Click on the start button from the bottom left and click on the Gear icon.
- Now the settings will be open, open the “Ease of access” option.
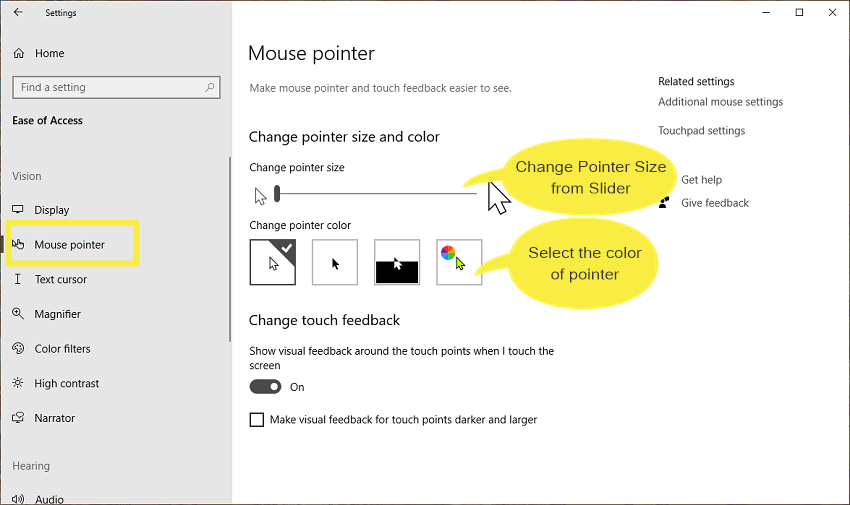
- Click on the “Mouse Pointer” option from the left side and you will see the pointer settings to make mouse cursor and touch feedback easier to see.
- Change the size by adjusting the slider. By default, the size is set to 1 point. You can select the size from 1 to 15.
After that, select the pointer color. You’ll see the four options like white, black, inverted, and custom. By default, white is selected. You can select any color by selecting the custom option.

- That’s it.
There are 15 sizes of pointer available in the Settings app (Small, Medium, and Large). Also, unlimited color options are available. You can choose the white, black, inverted, and custom color pointer.
Method 2. From Control Panel
This setting is available on all previous versions of Windows (Windows XP, 7, 8, and 8.1). The Control panel provides the pointer scheme and customize options. You can also install and delete custom packs from the control panel.
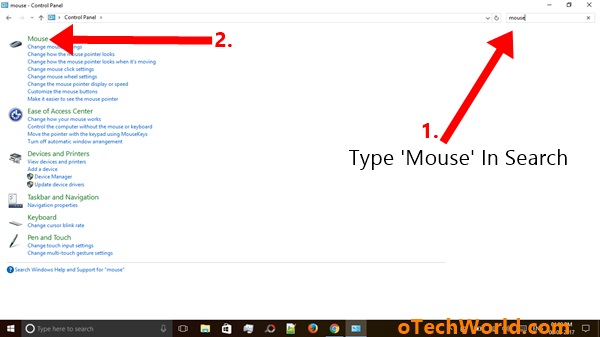
- Open the control panel and search for “mouse” and open the mouse option.

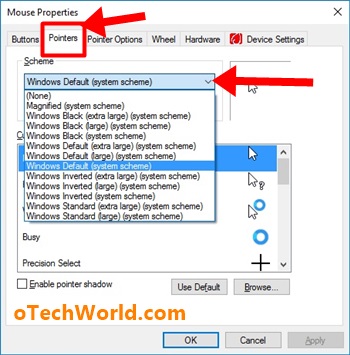
- Click on the pointer options tab and click on the “down arrow icon” under “Scheme”. You’ll see the list of all available system schemes. Select mouse pointers and click on Apply and OK button.

Method 3. Ease of access from the Control panel
Control panel also provides the ease of access option. Basically, you can change the display, sound, mouse, and keyboard settings from ease of access.
- Open Control panel and open ease of access.
- Click on the “Change how your mouse works” option and select the mouse pointer.

- After that, click on Apply and OK button.

How to Change Text Cursor in Windows 10
Text cursor indicates the text insertion while writing the text. It is a black color vertical line that is blinking or not.
Windows 10 also offers some customizations to the text cursor. You can enable the color indicators and change the thickness of the text cursor and indicators.
If you enabled the text cursor color indicator, you’ll see the indicator’s color matched with the mouse pointer color.
Steps are given below to change the text cursor.
- Open the Settings app by pressing Win Key + I from the keyboard. Alternatively, you can open it by clicking on the Start menu > Gear icon (Settings).
- Now click on the “Ease of access” option from the settings.
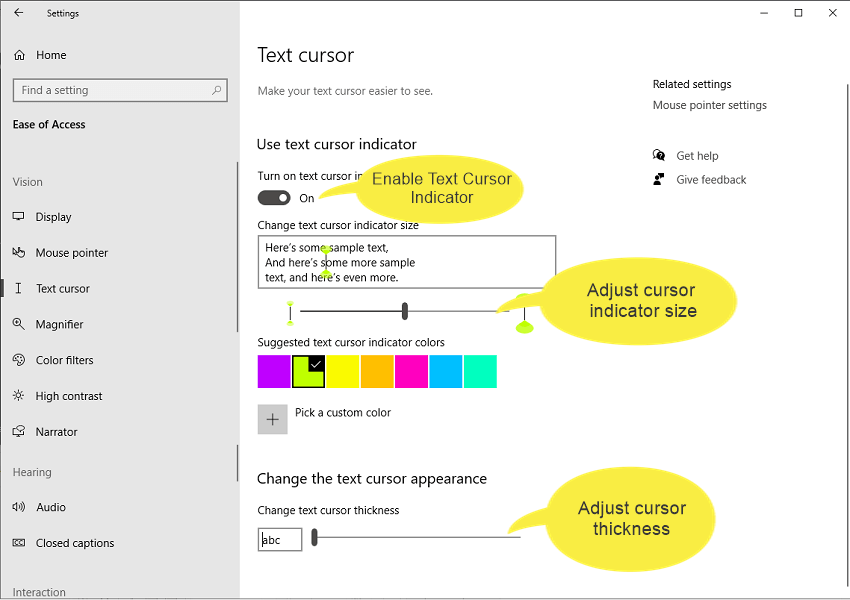
- Click on the “Text cursor” from the left side, and the settings will be open to make the text cursor easier to see.
- Turn on the text indication by enabling the toggle button.
Select the indicator size from the slider. You can select the size from 1 to 5. By default, 3 is selected.
Select the color from the list. Otherwise, click on the “Pick a custom color” option for more colors.
Change the text cursor thickness to change its appearance. The default thickness value is 1. You can select the thickness from 1 to 20.

That’s all.
Final Words
Now you know the three methods to change mouse pointer in Windows 10. The new version of Windows 10 provides unlimited colors and 15 sizes for the pointer. However, you can download custom mouse pointers from the internet and these downloaded custom pointers looked cool. So, if you want to change the complete pointer scheme, you may need to download it.
Popular on OTW Right Now!


About The Author
Gagan Bhangu
Founder of otechworld.com and managing editor. He is a tech geek, web-developer, and blogger. He holds a master's degree in computer applications and making money online since 2015.