2 Ways To Install Custom Mouse Pointers In Windows
How To Install Custom Mouse Pointers In Windows: You can change the themes in Windows 10. But, Windows doesn’t have inbuilt mouse pointer themes. Custom mouse pointers look great. If you bored from Windows mouse pointer and want the colorful mouse pointers, then you need a custom mouse pointers. You can download and install custom pointers. By default, Windows has white mouse pointer with a black border. The pointer changes when you select the text, link or do other tasks.
However, Windows provides the option to change the pointer size and 3 different pointer packages (White, Black, and invertible). But, Windows doesn’t provide other colors of a mouse pointer. If you want to change the pointer color, you need to download mouse pointers. It is your choice whether you want to install complete mouse pointer package or change only normal select mouse pointer. You can also change some mouse pointers according to your need. There is no need to change all mouse pointers.
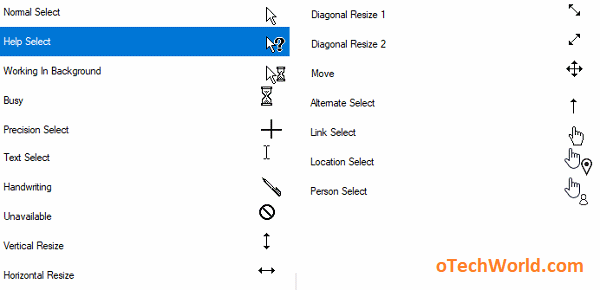
Below is the list of mouse pointers in Windows 10.
You can change these mouse pointers that matched with your Windows 10 themes. Here is the guide on how to install custom mouse pointers in Windows 7, 8.1, and 10.
How To Install Custom Mouse Pointers In Windows
You can install whole mouse pointer package at once or one by one.
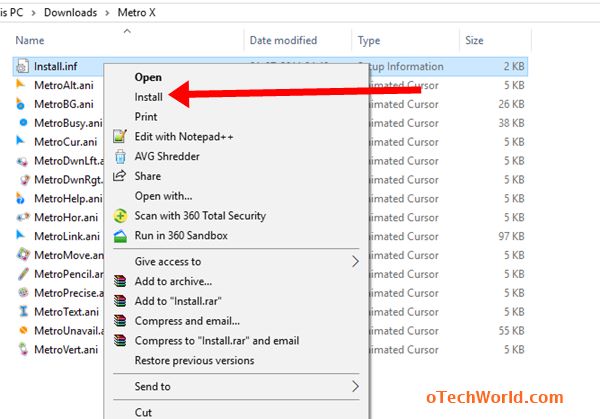
1. Install Custom Mouse Pointer Package In Windows At Once
Below are the steps.
- Extract the folder from rar or zip file. Open that folder and you will see the “install.inf” or another inf file. Right-click on the install.inf file and click on install option. Select Yes if any message prompted by Windows.

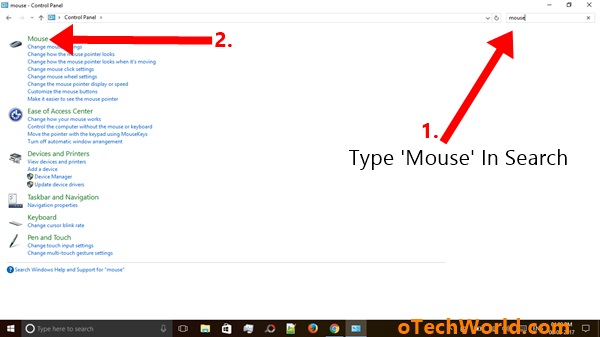
(Now the mouse pointer package is installed. You need to select that package to change pointers.) - Open control panel and search for Mouse. Open Mouse option.

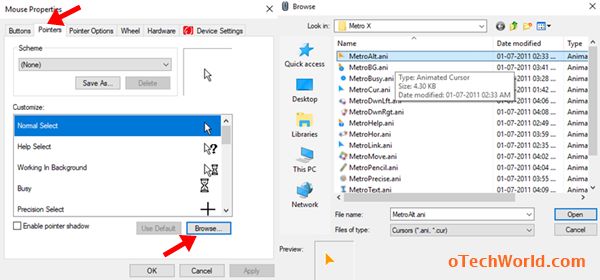
- Open “Pointers tab” and click on down arrow under the scheme and select the installed pointer package.

- Click on Apply and Ok button to make the changes.

To select the default mouse pointers, select None from scheme option.
2. Install Custom Mouse Pointers One By One In Windows
The default Windows mouse cursors are saved in C:\Windows\Cursors folder. When you download the custom pointer package, then it is in rar or zip file. Below are the steps.
- Extract the folder from downloaded zip or rar pointer package. (You can extract this folder in any drive. But, it is better to extract this folder in c:\Windows\cursors path.)
- Open Control panel and search for a mouse. Open Mouse option.
- Open Pointer tab from the settings window. Now click and select the “Normal Select” cursor option from customize. After that, click on “Browse” button and browse and select the pointer from downloaded folder.

(Note: You need to change the pointers carefully according to their renames. For example, select BG for a background.) - Select and browse all or some pointers as you need. After that, Click on Apply and OK button to save the setting.
If you want to set default pointers then click on “Use default” button. After that, apply the settings. To change all pointers to default, select “none” from the scheme.
Final Words
So, Guys, these are two ways to install custom mouse pointers in Windows. If you bored from windows default pointers, then you should try custom colorful pointers. You can download pointers packages from the internet.
Popular on OTW Right Now!


About The Author
Gagan Bhangu
Founder of otechworld.com and managing editor. He is a tech geek, web-developer, and blogger. He holds a master's degree in computer applications and making money online since 2015.