6 Ways to Fix Low Disk Space Error Due to a Full Temp Folder
Are you getting the low disk space error due to a full temp folder on your Windows PC?
Your Windows 11 computer may be annoying when you run out of disk space, and you do not even know what is consuming much of your storage space. The Temp folder with unnecessary files is one of the most prevalent reasons for low disk space errors that are not often noted.

Whenever you have come across such warnings, such as Low Disk Space, or just realized that your C: drive is getting smaller and you have not downloaded anything big, then most likely, it is the Temp folder that is causing you all the trouble.
The Temp directory of Windows is literally as it is a storage place of temporary files. They are files automatically created by Windows as well as other applications when they require storing large amounts of data in their operations. By way of an example, when you install software, surf the internet, unpack compressed files, or update your system, temporary files are created and put in this folder.
Preferably, they should be deleted automatically after they are no longer required. However, in reality, many of them remain behind, slowly accumulating and eating up valuable disk space.
With time, this accumulation may be great. Not only does a Temp folder full of gigabytes of junk files decrease the available storage, but it can also slow down the process of using your PC, cause updates to fail, and even cause the crashing of applications. A full Temp folder can soon become a big pain in Windows 11, which regularly requires free space to update and operate efficiently.
Fortunately, the problem is simple to solve when you are aware of what is going on behind the scenes.
So, in this guide, I’ll show you the role of the Temp folder, why it stores files, and the most effective methods to fix the “low disk space due to a full Temp folder” problem in Windows 11.
What is the Temp Folder in Windows 11?

The Temp folder is a special directory where Windows and installed programs store temporary data. The following are some typical ones:
- Installation files are generated during the installation or when updating the software.
- Application and browser cache data.
- Crash reports, logs, and remaining data of uninstalled programs.
- Temporary extraction of files in cases of compression or decompression operations.
In Windows 11, there are typically two main Temp locations:
- System Temp folder (located in C:\Windows\Temp) – used by the operating system.
- User Temp folder (located in C:\Users\<Username>\AppData\Local\Temp) – used by user-specific apps and processes.
These files were created to be automatically deleted, but in most instances, they remain as useless files, consuming your hard drive.
Why Does the Temp Folder Fill Up?
- Failed or incomplete updates: Windows Update has a habit of leaving behind huge temporary files.
- Browser cache buildup: Web surfing leaves behind temporary data that accumulates with time.
- Unclean software installations: Not all installers leave behind clean-up files.
- Application logs and crash dumps: The programs create logs and dumps, which might not be removed.
- System maintenance issues: Auto clean-up programs do not necessarily work as expected.
Methods to Fix Low Disk Space Error Due to a Full Temp Folder in Windows 11
Method 1. Manually Delete Temp Files
You can manually delete all files from the Temp folder to fix the low disk space error. This is one of the easiest and most effective methods to free up disk space by deleting temp folder files.
The steps are given below:
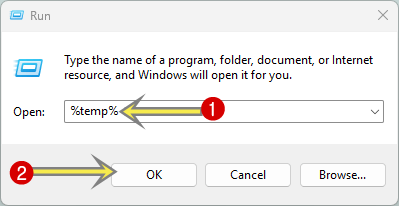
- Open the Run command prompt by using the Windows Key + R keyboard shortcut.
- Type the following command in the run command prompt and click on the OK button:
%temp%

- Now the Temp folder will be open. The temp folder is located at:
C:\Users\<username>\AppData\Local\Temp - After that, select all files by pressing the Ctrl + A keyboard shortcut and click on the Delete icon. Otherwise, right-click on the selected files and select the Delete option from the context menu.
Note: Some files may not be deleted because they are currently in use by running programs. If you see a prompt saying “File in Use”, check the box that says “Do this for all current items” and click “Skip”.
- In the last step, just empty the Recycle Bin.

- That’s it.


Method 2. Using Disk Cleanup Tool
The Disk Cleanup tool is a built-in tool in Windows 11. The Disk Cleanup tool scans your disk drive and lists the types of files that you can delete (temporary files, thumbnails, Recycle Bin contents, Windows Update leftovers, etc.), and then deletes them all at once. A detailed walkthrough and step-by-step guide are given below.
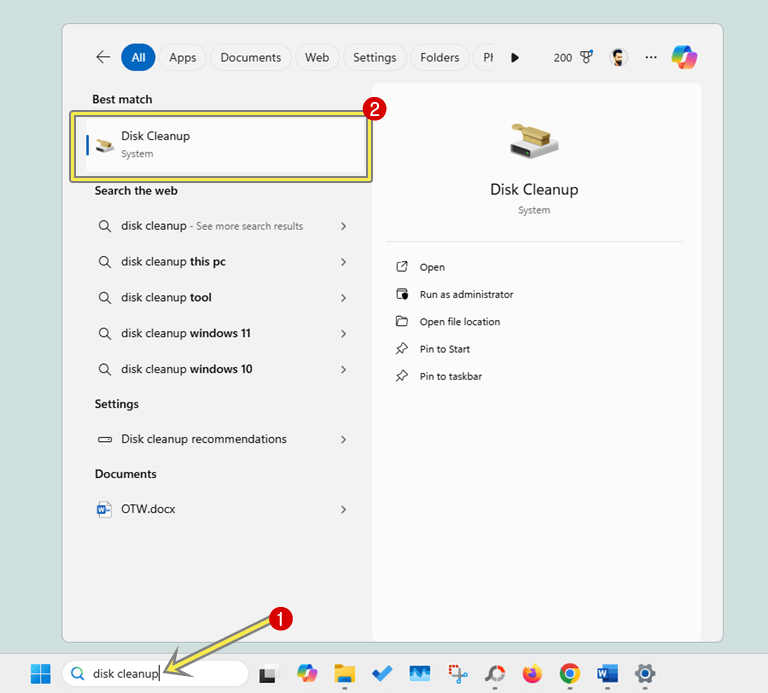
- Type “Disk Cleanup” in the search bar on the taskbar or from the start menu and open it from the results.
Alternatively, press the Windows key + R to open the run command and type cleanmgr in the run command prompt. After that, click on the Ok button.
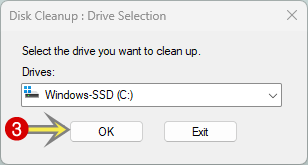
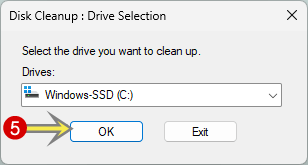
- Now the Disk Clean Up pop-up window will be open. Select the C: drive and click on the OK button.

- Wait for the initial scan. Because Disk Cleanup will calculate how much space can be freed. This usually takes a minute or two.
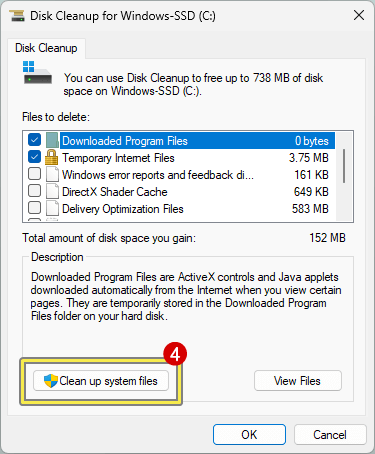
- Now the disk cleanup tool will be open. Click on the “Clean up system files” button.

- Again, you’ll see the Drive selection pop-up window. Select the C: drive.
- Wait for the scan. This will take a minute or two.
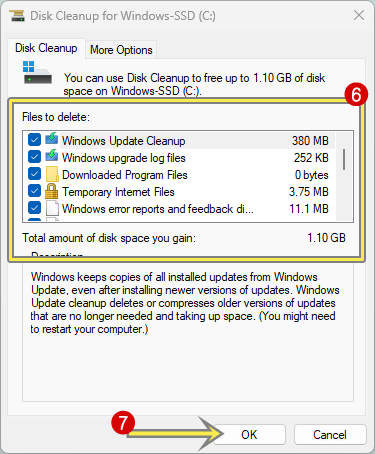
- You’ll see a list of file types with short descriptions and the estimated space they use. Common items include:
Windows Update Cleanup: Old update files that are safe to remove, but may prevent uninstalling some older updates.
Windows Upgrade log files: Contain the information that helps to identify and troubleshoot the problems during Windows installation, upgrading.
Downloaded Program Files: ActiveX and Java applets (rare now).
Temporary Internet Files: legacy Internet Explorer cache (may not reflect Edge/Chrome cache).
Windows error report and feedback diagnostic: It stores diagnostic files generated from Windows errors and user feedback.
DirectX Shader Cache: You can clean the files that are created by the graphics system.
Delivery Optimization Files: leftover Windows Update files and peer-to-peer caches.
Device Driver Packages: Contains older versions of drivers that are no longer needed.
Language Resource Files: Helps to remove unusual language resource files.
Recycle Bin: Files you’ve deleted previously (permanently free space if emptied).
Temporary files: General temp data (safe to remove).
Thumbnails: thumbnail cache (will be rebuilt as needed).
System recovery log files: These contain files that help to identify and troubleshoot the problems that occurred during system reset or recovery. - Check the boxes next to the options you want to clear. After that, click on the OK button.
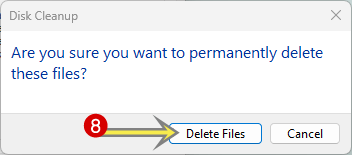
- You’ll see the confirmation pop-up. Click on the Delete Files button.

- That’s it.
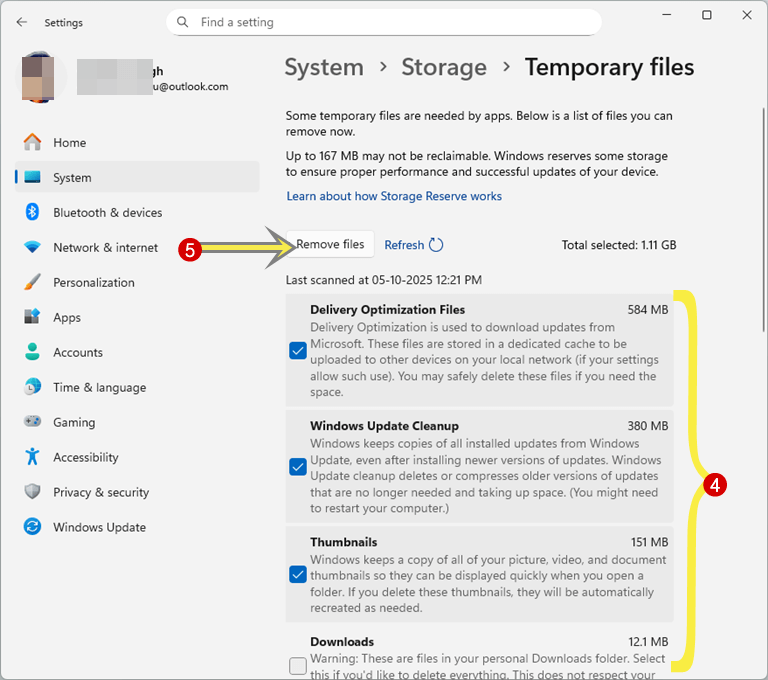
Method 3. Clear Temporary Files via Settings
- Open the Settings app by pressing the Windows Key + I keyboard shortcut or from the start menu.
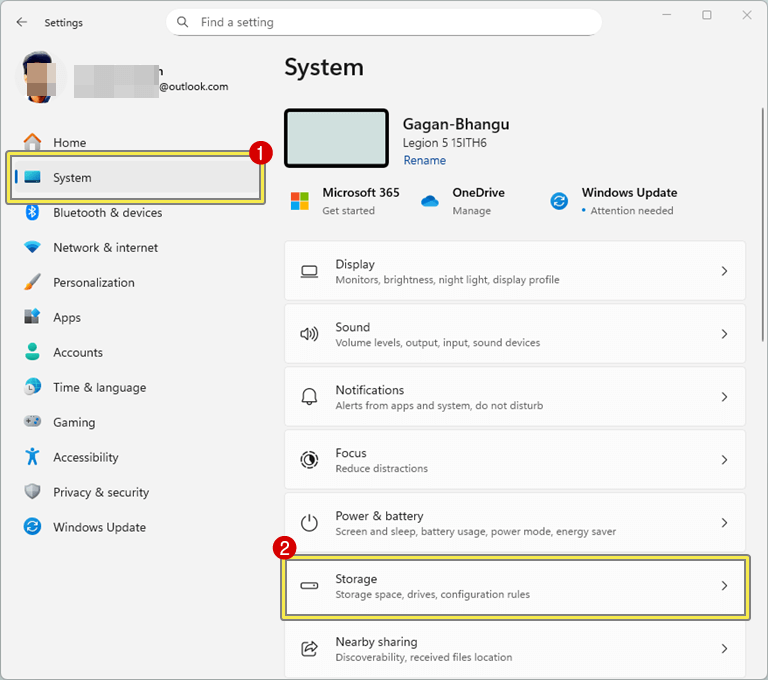
- After opening the Settings app, click on the System option from the left pane and open the Storage option from the right side.

- Wait while Windows is calculating the files. After that, click on the Temporary Files option.
- Select the Temporary Files option and other options you want to clear, and click on the Remove button.
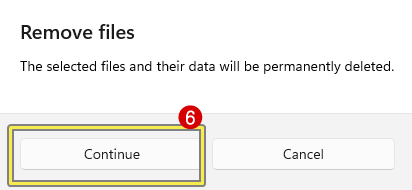
- After that, you’ll see the confirmation pop-up. Click on the Continue button to confirm.

- That’s it.

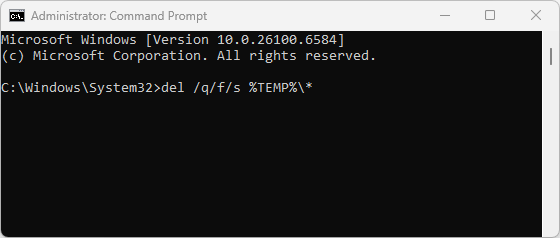
Method 4. Use Command Prompt to Clean Temp
This method quickly clears unnecessary files. The steps are given below:
- Open Command Prompt (Admin). For this type cmd or Command Prompt in the search box on the taskbar or start menu.
- From the search results, right-click on the Command Prompt option and select Run as administrator option from the context menu.
A User Account Control warning pops up. Click on the Yes button to continue. - Type:
del /q/f/s %TEMP%\*

del /q/f/s C:\Windows\Temp\*

- Press the Enter button after each command.
- That’s it.

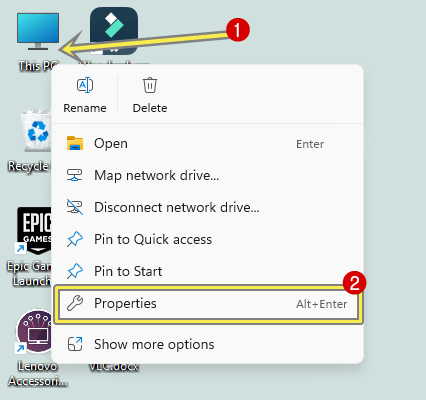
Method 5. Move Temp Folder to Another Drive (Advanced)
If your C: drive is small, you can move the Temp folder location:
- Right-click This PC and select the Properties option from the context menu.

- After that, the settings app will be open. Click on the Advanced System Settings option.
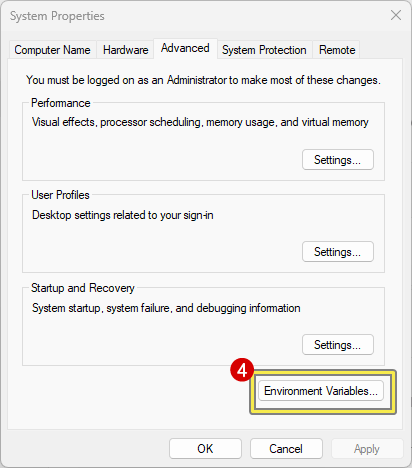
- Click on the Environment Variables button from the System Properties pop-up window.

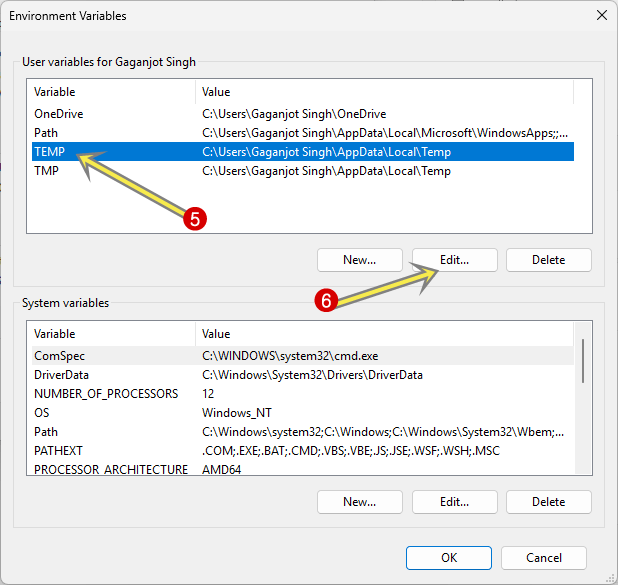
- After that, click on the Temp option and select it. Click on the Edit button.

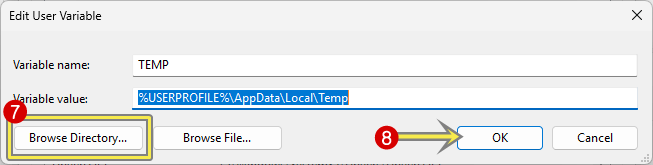
- Click on the Browser Directory button and select another drive and folder.
- After that, click on the OK button to apply the changes.

- Repeat the 3rd,4th, and 5th steps for the TMP option.
- That’s all.

Method 6. Enable Storage Sense (Automatic Cleanup)
Windows 11 includes a built-in feature called Storage Sense:
- Go to the Settings app using Windows key + I keyboard shortcut or from the Start menu.
- After that, click on the System option from the left navigation pane and select the Storage option from the right side.
- Enable Storage Sense.

- That’s it.

Configure it to automatically delete temporary files, recycle bin data, and downloads at intervals you prefer.
Frequently Asked Questions (FAQ)
1. Can you safely delete files in the Temp folder?
Yes, it is completely safe. The Temp folder is used to store temporary data that may be regenerated should the need arise. Windows and your programs create new temporary files automatically as needed, and there is no need to worry about deleting old files because they will not hurt your system or programs.
2. Why does the Temp folder keep filling up again?
Installations, browsing, updates, and the use of apps constantly create temporary files. Windows and programs will continue to create new temporary data even after cleanup. To avoid it getting full too quickly, you can turn on the Storage Sense feature in Windows 11 to have temporary files automatically removed on a schedule.
3. How often should I clear the Temp folder?
You should also make it a habit to clean up the Temp folder at least every two to four weeks unless you rarely use your PC. Cleaning it once a week may be useful to heavy users (those who edit their videos, who install/uninstall software frequently, or who test applications frequently).
4. Will deleting Temp files speed up my computer?
In many cases, yes. An overloaded Temp folder may slow down system operations, create delays when installing programs, and may even disrupt system updates. Extraction can free disk space and help enhance system responsiveness and stability.
5. What is the difference between the Temp folder and the Cache files?
Both are temporary, but cache files are generated to accelerate the load time by storing information so that it can be accessed quickly (e.g., browser cache). The Temp is more universal and can be used by Windows and applications to perform temporary activities such as installations and updates.
6. How much space can I free by cleaning the Temp folder?
It can be any size, ranging widely from hundreds of megabytes to tens of gigabytes, particularly when you do not purge it for a while or when you have a recent major update of an operating system, such as Windows 11.
7. What is the best method to clear Temp files?
All the methods work, however, with the majority of users:
- The safest and easiest is the Disk Cleanup Tool or Storage Sense.
- Manual deletion is fastest if you’re comfortable navigating folders.
- Power users may prefer Command Prompt cleanup commands for quick results.
8. Can I move the Temp folder to another drive?
Yes, you can. It also helps to transfer the Temp folder to a new drive with a bigger capacity in case your system (C:) drive is small. You can do this from System Properties → Advanced → Environment Variables, and change the paths for TEMP and TMP to a different drive.
Final Words
I hope this guide helps you learn how to fix the low disk space error due to a full temp folder. Having a full Temp folder might appear as a minor inconvenience, but it can easily grow to become a performance issue, broken updates, and constant low disk space alerts in Windows 11. You can avoid repeating the problem by regularly deleting temporary files and using tools such as Storage Sense. To provide a longer-term solution, moving the Temp folder to a second partition or drive can also be a clever solution for users with smaller drives.
Decluttering your Temp folder not only keeps your computer running more smoothly but also prolongs the service of the storage drive. All you need is the above methods, and you should have all the space to play in a Windows 11 that is clutter-free.
Popular on OTW Right Now!


About The Author
Gagan Bhangu
Founder of otechworld.com and managing editor. He is a tech geek, web-developer, and blogger. He holds a master's degree in computer applications and making money online since 2015.