How I Turn Static Images Into Short AI Videos Without Making the Workflow Complicated
I used to treat a single image as the final asset. A product photo, a character concept, a poster, a travel shot, or a social media graphic would sit there until I needed to crop it, caption it, or place it into another layout. That changed once I started testing modern image-to-video tools for quick creative work.
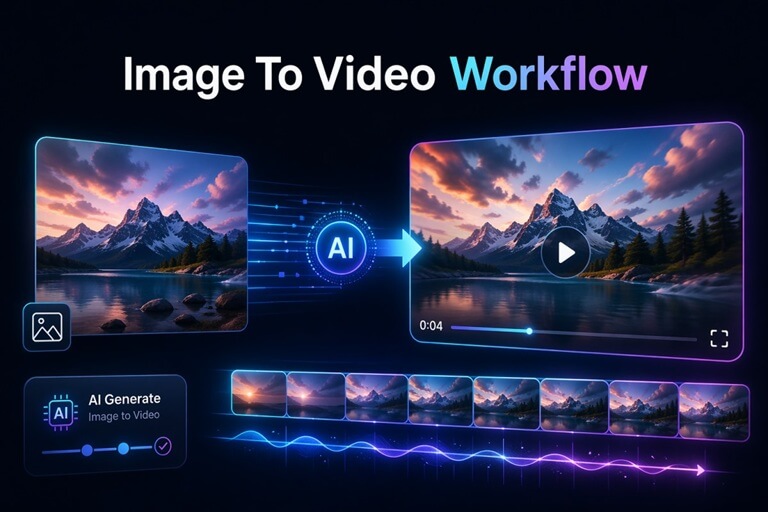
The interesting part is not that AI can “animate a picture.” That phrase sounds simple, almost too simple. The real value is that a still image can now become a short scene with camera movement, depth, mood, and a sense of direction. For creators, marketers, bloggers, and small business owners, this removes a lot of friction from video production.
I have tested this workflow on product shots, AI-generated art, old campaign graphics, and a few rough concept images. Some results were excellent. Some looked strange. The difference usually came down to how I prepared the image and how specific I was with the motion direction.
Why Static Images Are No Longer Enough
The use of static images is still suitable in blog posts, thumbnails, product pages, and social media. But nowadays, people scroll more than ever. A simple picture usually requires more force of composition, improvement of copy, or a well-known brand to halt a person.
A slight advantage is given to short videos here. Even a simple zoom, slow pan, or even subtle background change can make the same image feel more alive. I observed this when experimenting with old graphics that had already been good posts. When I converted some of them into single-motion video clips, they felt like they belonged more on reels, short videos, landing pages, and paid advertising tests.
It was not necessary that the picture had to turn into a complete movie. It simply had to shift sufficiently in order to be noticed.
What Worked Best In My Tests
Not all pictures are a good place to start. Clear and sharp pictures tend to perform well compared to congested pictures. When there is already a clear subject in an image, there is less to misinterpret by AI.
Here is the simple checklist I now use before generating a clip:
| Image Type | Works Well? | My Notes |
| Product photo with a clean background | Yes | Great for slow zooms and showcase clips |
| Portrait or character image | Yes | Works best when the face and body are not cut off badly |
| Busy collage or poster | Sometimes | Text and tiny elements may distort |
| Landscape or travel image | Yes | Good for camera movement and atmosphere |
| Screenshot or UI image | Not always | Motion can make interface details blurry |
The safest image is one that can have only one distinct subject, enough space in the background, and no small font that has to remain pristine.
The Prompt Matters More Than I Expected
Initially, I used such prompts as make this picture move or turn this into a cinematic video. Those prompts worked, but the results were inconsistent. The tool required too many guesses.
When I began to elaborate on camera and mood rather than merely state what the subject is, I began to get better results. As an example, I had a greater degree of control in this type of prompt:
Slow camera push-in, diffused cinematic lighting, slight background movement, prevent the main subject from moving, realistic movement, do not distort faces.
In the case of a product image, I took another turn:
Video showing products on display, camera moves slowly from left to right, good studio lighting, the slightest effect of depth, and retains the shape of the product.
Small details matter. Maintaining the main subject on a straight plane is particularly helpful when the picture has a face, a logo, a product shape, or a character design. The AI would otherwise go ahead and introduce an excessive amount of motion and sever the part of the object you are actually interested in.
My Practical Workflow
I do not consider AI video generation a one-click wonder. I make it more of a fast draft system. Such an attitude ensures the expectations are realistic and the working process is more beneficial.
Here is the process I normally follow:
- Pick one strong image with a clear subject.
- Crop it to the target format before generating.
- Write a short motion prompt with camera direction.
- Generate one or two versions.
- Choose the version with the most stable subject.
- Add captions, music, or CTA text in a video editor if needed.
The step that comes last counts. I would hardly anticipate the clip created to contain all marketing copy or final typography. The fact of creating the motion first and then adding some text is cleaner. This also allows me greater control, and when the final video must be used in advertisements, social posts,s or even in a section of a landing page.
Where This Helps The Most
In my case, the most compelling use case is speed. I am able to shoot one good picture and make a bunch of short video directions without booking a shoot, opening a complicated editing timeline, or building a three-dimensional scene.
I have found it useful for:
- Converting product pictures to mere showcase video clips.
- Getting social media posts less lifeless.
- Proving various visual moods and then making a larger campaign.
- Developing brief background images for landing pages.
- Creating character or concept art generated by AI and putting it into motion.
This is not a substitute for professional video production when the project requires actors, dialogue, artistic direction of the project at a brand level, or exact frame-by-frame control. It does fill the gap between I only have an image and I need something that feels like a video.
Common Mistakes I Learned To Avoid
The greatest blunder is the request for excessive. When I requested a fast action, dramatic camera movement, changing expressions, moving hands, flying particles, and background transformation in a single prompt, the result was prone to being unstable.
It would be a more effective strategy to control a single or two things at a time. A slow push-in, using soft lighting, is safer than an elaborate action scene. A background shimmer is less hazardous than requesting the subject to walk, talk, and turn around.
The other error is that of using pictures with an excess of small writing. Video AI tools can retain the overall structure, but small letters will become obscured or moved. When there is a logo, interface, or headline in the image,e I would prefer to ensure that the movement is not too strong.
Why I Keep This Tool In My Creative Stack
I like tools that make production lighter without forcing me to change the whole workflow. That is why I keep GoEnhance AI in my testing stack when I need to turn images into short videos or explore quick creative variations.
It is even better that it is not just the last clip. The skill to experiment with ideas fast is what it is. A still image can be turned into a smooth cinematic shot, a product-style motion shot, a social post, or a visual sketch of a larger campaign. Such flexibility proves to be worthwhile in the event that deadlines are fast and budgets are tight.
Final Thoughts
The image-to-video tools of AI are not flawless, yet they are already helpful. The art lies in applying them in a realistic approach. Begin with a blank image. Provide explicit motion directions. Hold the subject steady. Get not too much of the present generation.
When used in this manner, one image becomes more than a two-dimensional asset. It allows a flexible baseline to start with short videos, creative testing, and quicker content creation. To the person who already has to deal with images on a daily basis, that is a workflow that is worth trying.
Popular on OTW Right Now!


About The Author
Gagan Bhangu
Founder of otechworld.com and managing editor. He is a tech geek, web-developer, and blogger. He holds a master's degree in computer applications and making money online since 2015.