Chrome Flags – How to Access, Enable, and List of Best Flags
You can enable and use flags in the Google Chrome browser on your PC (Windows, Mac, Chrome OS, and Linux) and Android. Here is how to access, enable, and use Chrome Flags for PC to get more features and enhance your browsing experience.
When it comes to the best web browser, Google Chrome is the first choice for most people. It comes with tons of features that give you an amazing browsing experience. Well, some of its features are hidden in flags and settings. Every tech geek loves to find and use hidden features.
No doubt, a Web Browser is a must-have software or app on a PC and smartphone to access the internet. The web browser allows us to access websites and web pages.
Google Chrome is one of the best, most popular, fast, most secure, and powerful browsers for PC and smartphone users.
Chrome app is pre-installed on Android devices, so you don’t need to install it manually from Play Store. Recently, I’ve also shared how to use Chrome flags on Android. You can’t use extensions on Android, that’s why flags are most useful for Smartphone users.
Well, all web browsers offer basic features for browsing. If you are a normal user, you don’t need advanced features.
On Chrome, you can extend the features by installing extensions from the store. But, what if you don’t want to install extensions? The web browser also has some features that are hidden from normal users. You cannot access some features directly from settings. You can simply enable and use flags.
What are Chrome Flags?
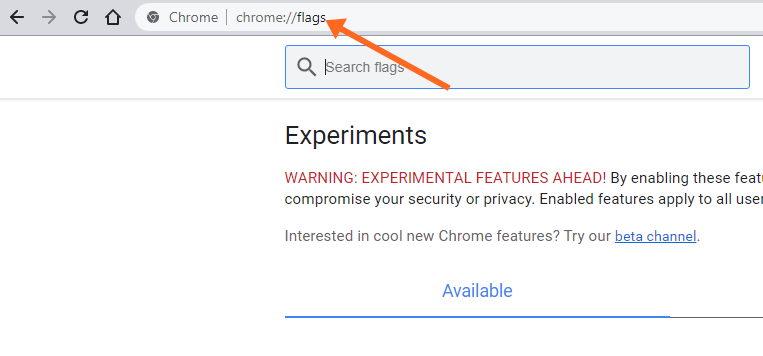
Chrome://flags are experimental features that are under development. These features are not enabled by default, and you can’t find them from settings. Because these settings are completely hidden and can be accessible by typing chrome://flags in the Omnibox. This works on both Windows and Mac versions.
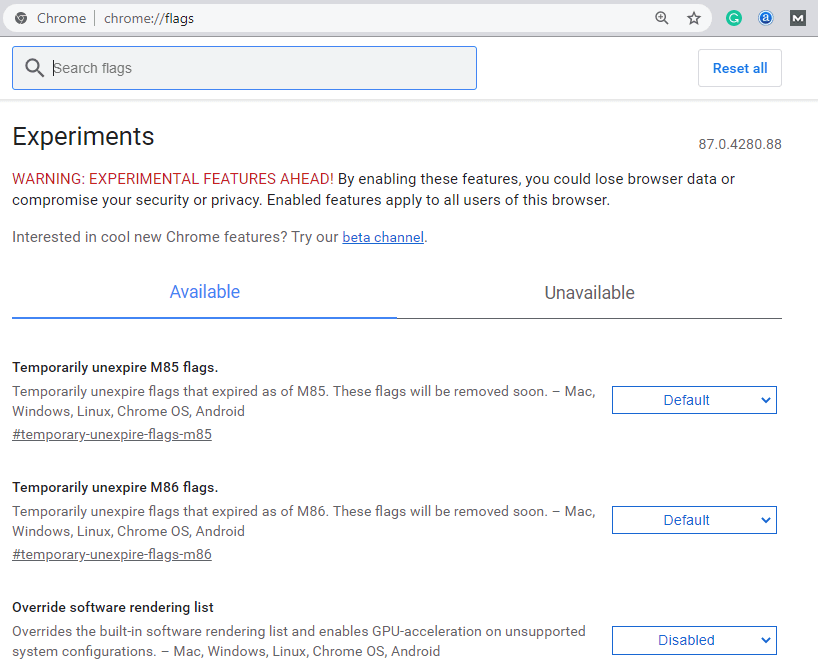
You can add additional features using flags that allow you to improve your browsing experience and performance.
However, in-development features are unstable. But, some stable flags are enabled by default.
Google added new features in the Chrome browser regularly, and developers continuously make changes in in-development features. That’s why flags (in-development features) may remove by developers at any time. Moreover, you can see the constant changes in it.
If you are a Chrome user, you should know that there are two ways to use these features before enabled for normal users. You can either use Chrome Beta or Chrome Flags.
You can download the beta version from www.google.com/chrome/beta/. The beta version is updated weekly and you can preview new features. Moreover, you can give your feedback.
If you don’t want to install the Beta version and want to use new and experimental features in the normal and stable version, you can enable flags.
Note: Chrome flags are unstable and experimental features, thus affecting program functionality. You may need to compromise your security and privacy by enabling the flags. Also, you may lose (rare chances) your browsing data like history, cookies, and cache. Also, note that the browser may crash or shows some errors after enabling it. But, you can reset and disable the flags at any time.
Read Also – Best Edge Flags
How to Enable Chrome Flags on Windows and Mac?
To enable the Chrome flags, you need to open the flags menu which is hidden by default. The steps are given below to open the menu. Also, note that the steps are the same for Chrome for Windows and Mac OS.
Steps to access the menu:
- Open Chrome browser on Windows or Mac machine.
- Click on the address bar (Omnibox) and type chrome://flags or about://flags in the address bar. Press the enter key.

- You’ll see the menu screen with the list of functions.
After opening the Menu, Chrome shows the Warning message “By enabling these features, you could lose browser data or compromise your security or privacy. Enabled features apply to all users of this browser.” on the top.
On the menu page, you’ll see the Available and Unavailable tabs. By default, the Available tab will be opened and shows the features that are available for your PC or platform. On the Unavailable tab, you‘ll see the features that are not available on your platform due to hardware or other limitations. You can’t enable anything from the unavailable tab.
Steps to Enable and Disable the Flags:
- After opening the menu, you’ll see the all functions that you can enable or disable.
- Find the feature/function by scrolling or searching.
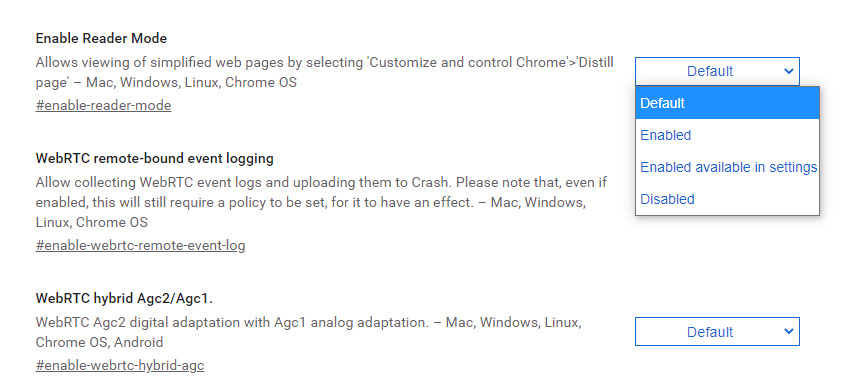
- On the right-hand side of the function, you’ll see the drop-down menu button to change the state. By default, the button is at the “Default” or “Disabled” state. You can click on the “Enabled” button to enable the feature or function.

- After selecting the Enabled or Disabled option, the browser shows the “Relaunch” button. Click on it to restart the browser to see the changes.
Now, you know to enable and disable these additional functions. Well, there are chances you face some problems. You can simply disable the enabled flag that causes the problem. But, in case you forget about which function you enable, then you need to reset the flags.
Open the menu and click on the “Reset All” button from the top right and relaunch the browser. This will reset all functions to their original and default state.
Best Chrome Flags to Enable on PC
You’ll see more than two hundred functions in the menu to extend Chrome functionality. You can find the best and most suitable functions for yourself. But, few functions are useful that everyone can use. So, the list is given below.
Let’s get started.
1. Enable Reader Mode
Nowadays most websites and web pages are loaded with a lot of ads and pop-ups. However, ads are necessary to run any website. But, too many ads and popups put disturbance while reading. So, it may be hard to read the posts from an annoying web page.
So, you can view simplified web pages by enabling this function. On a simplified web page, there will not be any ads, pop up, or banners. Moreover, you can change the text color, background, and fonts. This will increase your reading experience.
#enable-reader-mode
2. Quieter notification permission prompts
Nowadays, every website and blog uses a web push notification service. When you open any web page, it prompts the notification dialog box to enable the service. If you’re fed up with the unwanted dialog box, you can use this function.
By Enabling Quieter notification permission prompts, the modal dialog is replaced with the quieter version for the website that wants to show notifications.
#quiet-notification-prompts
3. Show Autofill predictions
While filling out the web forms online, you need to enter your basic information again and again in the fields. However, browsers are smart enough to save your information while filling out the form, and the next time shows the prediction.
But, when you enable the Show Autofill predictions, it annotates the forms with autofill field type predictions as placeholder text.
So, it can autofill your name, phone number, email, address, and other details automatically. You just need to verify your information.
#show-autofill-type-predictions
4. Parallel downloading
Are you regularly download the files on your PC? Well, if yes, then you should enable this flag. This will increase and accelerate the download speed.
Most PC users use IDM (Internet Download Manager) app to accelerate the download speed. You may be happy to know that, this flag or function works as same as IDM.
It split or breaks down the single file into multiple chunks/parts and downloads all parts simultaneously. While downloading, all parts are saved temporarily. In the end, it joined the file into a single one.
#enable-parallel-downloading
5. Enable lazy image loading
This is the best function to save data or bandwidth. A single web page contains HTML, CSS files, JavaScript files, and images. By default, when you open any web page, the browser loads all files from the server. Well, images use more bandwidth, if a web page contains more images.
So, Enable lazy image loading function defers the offscreen images until the page scrolls down to the near them. The browser loads the images when you scroll.
It helps to increase the web page load speed and save your data. It also helps to reduce the server load.
Nowadays, most of the blogs and websites enabled this feature from the server end. But, you can enable this feature for all websites from your Chrome browser.
#enable-lazy-image-loading
6. Heavy Ad Intervention
Showing ads is the most common way of generating revenue from websites. But, if the website/web page shows a lot of ads, it affects the user browsing experience.
A web page with heavy ads takes more time to load and uses too many PC resources. That’s why you may see lag while scrolling.
So, you can use the Heavy Ad Intervention function to unload the ads that use too many PC resources. This will help to improve your browsing experience.
Note that, the function doesn’t unload all ads. It just unloads the ads that eat up too many resources. However, you can install extensions to block the ads.
#enable-heavy-ad-intervention
7. AutoDark Mode for Web Contents
Now using Auto Dark Mode for Web Contents flag, you can render all web contents using a dark theme. So, you can view the web pages in the dark theme.
You can also change the browser theme color from the appearance settings. But, this function is different. The browser theme changes the UI color. But, this function changes the web content theme.
It helps to reduce eye strain while reading the content at night on a PC. You can also enable “Web Platform Controls Dark Mode” to render forms controls and scrollbars with a dark theme.
#enable-force-dark
8. Read Later
Read Later enables the new functionality of the browser. By default, you can save a tab or link by bookmarking the page. But, it allows you to save tabs for later.
After enabling, a new button and menu will be added to Chrome. You can save any tab by clicking on the Read Later button. Also, you can access your saved tabs from the menu.
#read-later
9. Enable sharing page via QR Code
You can easily share web page URLs on the internet. But, it is difficult to share long URLs on newspapers, posters, or anywhere else from where users need to type the URL manually.
So, you can use the “Enable sharing page via QR Code” function to generate a QR code to share the web page URL. You can download the QR code and send it to anyone or print it on paper.
The user can open the URL by scanning the QR code from a Smartphone or PC.
#sharing-qr-code-generator
10. Latest stable JavaScript features
Mostly all websites use JavaScript. It is a programming language that makes web pages interactive and allows to add of more functionality.
Some websites use legacy or non-standard JS extensions that conflict with the latest JS. This function disables the support of non-standard JavaScript and enables new and stable JS features.
#disable-javascript-harmony-shipping
11. NoScript Previews
A normal web page contains many files i.e. HTML, CSS, JavaScript, images, and others. Corrupted & poorly coded JavaScript files, or on a slow internet can affect your experience. The browser may lag or crash due to faulty JS.
So, if you have a slow internet connection or think that the website uses malicious JavaScript, you can enable “NoScript Previews” to turn off or disable the JavaScript on some web pages.
#enable-noscript-previews
12. Smooth Scrolling
A web page can lag while scrolling due to many reasons. When you open a web page that holds too much content, you may face a scroll lag issue.
If you face any issue while scrolling page content, you should enable a smooth scrolling function or flag. It gives you a smooth scrolling experience.
#smooth-scrolling
13. Run Video Capture Service in Browser
By enabling this flag, you can run a video capture service in the browser using API. So, you can record videos in a browser.
The capture service will run in the Chrome browser services. You can see the service in the task manager by pressing Shift + Esc from the keyboard. The function is available only for Windows platforms.
#run-video-capture-service-in-browser
14. Previews Allowed
On the internet, links with false anchor text may lead you to malicious websites. Previews Allowed functions can prevent you from clicking on those links.
Well, after enabling it, you’ll see the web page thumbnail when you hover the mouse on the link. However, it may consume your data but prevent you from going to the wrong page.
The function can also be used as a kill switch to turn off all preview types.
#allow-previews
15. Hardware-accelerated Video
You can see the high CPU usage in the task manager when you play the video and play the games on the web. You can reduce CPU usage by enabling the Hardware-accelerated Video function. This will also reduce the CPU power.
This flag forces the Graphic/Video card to encode or decode the video. You can enable/disable the function separately for both encode or decode the video. Well, both functions increase the encoding and decoding performance in H.264 AVC and HEVC codecs.
#disable-accelerated-video-decode
#disable-accelerated-video-encode
16. Fill Passwords on Account selection
This will enable filling the passwords when the account is selected by the user rather than auto-filling credential on page load.
This will help you when you use multiple accounts for the same website or service. You can select the account for login. After selecting the account, the browser fills in the password automatically.
#fill-on-account-select
17. Password Import
Google Chrome already offered export password functionality. But, if you want to import the passwords from other services, you need to enable Password Import.
If you came from another web browser, at first, you may need to import your existing passwords. So, with this function, you can add your existing password to Chrome safely.
After enabling, open Settings > Passwords > More options (three dots) from the saved password, and open the “Import Password” option from the context menu.
#PasswordImport
18. Treat risky downloads over insecure connections
If your PC is used by someone who doesn’t have much knowledge about the internet, you can use the “Treat risky downloads over insecure connections as active mixed content” function. This will prevent downloads of unsafe files.
Unsafe files are those files that can execute and may be harmful to your device. It also blocks downloads from an insecure origin.
Nowadays, it is common that some websites to show pop-ups and force us to download malicious software. Some people accidentally click on the download button and malicious software can run automatically.
#treat-unsafe-downloads-as-active-content
19. Tab Groups
While browsing and working online, everyone opens multiple tabs in the browser. For some users, it may hard to find a specific tab. So, the Tab Group flag can solve your problem.
It allows us to organize tabs into visually distinct groups, and we can set a specific color for each group.
You can also use Tab Groups Auto-Create, Collapse, and Collapse Freezing functions. Auto-create automatically creates groups for users. And Collapse allows a tab group to be collapsible and expandable.
#tab-groups
20. Tab Hover Cards
By default, Chrome uses a tooltip for tabs. When you open multiple tabs, you can’t see the tab titles. You need to hover the mouse on any tab and Chrome shows the tooltip with the web page title.
Tab Hover Cards replace tooltips for tabs and show the popup cards with tab information when you hover the mouse on the tabs.
You can also enable “Tab Hover Card Images” to see the preview image in the tab hover cards.
#tab-hover-cards
21. Pull-to-refresh Gesture
Well, the Pull-to-refresh gesture is most commonly used on smartphones while browsing the internet. Now it comes to Laptop users.
Now you can refresh or reload the web page by swiping down on the trackpad.
#pull-to-refresh
22. Enable Media Feeds
Some websites offer media feed features and recommend videos to the users. Now the feature is also offered by Chrome browser too. So, you can enable the media feeds option to fetch the media feeds from websites that provided this feature.
You can also fetch the feeds in the background also.
#enable-media-feeds
23. Edit Passwords in Settings
Google allows you to keep your passwords safe in your Google account. You can access and make the changes in your password by opening the passwords.google.com URL.
This flag allows you to edit the passwords directly in Chrome settings. You must be logged in to your Google account to use this feature.
So, you don’t need to open the passwords.google.com URL to make the changes in passwords.
#edit-passwords-in-settings
24. Enable Media History
By default, Chrome stores browsing history. This will help you to find the web pages you opened recently.
If you regularly play multimedia files (music, podcasts, and videos), you can use the Enable Media History function. This will record your media playbacks.
So, you can see the history of media files played on the browser anytime.
#media-history
25. Passwords weakness check
When it comes to online security, passwords are the most important thing. Weak passwords lead to security risks and are guessed by executing a brute-force attack. So, you always need to use a strong password.
This function enables checking passwords for weaknesses. After enabling this function, go to Settings > Passwords and click on the check passwords. Chrome will warn you if any weak passwords are found.
#passwords-weakness-check
26. Enable Incognito Desktop Shortcut
Incognito mode allows you to browse privately. Chrome won’t save your browsing history, cookies, site data, and the information you entered in forms.
By default, you can open a new incognito window on Chrome by pressing Ctrl + Shift + N or by clicking on the three dots (Customize and control Google Chrome) from the top right of the window.
With this Chrome flag, you can create the shortcut to open an incognito window directly.
#enable-incognito-shortcut-on-desktop
27. Use the Windows OS spell checker
Windows 10 OS offers language packs and you can add/install any language from the settings. Each language pack comes with a spell-checker tool.
Now, you can enable and use the Windows OS spell checker tool in Chrome. Currently, the feature is in the testing phase, but, you can use it by enabling it from Chrome flags.
#win-use-native-spellchecker
28. Treat Force color profile
This function forces the Google Chrome browser to use a specific color profile. It prevents the color specified by the OS and current monitor.
The available color profile are – sRGB, Display P3 D65, Color spin with gamma 2.4, scRGB Linear (HDR where available), and HDR10 (HDR where available). Note that, after selecting the profile, you’ll see all web pages in the selected color profile.
#force-color-profile
29. PDF Viewer Update
Chrome browser comes with an inbuilt PDF viewer. However, there are limited features in it, but, you can add more by updating it.
To use the updated viewer version, you need to enable the PDF Viewer Update function. After that, you’ll see the new updated UI, features, and options in the inbuilt PDF Viewer.
#pdf-viewer-update
30. Copy Link To Text
This is an amazing feature by Chrome. Now you can copy a link to the page with the selected highlighted text. Now, you don’t need to install any extension to use this feature.
When you enable the Copy Link to Text, you’ll see the new option in the right-click context menu. After that, when you select the text and click on the option, the link will be copied.
So, when the recipient or you open the link, the browser will scroll the selected text and highlight it in view.
#copy-link-to-text
31. Experimental QUIC protocol
Chrome Flag QUIC (Quick UDP Internet Connection) is an experimental and new encrypted transport layer network protocol. It supports set multiplexed connections over UDP.
It is a low-latency transportation protocol that makes HTTP traffic faster. So, you can increase your browsing speed.
#enable-quic
32. Global Media Controls
You can add global media controls UI on the toolbar to control the media playback and allows you to play, pause, forward, backward, and change track options. The modern UI is also rolled out by Google.
You can also use media controls cast and picture-in-picture. You’ll see the controls on the top right of the browser.
#global-media-controls-modern-ui
Chrome Settings Vs Chrome Flags
Chrome settings and Chrome flags are different. Settings allow the users to customize the browser features. On the other hand, Flags allow the users to activate or deactivate experimental features.
You can access the Chrome settings by type chrome://settings/ URL in Omnibox. Alternatively, click on the Customise and control Google Chrome (three dots) icon from the top right of the browser and select Settings option from the list.
Frequently Asked Questions
1. Is it safe to use Chrome Flags?
Well, flags are safe to use, but you could lose your browsing data. You may face some errors because these features are under-development. If you are worried about your privacy and security, stay away from that.
2. I forgot flags enabled by me, what to do?
Enabled too many flags may lead to unexpected errors. So, you need to disable all features enabled by you. You can reset all flags at once. Open Chrome://flags and click on the Reset All button. That’s it.
3. Are some features affect performance?
Yes, some experimental features can decrease browser performance. For example, you can see the lag by turning on the force color profile.
Final Words
Now you know the best Chrome Flags to enable. Official beta and experimental features are added in flags. But, you can also try the Beta Version to get more under-development features.
Well, you know that you can add additional functionality to Chrome with extensions and flags. There are more than two hundred flags available on the menu. I’ve listed the best 30 that you can try.
Also, note that these features are not stable. Chrome developers team regularly make changes in all experimental features. That’s why you can see frequent changes in the menu. You may face some errors after enabling too many functions. But, the reset option will help to solve your problem.



my google screen is invisible after using forced colors, have to access this site via bing. tried uninstalling and reinstalling but still invisible. how do I fix this? thanks