C Drive Full? The Anxious User’s Complete Guide to Safely Extend It
When you open the file explorer, you will see a terrible red bar on the C drive. Even worse, when you attempt to save valuable files or do updates, Windows occasionally alerts that you are using Low Disk Space. The heart is pounding. You may delete a file, empty the recycle bin, and run a disk cleanup, but the red bar will still appear. You are not alone. The problem is being experienced by many Windows users. The consideration of expandingthe C drive in Windows 11 or new versions is terrifying. This guide is different. Rather than being fast, be slow and steady with a focus on safety. At the conclusion of the reading, you will be assured of the proper and safe method of extending the C drive space, even when a straightforward method fails.

Phase 1: Safety First – The Unbreakable Rules
You should make sure to take precautions before any changes are made to your C drive. Drive expansion might appear risky. This is more so when you fear losing valuable documents. This step will be oriented on data protection, data backup, and establishing a secure environment. This gives you confidence in how to safely extend your C drive.
Rule #1: Your Data is Sacred. Rule #2: See Rule #1
Before manipulating the partition, keep this in mind: Files are paramount. Expansion of the C drive is a safe operation, although without proper precautions, errors are bound to be made.
Step 1: Backup Critical Files
Move necessary files, documents, and photos to the external USB disks or other cloud storage options like the OneDrive or Google Drive.
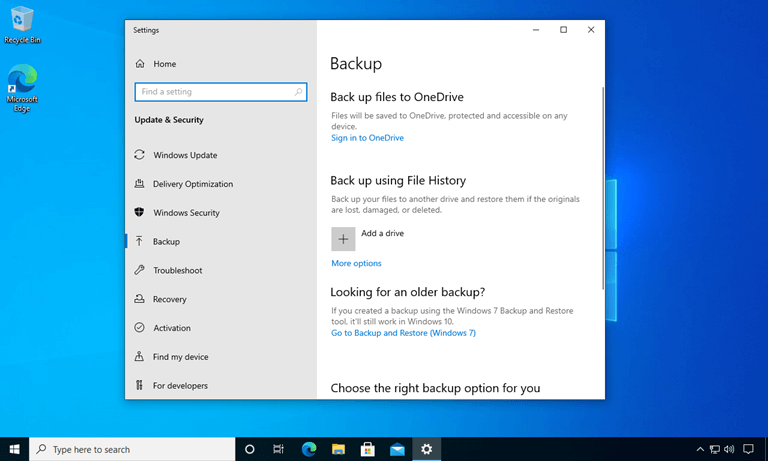
Step 2: Create a Full System Backup (Recommended)
Windows allows you to create a complete system image:
- Press Win + S and type “Create system image.”
- Select destination (external drive recommended).
- Follow the wizard to create a complete snapshot of the system.
This backup acts as the “Undo” button. You can restore everything to its original state even if a problem occurs.

Why This Matters:
Backups are not to be left out. A backup provides you with the feeling of being safe, and you can even experiment with the way you can extend the C drive.
Phase 2: Diagnosis – Understanding Your Specific Puzzle
One should be aware of the disk format prior to increasing the C drive. Check all Partitions and free space in Open Disk Management. As can be observed by many users, the Extend Volume option is not allowed due to the inappropriateness of the unallocated area location. This phase will identify your situation and plan the safest way to extend the C-drive area.
Why is “Extend Volume” Greyed Out? Let’s Find Your Scenario
Open Disk Management (Win + X> Disk Management). Other partitions, such as C Drive (probably Disk 0) and D: are visually displayed.
Simple guidelines on extending C drives: the space is to be unallocated directly right of the C drive. Failure to achieve this enables the gray-out of the “Extend Volume” option. This is the reason why C drives could not be extended by many users.
Common Disk Layout Scenarios:
- Scenario A: Unallocated Space Right After C: Ideal but rare case. Here, you may expand the C drive directly using Windows Disk Management.
- Scenario B: Another Partition Between C and Free Space: General case. The D drive comes in between the C drive and the unassigned area. Windows do not support the movement of D drives and hence it is difficult to expand C drives out of D drives or unallocated space.
- Scenario C: Dynamic Disk: When the disk is not basic, but is dynamic, then the normal method of extension fails. You need a dedicated tool.
Key Takeaway:
In order to fix scenario B, you should resize the D drive and shift this unallocated space beside the C drive. Windows cannot do this alone. You require a visual and secure partitioning device.
Phase 3: The Solution – A Safe, Visual Approach
Since Windows Disk Management cannot move partitions, you need tools that visually display the entire disk and handle operations safely. 4DDiG Partition Manager is a reliable choice to convert abstract disk diagrams into clear interactive views. All partitions, all free space, and all unassigned blocks can be viewed at a glance. The most significant in this job is the Resize/Move Partition, with which you can safely reduce, move and expand the drive and fix the greyed Extend Volume problem. It operates step by step without tampering with files and systems.
Key Features of 4DDiG Partition Manager:
- Visual Disk Layout: This shows all the partitions, unassigned space, and free space in a clear, interactive bar to enable comprehension and ensure planning is secured.
- Resize/move partitions: Reduce or move partitions and create unassigned areas next to C: drives for seamless expansion.
- Secure execution queues: Preview operations, then execute them sequentially so that the possibilities of errors and data loss are reduced.
- Compatible with all scenarios: Managing simple layout to complex layout D: Relocation without breaking Windows of a drive or other drive.
- Nondestructive operation: Preserve the integrity of all files and systems during the process of resizing and task mobility, assuring anxious users that everything is safe.
Step-by-Step Workflow
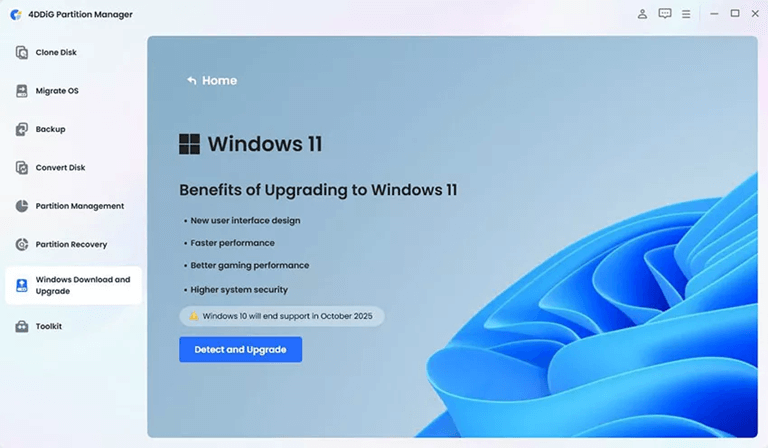
Step 1: Download and open 4DDiG Partition Manager. Go to the Windows Download and Upgrade section, then select Windows 11 Upgrade from the options.

Step 2: Check if your PC meets the basic system requirements by clicking the Detect and Upgrade button.
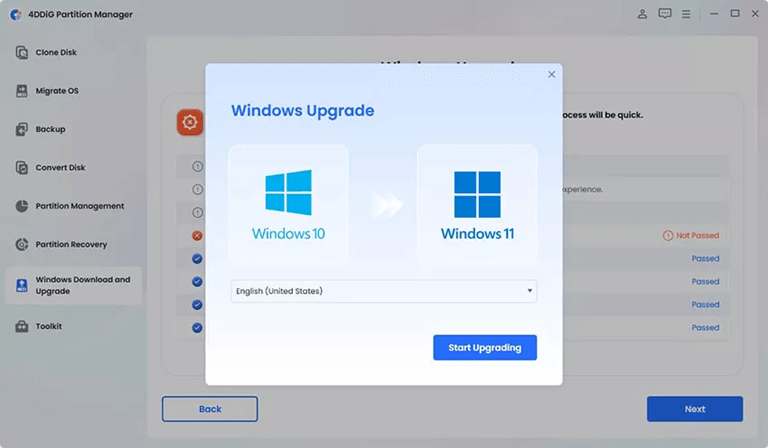
Step 3: You’ll now see a report showing whether your computer supports Windows 11. If it doesn’t meet the requirements (like TPM 2.0 or CPU), just click Next to continue and bypass the checks.

Step 4: Select your preferred language and region, then click Start Upgrading. When asked for confirmation, click Sure to proceed with the upgrade.
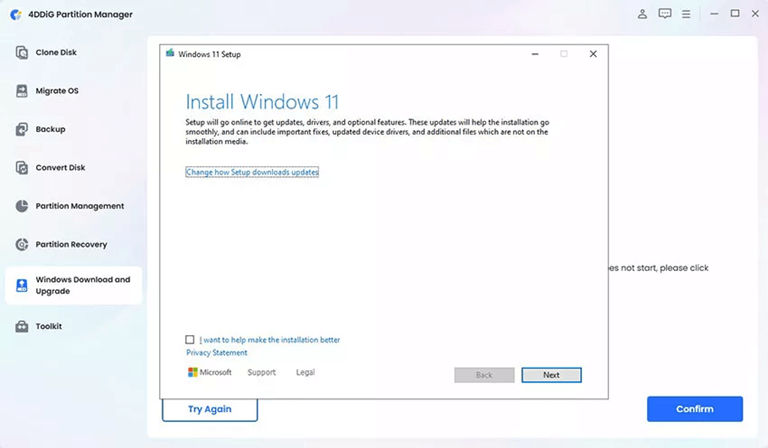
Step 5: The tool will now bypass windows 11 CPU requirements. This may take a few minutes wait until the process finishes.
Reassurance: This tool is non-destructive. Prevents impossible movement and ensures that the system is fully maintained.
Phase 4: Execution & Verification – The Confidence Boost
Once the disk is ready, and the unallocated area is relocated beside the C: drive, then you should alter the disk. During this step we will demonstrate how you can secure the application of the expansion safely and also ensure that you have increased space in your C drive.
Click “Apply” and Breathe
On clicking on the Apply button, the tool shows the progress bar: shrink D:, move unallocated areas, and extend C:. Depending on the size of the disk, it can take several minutes. This does not render the system risky.
Verify the Results
After completion:
- Open File Explorer. The C drive bar needs to be longer, and most of them ought to be blue (free space increase.
- Check Disk Management. C: The drive takes up a new location, and the D: drive is safely shrunk.
Celebrate success:
I got to know how to expand the C drive without any concern. The system is put into better operation and the files are completely secured.
Optional safety confirmation:
Backup made in Phase 1 can be used in case of necessity. You will be able to have full peace of mind.
Additional Tips for C Drive Management
It is important to stay healthy after expanding the C drive. Here are some practical tips:
- Regular cleanup: Delete temporary files in disk cleanup.
- Move large files: Save photos, videos, and download files to a D or external drive.
- Free space monitoring: Periodically check the C drive to prevent the occurrence of red bars.
- Leverage Cloud Storage: Occasionally, make a check on the C drive so that red bars are not created.
Common Questions About Extending C Drive
Q1: Can I extend the C drive from another disk?
Yes, it is possible. But you are forced to transfer or relocate disks between disks. Maintaining consistency in the process is safe and the data is stored with the help of reliable tools such as 4DDiG.
Q2: Can I extend the C drive without losing data?
Yes, it is possible. Use a trusted partition tool and create a backup in advance to safely extend your C drive without losing data. This protects files throughout the process.
Q3: Why does Windows not allow extending the C drive?
Windows only supports extensions where there is space that is not allocated to the drive right after the C drive. In case there is another partition in between, like the D drive, the disk management will not allow the extension of the drive and will leave the option grayed out.
Q4: Can I extend the C drive in Windows 11?
Yes, you can extend your C drive on Windows 11. The interface has minor differences with Windows 10, and with the visual tools such as 4DDiG, it is easy, secure, and simple to execute.
Conclusion
Lack of C drive capacity will cause a feeling of being stressed; however, everything will be different when you know how to increase the C drive. Data backup, disk layout knowledge, and visual and good-faith tools can be used to expand C drives without interfering with file and system stability. It is an easy, manageable, and understandable process, even though it is a how to extend C drive to the D drive, to an unallocated area, or to another disk. Once this guide is followed, the system will have a bigger working area, will work better, and will be sure about the PC management. The feeling of security comes back, and the red bar goes away.
Popular on OTW Right Now!


About The Author
Gagan Bhangu
Founder of otechworld.com and managing editor. He is a tech geek, web-developer, and blogger. He holds a master's degree in computer applications and making money online since 2015.