How to Set an Alarm on Windows 11 Laptop or PC
Do you want to know how to set an alarm on Windows 11 laptop or PC?
The built-in Clock app allows us to set alarms in Windows 11. When it comes to Windows 10, the clock app provides the timer, alarm, stopwatch, and world clock options.
But Windows 11 provides the Clock app with some enhanced features as compared to Windows 10. Now it provides the Focus Sessions feature. When you turn on this feature, the operating system will turn off notifications and app alerts during the focus session.
However, the alarm is different from the focus sessions.

So, in this guide, I’ll show you how to set an alarm on a Windows 11 laptop or PC.
Why do you need to Set Alarm on Windows 11 Laptop or Computer?
However, most people use alarms on their smartphones, because mobile phones offer convenience and portability. But, setting alarms on a PC can provide better integration with your work environment, more customization, and reduced distractions.
So, it helps you manage time effectively without needing to switch devices.
Also, there are plenty of situations where PC alarms are useful, such as while working on projects (for deadlines and milestones related to long-term projects), break reminders (setting regular intervals for breaks), end-of-day notifications, and meeting reminders.
Note: The alarm will sound when your PC is awake.
How to Set Alarm in Windows 11
The steps are given below to set the alarm in Windows 11:
- Open the clock app on your PC or laptop. For this, type “Clock” (without quotes) in the search field on the taskbar or from the start menu, and click on the Clock app from the results.
Otherwise, you can open the Clock app from Start » All Apps » Clock.
- Now the clock app will be open. Click on the Alarm option from the left navigation pane.
- Click on the + (Add Alarm) icon from the bottom right of the screen, and you’ll see the popup to add a new alarm.

- After that, you can set the alarm:
Set the time: First, you need to set the alarm time.
Alarm Name (Optional): The second option is available to set the alarm name.
Repeat Alarm: You can enable this option and select the days to repeat the alarm.
Select Alarm Sound: From this option, you can select the alarm sound for the specific alarm.
Select Snooze Time: By default, the snooze time is 10 minutes. But you can disable or select the time as per your requirement.
- Click on the Save button, and that’s all.
Also Read: How to Turn off Background Data Usage in Windows 11
How to Edit Alarm in Windows 11
You can edit the existing alarms to change time, repeat days, sound, and snooze time. The steps are given below.
- Open the Clock app on your Windows PC or laptop using search or all apps.
- Click on the Alarm option, and you’ll see a list of all the alarms that have been added.
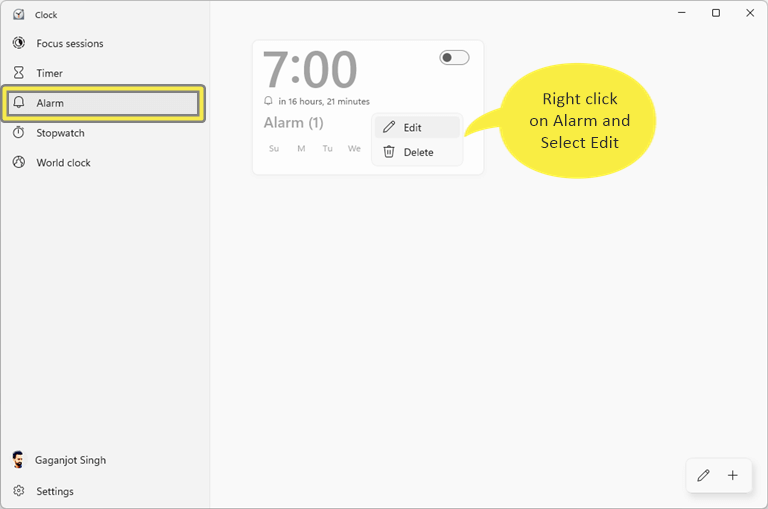
- Right-click on the alarm that you want to edit and click on the Edit option from the context menu.

- Now you can edit alarm time, alarm name, repeat alarm days, alarm sound, and snooze time.
- After that, click on the Save button.
How to Delete Alarm in Windows 11
However, the Clock app provides a toggle button to enable or disable the alarm. But you can also delete the alarm. The steps are given below.
- Open the Clock app on your Windows 11 device and click on the Alarm option from the left navigation pane.
- Right-click on the Alarm that you want to delete and select the Delete option from the context menu.

Alternatively, click on the pencil icon from the bottom right, and you’ll see the delete icon on all alarm cards. Just click on the delete icons to delete the alarms.
Final Words
I hope this article helped you know how to set and use an alarm on a Windows 11 laptop or PC. However, you can download third-party software for this task, but the built-in clock app is sufficient for most users. Moreover, you can use the focus sessions feature, which will alert you after a specific time.


