How to Reinstall Xbox Controller Drivers on Windows 11/10
Do you want to reinstall Xbox Controller Drivers on Windows 11/10?
Sometimes, you might be unable to play the games on your Windows 11/10 PC using an Xbox controller. The most common reasons for this are outdated or corrupted drivers.
However, the system automatically downloads and installs the latest version of the drivers. But, sometimes, updating might fail due to some reasons. And you face the issues because of this.
So, in this article, I’ll show you how to update and reinstall Xbox drivers on Windows PC.
What is the Xbox Controller for Windows PC?
The Xbox controller for PC is essentially the same as the Xbox Wireless Controller that is used with Xbox consoles. However, it is specifically designed to be compatible with Windows-based PCs, allowing users to play games on their computers using the familiar Xbox controller layout. It offers seamless compatibility with Windows operating systems.
The Xbox controller typically features a familiar layout with two thumbsticks, a directional pad (D-pad), four face buttons (A, B, X, and Y), two shoulder buttons (LB and RB), two triggers (LT and RT), and a central Xbox button that allows users to access the console’s menu system. The thumbsticks are used for controlling character movement and camera angles, while the buttons and triggers are used for various in-game actions.
The system requires the necessary drivers to use an Xbox controller on a Windows PC. When you connect your Xbox controller to your PC using a USB cable, Bluetooth, or the Xbox Wireless Adapter. Windows will typically recognize it automatically and install the necessary drivers.
However, you can also download the drivers from the Microsoft website.
Also read: 10 Best Xbox One and Xbox 360 Emulators for PC
Why you need to reinstall Xbox Drivers on Windows 11/10?
Sometimes the Xbox controller stops working for some reason. The main reasons are Outdated drivers, Installation errors while updating, Conflicting drivers (multiple drivers can conflict with each other), Hardware issues, Software conflicts (Certain software applications or security tools can interfere with driver operations.), and Corrupted or missing files (driver files become corrupted or are missing).
To solve or address driver issues, you need to update or reinstall the drivers.
How to Reinstall the Xbox Controller drivers on Windows 11/10
There are three ways to reinstall the Xbox controller drivers on Windows computers. These methods are given below.
Method 1. Uninstall and Reinstall Xbox Controller drivers
The steps are given below. Let’s get started.
- First, disconnect the Xbox Controller from your computer. Unplug the USB or wireless adapter, or turn off the Bluetooth.
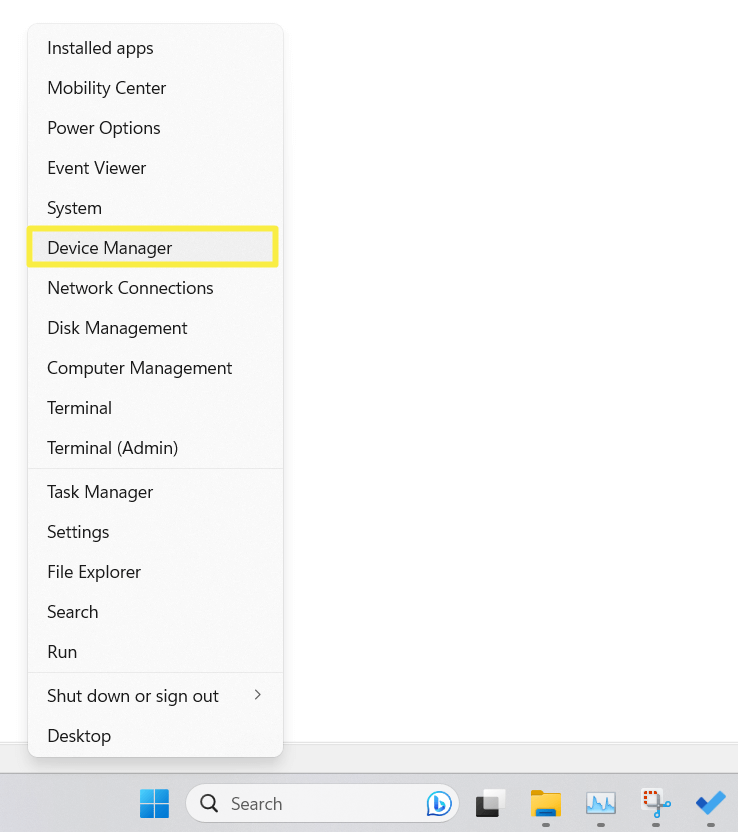
- Open “Device Manager” on your Windows computer. For this, right-click on the Start icon from the taskbar and select “Device Manager” from the list. Alternatively, you can press the Windows key + X keyboard shortcut.

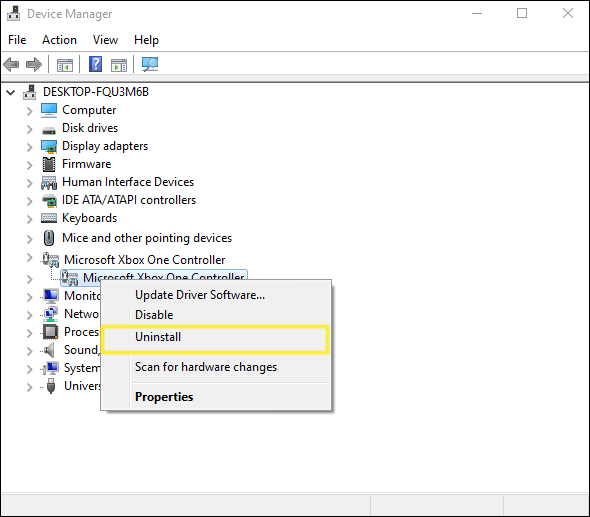
- Now you’ll see the list of all devices connected to your computer. Locate and expand the “Microsoft Xbox One Controller” from the list.
- After expanding, right-click on the “Microsoft Xbox One Controller” device and you’ll see the list of options.
- Click on the “Uninstall” option and you’ll see the confirmation popup window with the “Delete the driver software for this device” message.

- Click on OK to confirm.
- Now restart your computer. Click on the Start » Power icon » Restart.
- After restarting, connect the Xbox controller again using USB, Wireless adapter, or Bluetooth. And Windows will automatically install the drivers.
- That’s all.
Method 2. Update the Xbox Controller Drivers on Windows 11/10
However, Windows automatically updates all drivers. But you can also do this job manually. The steps are given below to update the Xbox Controller drivers manually. Let’s get started.
- Open Device Manager on your Windows computer. Press the Windows key + X and select “Device Manager” from the list of options. You can also access this option by right click on the Start icon.
- Now you’ll see the list of all connected devices. Locate and expand the “Microsoft Xbox One Controller”.
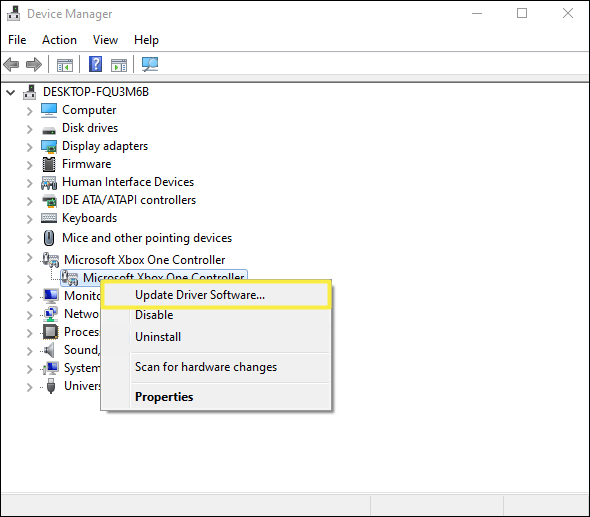
- After expanding, right-click on the “Microsoft Xbox One Controller” option and you’ll see the list of options.
- Select the “Update driver” option.

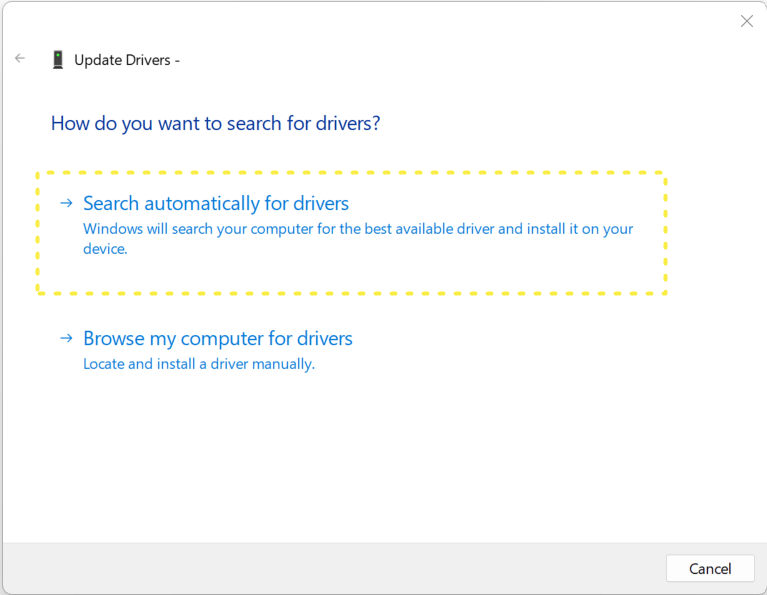
- After that, a popup window will be open. Click on the “Search automatically for drivers” option.

- Windows will automatically check and install the latest version of the drivers if available. If the update is not available, you’ll see the message “The best drivers for your device are already installed”.
- That’s all.
Method 3. Roll Back Xbox Controller Driver
Sometimes, the latest version of the drive creates problems. If your device fails after updating the driver, you can roll back to the previous version of the driver. This will reinstall the recent version and helps to solve the problems. The steps are given below.
- Go to Device Manager. To open it, press the Windows key + X from the keyboard and select Device Manager from the list.
- Locate and expand “Microsoft Xbox One Controller”. After that, double-click on the “Microsoft Xbox One Controller”. Alternatively, right-click and select the “Properties” option.
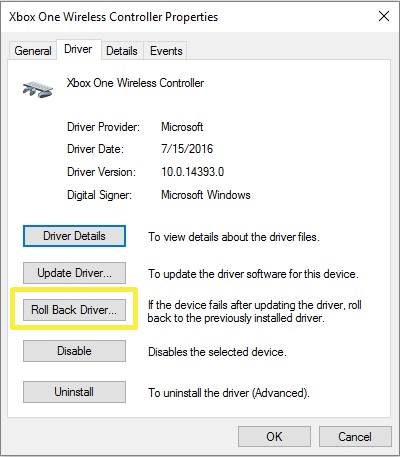
- The new popup window will be open. By default, the General tab will be open. Click on the “Driver” tab from the top.
- Now click on the “Roll Back driver” button. You’ll see the confirmation message. Click on Yes to proceed.

- The recent version of the driver will automatically be installed on your computer.
- That’s all.
Final Words
I hope this article helped you learn how to reinstall the Xbox controller drivers on your Windows 11/10 computer. I’ve also mentioned the steps to update the drivers. However, the reinstall and update process is different. In Reinstall, the drivers are uninstalled and then reinstalled. On the other hand, the drivers will only reinstall when the update is available.
