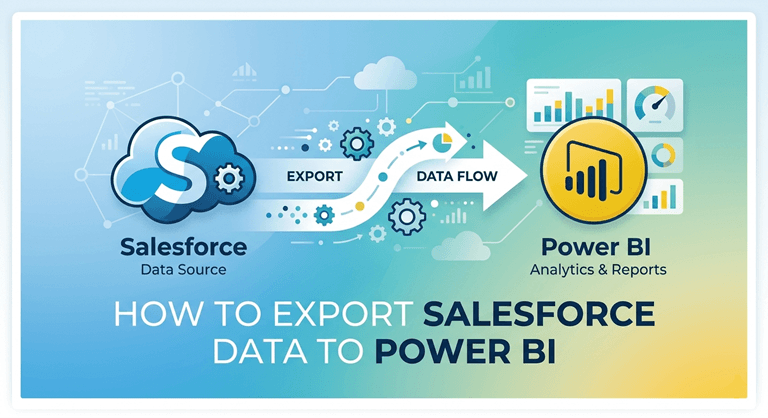
How to Export Salesforce Data to Power BI (Step-by-Step Guide)
Exporting Salesforce data to Power BI gives your team the reporting flexibility that Salesforce’s native tools do not. Instead of working around the limits of Salesforce reports and dashboards, you pull the data you need directly into Power BI and build from there. This guide walks through the full process using Power BI Connector for Salesforce, from installation to a live, refreshing dataset.
What Is Power BI Connector for Salesforce?
Power BI Connector for Salesforce is a native Salesforce AppExchange app that allows you to export Salesforce data directly into Power BI through a secure OData connection. You define which data to export inside Salesforce, and Power BI fetches it on each refresh through that connection.
The connector is completely based on Salesforce and therefore does not override your existing object and field permissions. Users can only view the data that they already have access to in Salesforce. No external server, no third-party middleware, and no manual data transfer. The app is built by a company that has a long history of creating enterprise-class Power BI connectors for complex business systems, Metrica Software.
What Salesforce Data Can You Export to Power BI?
Salesforce Objects & Fields
Power BI Connector for Salesforce exposes all standard and custom objects available in your Salesforce org, grouped by product area:
- Core objects: Account, Contact, Opportunity, Case, Lead, Task, and other commonly used standard objects
- Sales Cloud: Opportunities, Quotes, Products, Price Books
- Service Cloud: Cases, Entitlements, Service Contracts
- Marketing: Campaigns, Campaign Members, Leads
- Custom objects and installed apps: any custom object or object from an AppExchange package appears automatically in its own tab, no extra setup needed
You are allowed to select which fields you add to each object. No specific column set is enforced by the connector. The following types of fields are supported:
- Standard fields
- Custom fields
- Formula fields
- Lookup and relationship fields
The only restriction is what you have access to in Salesforce based on field-level access. Any field that can be seen on your profile in Salesforce will be exportable.
Filters & Record Scope
Filters allow you to specify which records will include data before it moves out of Salesforce. You can export only part of the objects. The most common filter options are:
- Enter the date range on Created Date or Last Modified Date. Enter the date range on the Created Date or the Last Modified Date.
- Record of the owner or assigned team.
- Whether it is in status, stage, or record type
- Any field value, Basic mode dropdown,s or more complex logic via SOQL.
Multiple Data Sources
You can create any number of data sources. Each is an independent export setting, which will be a separate dataset within Power BI. The general configuration is:
- Sales Pipeline 2026: Opportunities and Accounts filtered to open deals.
- Support Cases EMEA: Cases filtered by region and status.
- Marketing Leads Q2: Leads and Campaign Members for the current quarter.
Each dataset refreshes independently and can be shared with different users or teams.
How to Install Power BI Connector for Salesforce
Open the Power BI Connector for Salesforce listing on AppExchange.
Before installing, you can click Try it and choose Test Drive to explore the connector in a pre-configured Salesforce org with sample data. No installation required, no impact on your own org. It is the fastest way to see how data sources, access tokens, and the Power Query connection work before committing to a full setup.
When you are ready to install, click Get It Now, sign in, select your org, and click Install in Production. After installation, a one-time configuration is required inside Salesforce: a Connected App with OAuth settings, and Custom Settings with your Consumer Key and Site URL. A Salesforce Site is also needed as the OData endpoint. In most or all cases, gs one is already active, so you may only need to grant access to the metrica_powerbi.OAuthProxy class rather than creating a new site from scratch.
Full configuration steps are in the Installation Guide. Once complete, open the connector and click Authorize with Salesforce.
How to Create a Salesforce Data Source for Power BI
Go to Power BI Connector > Data Sources and click Create data source.
A data source is a configuration that can be used repeatedly to export data back to the data source. It contains your object selections, your Field Choices, and any filters you specify, and will be used by Power BI to write the script to export the data. Each data source is converted into a different data set in Power BI.
Step 1: Name Your Data Source
Name it so that you can remember it later. When lists get long, it’s easier to manage a list with a name like Opportunities Q2 2026 or Open Cases by Region.
Step 2: Select Salesforce Objects and Fields
Review the objects in Salesforce that you’re using in your report. They are displayed in Power BI Connector for Salesforce in separate tabs, individually for each product area, and they automatically appear in each tab, which is a custom object. If there are fields in an object that you don’t need, expand the object to see them and only select what the report requires.
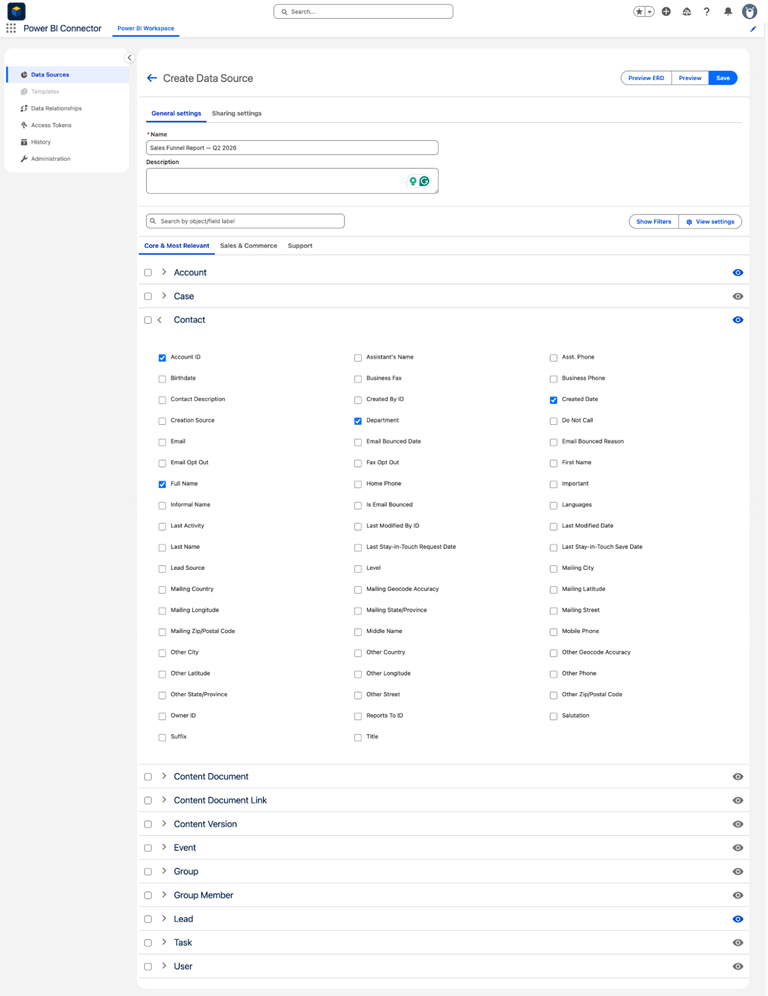
The export time has been directly affected by the field selection. There are 100+ fields that are normally associated with an object like Opportunity. If you only need Stage, Amount, CloseDate, AccountID,d and OwnerID, then you may only select those 5 items instead of all 100 items, which will make the export much faster.
Step 3: Apply Filters to Limit Export Volume
The records that are included in the export are defined by the filters. If you don’t have any filters, then you may have millions of rows for a large object such as Lead, Case, or Activity, which can cause long exports and slow Power BI refreshes.
Apply filters in Basic mode using dropdown controls for common fields like Created Date, Last Modified Date, Owner, and Status. For more precise control, switch to SOQL mode and write the filter logic directly. SOQL mode supports OR conditions, cross-object filtering, and any logic the Salesforce query language allows.
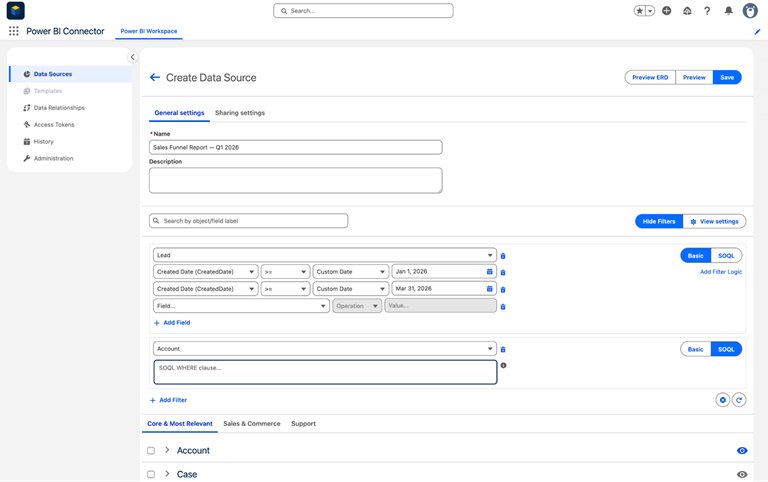
For most reports, it will be appropriate to use a date range filter for Created Date or Last Modified Date. Then you’ll have filters for owner and status to further limit the scope to what the report actually reports.
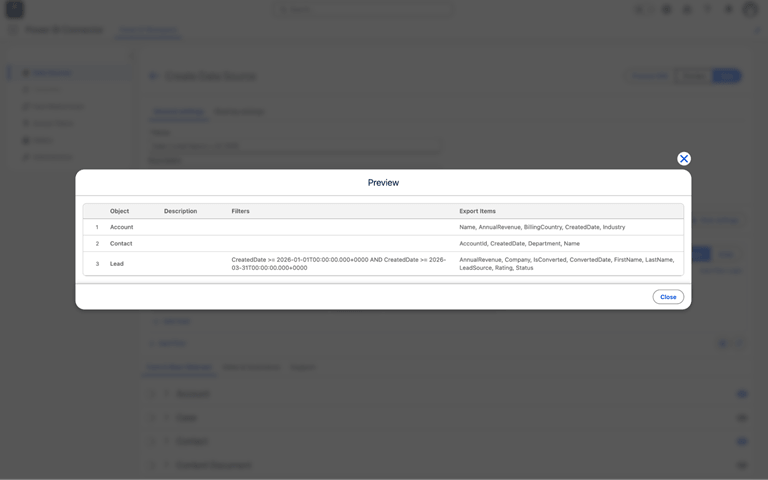
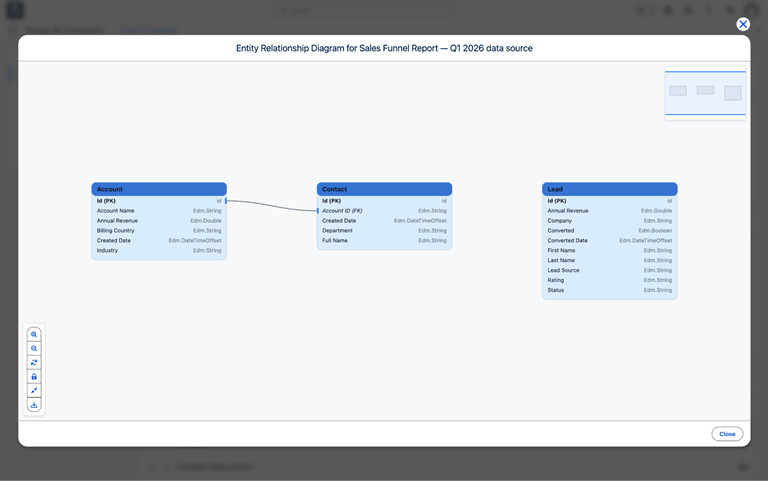
Step 4: Preview the Dataset and Object Relationships
Use the two preview settings to ensure that the configuration is correct before saving.
Preview Data shows the selected objects, applied filters, and exported fields in a summary view. Use it to confirm the structure is correct before connecting Power BI.
Preview ERD will produce an interactive Entity Relationship Diagram (ERD) that displays your selected objects as tables, the fields as types, and the relationships between the objects as lines. Here, ensure that the foreign keys match up to each other between objects, and you don’t have to deal with relationship problems in the Power BI data model later on. The ERD can be exported in PNG, SVG, or PDF format.
Step 5: Save the Data Source
Click Save. The data source is now ready to connect to Power BI.
How to Connect Salesforce Data to Power BI
With the data source saved, connecting to Power BI takes four steps: generate an access token, copy the Power Query script, set up the token parameter in Power BI, and load your Salesforce tables to Power BI.
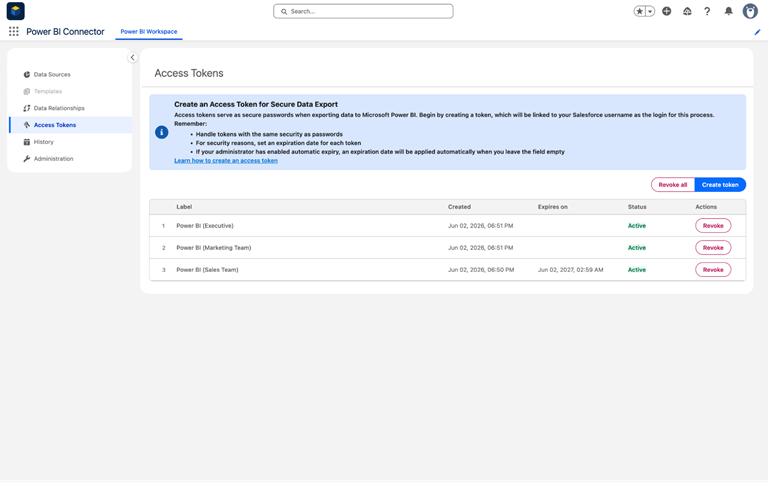
Step 1: Generate a Salesforce Access Token
Go to Access Tokens and click Create Token. Enter a label that identifies the context, set an expiry date if your org policy requires one, and click Create.
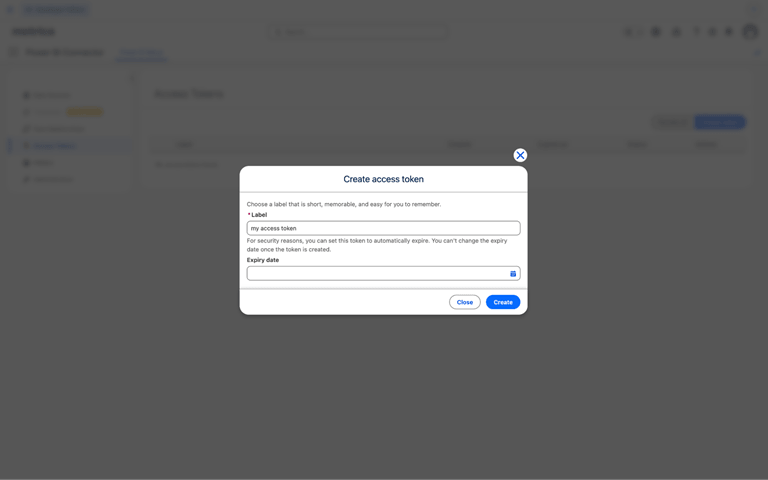
Copy the token immediately. It is only visible once. After closing this screen,n you cannot retrieve it, only revoke it and create a new one. Store it in a password manager before moving on.
Each user creates and manages their own tokens. Tokens are not shared. If a token expires or is revoked, exports stop immediately. The fix is creating a new token and updating one parameter value in Power BI.
Step 2: Copy the Power Query Script
In Data Sources, click the Power Query copy icon next to your data source.
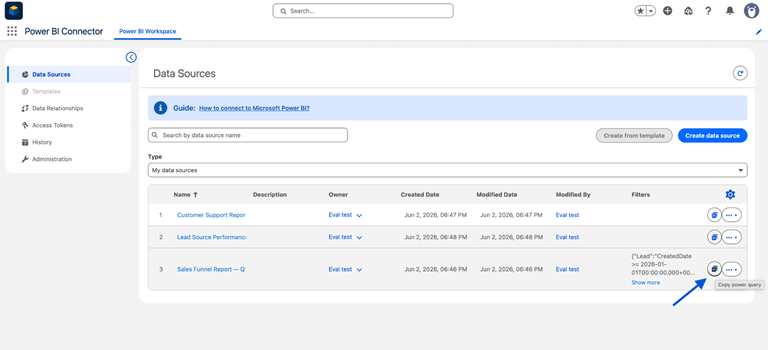
This copies the connection script to your clipboard:
let

    Source = OData.Feed(

        "https://your-org.my.salesforce-sites.com/services/apexrest/metrica_powerbi/OAuthProxy/a00XXXXXXXXXXXX",

        [xUserKey=metricaToken]

    ),

    Renamed = Table.RenameColumns(Source, {{"Data", "Value"}}),

    Selected = Table.SelectColumns(Renamed, {"Name", "Value"}),

    AsRecord = Record.FromTable(Selected)

in

    AsRecord
The URL is unique to your data source. The metricaToken value refers to a parameter you will create in the next step.
Step 3: Set Up the Token Parameter and Paste the Script
Open Power BI, create a Blank Report, and go to Get Data > Blank Query to open Power Query Editor.
Go to Manage Parameters > New Parameter and configure it:
- Name: metricaToken (exact spelling, case-sensitive)
- Type: Text
- Current Value: paste your access token
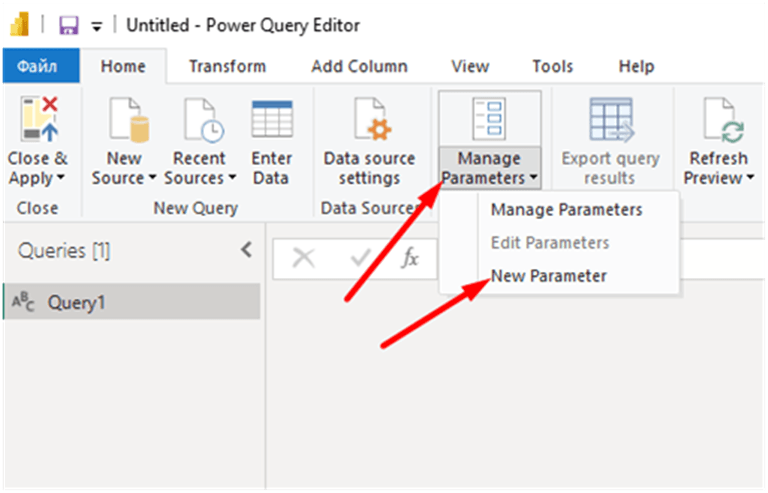
Click OK. Then right-click Query1 in the Queries panel, click Advanced Editor, delete the existing content, paste the script you copied, and click Done.
If Power BI shows an Edit Credentials prompt, click it, select Anonymous, and click Connect. Authentication is handled by the metricaToken parameter, not by Power BI credentials, so Anonymous is correct here.
Step 4: Load Salesforce Objects as Separate Tables
The script returns your full data source as a structured record. To use individual Salesforce objects as tables in your report, add each one as its own query:
- In the query output, find the object you want, for example, Contact.
- Right-click the word Table next to it.
- Click Add as New Query.
- Rename the new query to match the Salesforce object name exactly: Contact, Account, Opportunity.
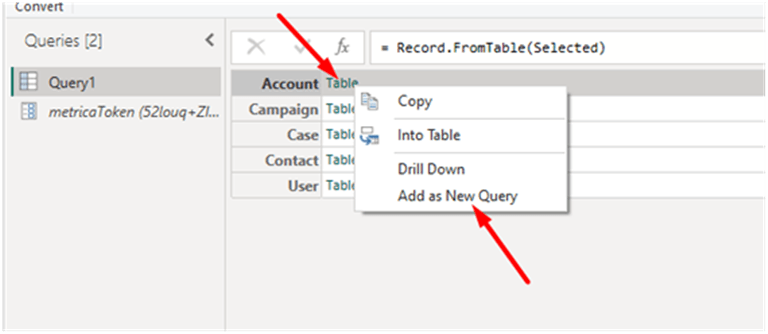
Repeat for every object in the data source. Then delete or hide Query1.
Step 5: Apply and Load the Data
Select Close and Apply. Power BI fetches the data from Salesforce and loads it. The tables you create are listed in the Fields panel and available in visuals.
How to Set Up Incremental Refresh for Salesforce Data in Power BI
By default, each Power BI refresh re-imports the full dataset. For large or growing Salesforce datasets, it gets slow. Incremental refresh solves this by fetching only records that are new or updated since the last refresh.
Step 1: Create RangeStart and RangeEnd Parameters
Incremental refresh requires two specific parameters in Power Query. Go to Manage Parameters -> New Parameter and create both:
- Name: RangeStart / Type: Date/Time
- Name: RangeEnd / Type: Date/Time
The names must be exact and case-sensitive. Power BI uses these names specifically to detect that incremental refresh is configured on a query.
Step 2: Update the Table Query to Filter by Date Range
Select your table query and replace the navigation step with a filtered version:
= Table.SelectRows(

    Source{[Name="Contact", Signature="table"]}[Data],

    each [CreatedDate] >= DateTime.AddZone(RangeStart, 0)

    and [CreatedDate] < DateTime.AddZone(RangeEnd, 0)

)
Replace Contact with your Salesforce object name and CreatedDate with the date field you are filtering on. The DateTime.An AddZone() wrapper is required because the OData protocol does not support Salesforce’s Date/Time/Timezone type natively. Without it, the filter comparison fails, and incremental refresh will not work correctly.
Step 3: Enable the Incremental Refresh Policy
Right-click your table in the Fields panel and select Incremental refresh. Turn the slider on, set your archive period (how much historical data to keep) and your refresh window (how far back each refresh looks), then click Apply.
If the slider is greyed out, Power BI is unable to locate RangeStart or RangeEnd in the query. Make sure that the names of the parameters are spelled correctly and that they are in the proper case, and that they are both of the Date/Time type rather than the Date type or Text.
Step 4: Publish and Schedule the Refresh
Upload the data to Power BI Service and schedule a refresh in Power BI Service. On the first refresh, the entire historical data is loaded according to the archive period you have selected. All refreshes since then only refresh the incremental window.
Summary
Exporting data from Salesforce to Power BI through a Metrica Software Power BI Connector allows analytics teams to receive the data that Power BI and manual exports or custom integrations can’t provide: a steady, repeatable data pipeline that they own and control!
No engineering dependence. When the connector is set up, data analysts can add new objects and data sources, as well as edit filters without modifying any code or consulting a programmer. The data source itself is not a script; it’s a configuration, so it will remain maintainable as your Salesforce instance grows.
Performance is controllable. As you can only export what you tell Power BI to export, you are not doing a complete org dump each time you refresh Power BI. In addition to incremental refresh, large Salesforce datasets remain in sync without the high cost of a complete refresh.
Security is not an add-on layer; instead, it follows Salesforce. Each user will only be able to see data that they can currently access in Salesforce. No other access controls to set up and no concerns about exposing data beyond existing org permissions.
The end result is a Power BI reporting layer that is in sync with your Salesforce data, reliably refreshes, and doesn’t require continuous maintenance effort.
Popular on OTW Right Now!


About The Author
Gagan Bhangu
Founder of otechworld.com and managing editor. He is a tech geek, web-developer, and blogger. He holds a master's degree in computer applications and making money online since 2015.