
Custom Jewelry Trays for Drawers: A Smarter Retail Solution
An employee opens a drawer and finds the right necklace. At the counter, the problems begin. A ring is in the wrong slot. Two earrings have lost their pair.
Then a price tag slides under a bracelet. By closing time, the counter display no longer matches the drawer. That is not a styling problem alone. It is a workflow problem.
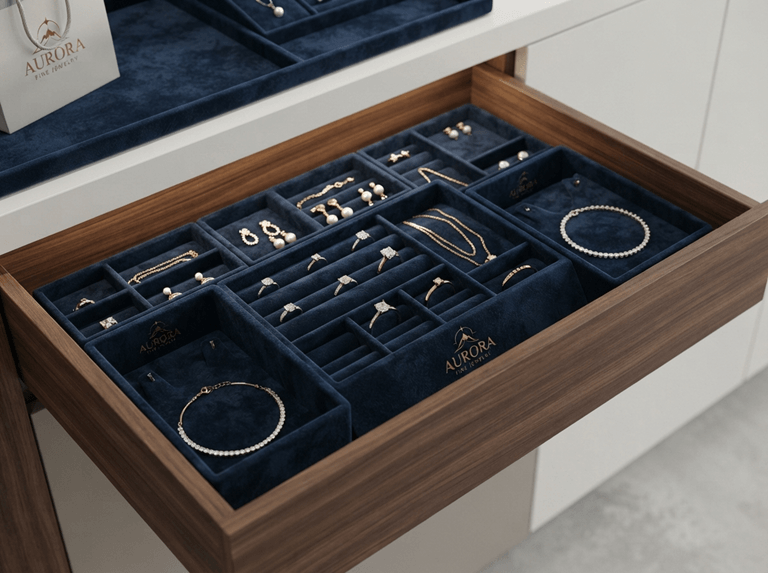
Custom jewelry trays help when a retailer needs the same product groups to move from backstock to the counter, return to the right drawer, and stay easy to replenish. Before you discuss color, velvet, or a logo, you need five facts: drawer space, SKU groups, restocking frequency, display location, and the insert or surface each product needs.
By the time you finish reading, you will be able to:
- Decide whether a standard organizer or a custom tray system fits your store.
- Map products by movement, visibility, and handling needs instead of product name alone.
- Prepare a supplier brief and a functional sample check that tests the daily retail workflow.
Start with the first decision. A standard organizer can work for a small, stable assortment. A custom system deserves attention when staff move products often, collections change, or several locations need the same operating logic.
| Retail question | Practical answer |
| Best reason to customize | Match drawer fit, SKU zoning, and counter display in one system |
| Most important design input | How products move during setup, replenishment, and closing |
| Common mistake | Filling every space instead of protecting visibility and access |
| Best long-term structure | A stable outer tray with inserts that can change |
| First test before bulk production | Fit, handling, product contact, labels, cleaning, and reset |
Why Custom Jewelry Trays Matter in Retail Operations
A retail tray has two jobs. It must hold products in the back of the store, then help staff present those products clearly at the counter. When a design works for only one of those moments, staff rebuild the display by hand.
One Tray for Backstock and Counter Display
The useful unit is the tray, not the single piece. Staff can move a grouped set from a drawer to a counter position, then return the same set when the display changes.
That only works when the outside dimensions, handle area, compartment layout, and counter location are planned together. A tray that fits the drawer but cannot sit securely in the display still leaves the team with a second setup to manage.
Faster Replenishment Without Rebuilding the Display
Replenishment becomes easier when the tray already reflects the way products sell. A staff member can replace the fast-moving area, check the empty slots, and leave the rest of the display untouched.
Do not promise a fixed time saving without store records. Instead, record the steps before ordering. Count how many pieces move from the drawer, how many labels need adjustment, and how often a necklace must be untangled before it reaches the customer.
Consistent Displays Across Staff and Locations
A fixed tray footprint gives staff a shared starting point. Fixed zones and label positions make the setup easier to explain to a new employee or to repeat in another store.
A shared layout does not mean every location must show the same number of pieces. One store may need a fuller bridal collection. Another may need more room for higher-priced pieces. The useful part is the logic, such as where each series starts, where prices sit, and how the tray returns to storage.
Better Visibility Without Maximum Capacity
More compartments can create a worse display. Small products disappear when the tray is crowded, and long chains can turn into a dark knot across several areas.
Leave enough room for a customer to see the product, read the price, and understand the collection. A practical check is simple: can a staff member remove one piece without touching three others?
When a Custom Tray Is Worth the Investment
Customization deserves a closer look when several conditions appear together:
- The drawer has unusual dimensions or fixed obstructions.
- The collection includes products with very different shapes.
- Staff replenishes the counter often.
- The same display logic must work across stores or wholesale counters.
- The assortment changes for seasons, launches, or collaborations.
A small store with few SKUs, standard drawers, and rare display changes may be fine with an off-the-shelf organizer. Custom work becomes more useful when the same handling problem repeats every day.
Once that decision is clear, the next task is to map how products move. The tray layout should follow the store routine before it follows product categories.
Plan the Layout Around SKU Movement and Customer Visibility
Start with a different question: Which products move together, and which products need attention first? That answer shapes the retail plan. It also tells you which products need quick access, which need more open space, and which can sit deeper in the drawer.
Start With SKU Zoning Instead of Jewelry Names
Product type still matters, but it should not be the only organizing rule. A useful tray may combine:
- Collection or series.
- Price band.
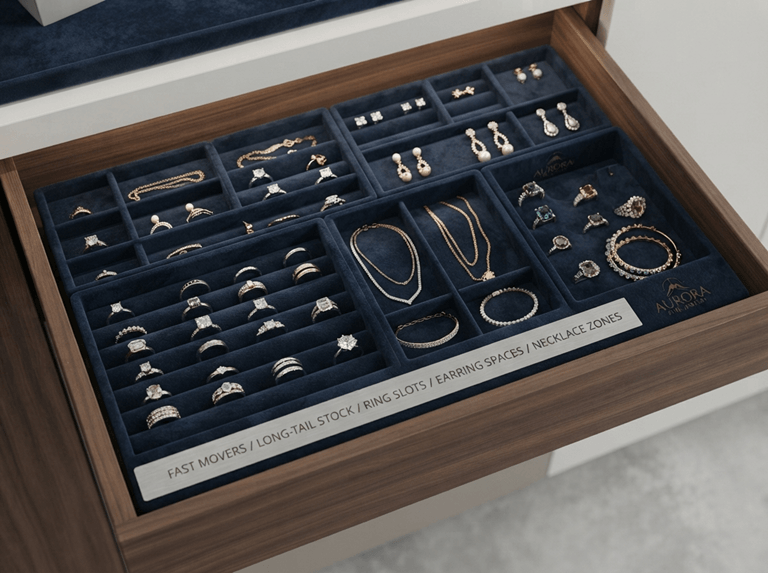
- Fast-moving and long-tail stock.
- Store event or seasonal display.
- Replenishment frequency.
- Color, finish, or material.
These variables can overlap. A fast-moving holiday earring may sit near the counter, while its matching necklace stays in a deeper area.
Build Ring and Earring Sections for Pairing and Counting
Ring slots need enough room for the product profile and the employee’s fingers. A slot that holds a narrow band may grip a wider design or make removal awkward.
Earrings bring a different problem. Pairs can split across areas, and small posts can disappear into a mixed compartment. Plan the layout so staff can see the pair, check the count, and return it to the same place.
Control Necklaces and Bracelets Before They Tangle
Long pieces need a clear path. A necklace tray may need longer zones, dividers, shallow holds, or extra space near the clasp. The right choice depends on length, chain weight, pendant size, and how staff pick up the item.
Surface softness alone will not stop tangling. A velvet jewelry tray can look calm while a chain crosses its neighbor. Test the actual necklace set with the intended hand movement before approving the layout.
Also Read: Rapaport Trade Launches Rapaport MarketIQ, Deepening Its Shift to a Tech-First Platform
Separate Fast Movers From Long-Tail Stock
Fast movers should sit where staff can reach them without disturbing the rest of the collection. Long-tail pieces can use less accessible space, but they still need a clear location.
This split helps with opening, restocking, and closing. It also gives the store a practical way to decide which areas need quick access and which areas need more capacity.
Leave Space for Price Labels and Product Storytelling
A price label needs a stable home. If it is tucked under a bracelet or placed across a necklace, staff will move it every time a customer handles the product.
Reserve space for the series name, price, or short product note before finalizing the compartment count. The label should support the product, not compete with it. A small amount of blank space often makes the whole tray easier to read.
Use Stackable Trays Only When Access Still Works
Stackable jewelry trays can help a store use vertical space, especially in backstock. They become less useful when staff must lift several layers to reach a fast-moving item.
Check the stack height, tray weight, clearance, stability, and daily access. A solution that saves drawer space but slows every customer request has solved the wrong problem.
Design the Drawer-to-Counter Workflow
The layout only works if the tray also works in the furniture and the daily routine. Now test the short trip from storage to display, then make the return trip just as clear.
Measure the Drawer as a Working Space
Record the drawer’s usable width, depth, and height. Then note the details that affect movement:
- Slides, rails, dividers, and door frames.
- Opening direction and stopping points.
- Hand clearance around the tray.
- The counter or display-case space where the tray will sit.
External drawer dimensions are not enough. A tray can fit on paper and still scrape a rail, catch on a frame, or leave no room for fingers.
Standardize the Outer Tray Footprint
A stable outside footprint helps the same tray family work in drawers, counters, carts, or display-case areas. The inside can change with the collection, while the outside remains familiar to staff.
For a retail program that needs this fit, Custom Jewelry Trays for Drawer can start a supplier conversation. Ask about dimensions, compartments, and display movement before discussing finishes.
Add Safe Handling Zones
Employees need a clear edge to grip. They also need room to place the tray down without brushing the product against a wall, glass panel, or neighboring tray.
Add handling features to the brief. These may include a defined edge, a recessed grip, a stable base, or enough space between stacked units. The right detail depends on the tray weight, surface, drawer depth, and movement frequency.
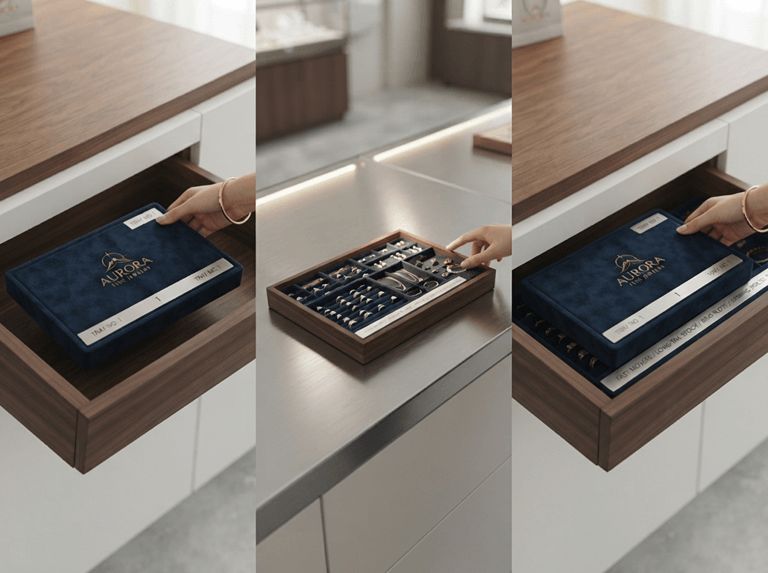
Create a Set-Up and Replenishment Routine
Keep the routine short enough for daily use:
- Remove the labeled tray from its assigned drawer.
- Place it in the matching counter or display-case position.
- Check missing pieces, labels, and product visibility.
- Replace only the SKUs that need restocking.
- Record any temporary move before the tray returns to storage.
This routine treats the tray as a prepared work unit. Staff does not need to rebuild the display from memory each morning.
Close the Day With a Count and Reset
Closing is easier when every product has a known place. Staff can look for empty slots, mixed areas, loose pieces, stains, or shifted labels while returning the tray to the drawer.
Fixed positions can help reveal an exception. They cannot eliminate loss by themselves. The store still needs its own counting, security, and staff procedures.
Reproduce the Same Logic Across Stores
For several locations, save the tray number, layout drawing, label position, collection version, material, color, and change date. A new store should be able to identify the approved layout without relying on a single employee’s memory.
Keep the record with the approved sample. When a collection changes, update the version instead of sending a vague message that says “same as last time.”
Choose Construction and Materials for Retail Use
Once the tray fits the drawer and works in daily handling, choose the construction that can keep doing that job. The surface must look right, the structure must hold its shape, and the contact area must suit the jewelry and the way staff handle it.
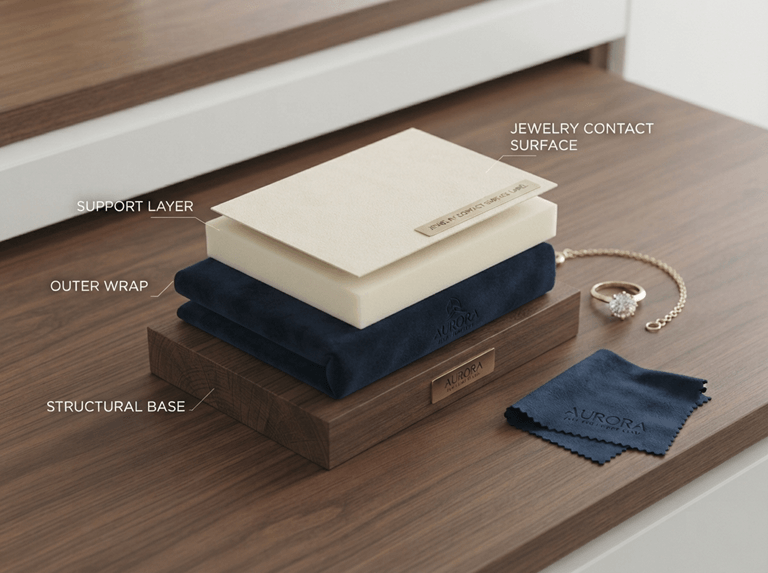
Separate Structural Support From the Contact Surface
The structural core supports the tray. The outer wrap controls much of the visible finish. The insert or lining supports and touches the jewelry.
These layers can have different jobs. A soft contact surface does not replace a stable base, and a rigid base does not automatically provide a suitable jewelry contact surface. Ask the supplier to describe each layer by function.
Match Surface Feel With Cleaning Needs
Velvet, leather, and wood create different visual and tactile results. They also react differently to dust, fingerprints, rubbing, and cleaning.
Choose the surface with the store routine in mind. If staff wipe the tray often, test the actual cloth and cleaning method. If the surface may shed fibers, transfer color, hold odor, or mark the jewelry, check those points on a production swatch and finished sample.
Match Tray Depth to Product Height
A ring, a low earring, a pendant, and a wide bracelet do not need the same vertical space. A deep area may hide a small piece. A shallow area may let a tall piece tip or rub against the next item.
Use real products when checking depth. Measure the product profile, observe how staff pick it up, and leave enough room for the hand to work without scraping the adjacent area.
Use Branding as a Navigation Cue
Color, logo placement, collection marks, and label zones can help staff identify a tray quickly. They should also support the customer’s view of the jewelry.
Branding works best when it guides the eye. A logo stamped across every open surface may leave less room for prices, collection names, or the product itself.
Set Cleaning and Replacement Rules Before Production
Write the care routine into the supplier brief. State what staff may wipe, which parts can be replaced, and what counts as a visible defect.
Check for loose fibers, color transfer, odor, marks, edge lifting, and uneven bonding. A material can look good in a photograph and still need adjustment after handling. Testing the finished sample gives the store a clearer answer than choosing from a color card alone.
Material choices keep the current tray usable. Modular inserts determine whether the same tray can still work after the collection changes.
Use Modular Inserts to Support Collection Changes
Collections change faster than store furniture. A tray system should make that change manageable without forcing the team to redesign every drawer and counter position. The goal is simple: keep the working footprint, then change only the parts that no longer fit the assortment.
Keep the Outer Tray Stable as the Collection Changes
A stable outer tray can continue to fit the drawer and counter while the inside changes with the assortment. That makes the store’s physical locations easier to remember.
The approach does not guarantee lower cost. Its value is planning flexibility. It lets the team ask whether the next change needs a new insert, a new label map, or a full structural revision.
Choose Fixed or Removable Compartments
Fixed compartments suit a collection with stable products and a long service life. They can be simple to identify and easy to count.
Removable inserts suit seasonal displays, changing collections, collaborations, and mixed product sets. They require stronger version control because an insert that looks similar may belong to a different product group.
Match Inserts to Rings, Earrings, Necklaces, and Sets
One universal layout rarely serves every product equally well. Ring slots, paired earring areas, long necklace zones, and gift sets create different handling needs.
Plan inserts around the product combination and the action that follows. If a set moves from drawer to counter as one unit, the insert should keep the set together. If pieces sell separately, the layout should make individual counts easy.
Separate Drawer Trays From Box Inserts
A drawer tray supports backstock, counter display, restocking, and closing. A box insert supports one customer’s product, packaging, delivery, and opening experience.
Those roles can work together, but they should not be confused. Custom Jewelry Box Inserts belong in the packaging conversation when the product needs a fitted presentation inside an individual box.
Plan Changeovers for New Collections
Prepare a changeover list before the new products arrive. Record the old layout, new layout, label changes, remaining stock, and the location of unused inserts.
That small record prevents the new collection from becoming a table of loose pieces. It also gives the team a clear way to return older stock to its assigned place.
Modular inserts are one option, not an automatic answer. Before you order anything, compare the level of control you need with the amount of preparation the store can support.
Compare Retail Storage Approaches Before You Customize
Customization is useful when it removes a repeated problem. It is unnecessary when a simple organizer already fits the drawer, the products, and the store routine. The comparison below turns the earlier workflow into a buying decision.
Off-the-Shelf Jewelry Organizers
A standard organizer can work for a single store with few SKUs, regular drawers, and rare display changes. It is quick to buy and easy to replace.
The tradeoff is limited control over size, zoning, labels, and support for each product. If staff keep moving products between compartments, the low setup effort may not solve the daily problem.
Open Jewelry Display Trays
Open jewelry display trays suit a counter or display case where the customer needs to see the product quickly. They can make a collection easy to browse.
They may need a separate plan for backstock, transport, stacking, and closing. A tray that looks good on the counter may not fit in the drawer or protect the same products during movement.
Stackable Jewelry Trays
Stackable trays use vertical space and can help organize slower stock. They work best when staff do not need the lowest layers every few minutes.
Check how high the stack becomes, how much clearance staff needs, and whether one tray can be removed without disturbing the others. Access comes before capacity.
Custom Drawer Trays
Custom drawer trays make sense when the drawer is unusual, the SKU map is complex, or the same tray must support storage and display. They also help when collection changes need a stable outer footprint.
The tradeoff is preparation. Accurate measurements, product samples, layout drawings, and a functional sample take time before larger production can begin.
Custom Tray and Box Insert Systems
A combined system suits a brand that manages both store presentation and individual delivery packaging. The drawer tray organizes the retail work. The box insert organizes the customer’s opening moment.
Use the two systems together when the brand needs a shared product logic across stock, display, and delivery. Keep their measurements and use cases separate in the supplier brief.
Comparison table
Use this comparison to match the storage format to the store’s actual work. The key fields are fit, access, backstock control, and sample testing. A solution is stronger when it supports the next action, not when it has the longest feature list.
| Option | Best for | Main strength | Main limitation | Sample need |
| Off-the-shelf organizer | Simple single-store storage | Low setup effort | Limited fit and zoning | Basic fit check |
| Open display tray | Counter presentation | Fast visibility | Weak backstock control | Product placement check |
| Stackable tray | Vertical storage | Uses height | Access can suffer | Stability and handling check |
| Custom drawer tray | Retail workflow | Fit plus zoning | Requires planning | Full functional sample |
| Custom tray plus box insert | Inventory and delivery system | Connects display and packaging roles | Needs coordinated specifications | Tray and box fit check |
Prepare the Supplier Brief and Sample Test
Once you choose the right format, turn the retail workflow into instructions a supplier can build. A logo and a general size may open the conversation.
They do not explain how the tray will move, what each area must hold, or how the finished sample should pass. The brief must connect the drawer, the SKU map, the materials, and the daily handling steps.
Record Drawer Dimensions and Obstructions
Give the supplier the internal width, depth, height, slide details, frames, obstacles, opening direction, and hand clearance. Add the counter or display-case dimensions if the tray will move there.
Photos, a quick sketch, and a physical sample of the drawer can prevent confusion. The more the tray moves through a real space, the more useful these details become.
Add a SKU and Compartment Map
List each zone’s product type, quantity, size range, restocking frequency, and store use. Mark which areas need fixed slots and which areas need removable inserts.
The map should explain why the divisions exist. “Six compartments” is a vague request. “Four fast-moving earring pairs, one seasonal set, and one space for returns” gives the supplier a layout to review.
Specify Materials, Finish, Labels, and Handling Features
Describe the structural support, contact surface, color, logo, label area, edge finish, grip area, and cleaning method. State which details affect product contact and which details affect appearance.
Avoid vague words that do not describe a physical feature. Name the surface, color, edge, texture, or handling requirement that a sample can show.
Approve a Functional Sample Before Bulk Production
Check the sample in this order:
- Drawer fit and opening clearance.
- Tray lifting, carrying, and placement.
- Real rings, earrings, necklaces, bracelets, and sets.
- Labels, product visibility, and customer-facing spacing.
- Wiping, surface contact, odor, loose fibers, marks, and edge bonding.
- Closing reset, missing-piece checks, and return to storage.
A sample can look right and still fail during handling. Test the actions that happen on a busy day, not the quiet moment when the sample arrives.
Build Batch QC Around the Approved Layout
Check the outer dimensions, compartment positions, color, logo, label area, edge finish, and contact surface. For several stores, identify trays by number or approved version.
Keep defect photos and corrections with the approved sample. That record gives the next production run something clearer to follow than a short message copied from an old quote.
Version the Approved Layout for Reorders
Record the version, date, store, collection, materials, and reason for each change. When the assortment grows, update the layout instead of starting from memory.
This practice also protects the staff who use the tray every day. They can see whether a new insert belongs to the current collection or an older setup.
FAQs
Are Custom Jewelry Trays Worth It for a Small Jewelry Store?
They can be worth considering when drawers are unusual, products have different shapes, replenishment happens often, or the same display logic must repeat. A small store with a few stable SKUs may find a standard organizer sufficient.
How Do I Measure a Drawer for a Jewelry Tray?
Measure the usable internal width, depth, and height. Record slides, frames, dividers, opening direction, stopping points, hand clearance, and the counter space where the tray will sit.
Should I Choose Fixed Compartments or Removable Inserts?
Choose fixed compartments for stable products and long-term layouts. Choose removable inserts when collections change often, products rotate by season, or one outer tray must support several assortments.
What Is the Difference Between a Drawer Tray and a Jewelry Box Insert?
A drawer tray supports backstock, counter display, restocking, and closing. A jewelry box insert supports the fitted presentation of one product inside its package.
Can One Tray Work for Rings, Earrings, and Necklaces?
It can, if the tray uses separate zones for different product profiles. The layout still needs to account for height, length, pairing, hand clearance, and display density.
What Should I Test Before Ordering Custom Jewelry Trays in Bulk?
Test drawer fit, opening clearance, handling, product placement, tangling, labels, cleaning, odor, loose fibers, edge bonding, batch consistency, and the reset routine. Use real products instead of relying only on a drawing or digital rendering.
Conclusion
The best custom jewelry trays do more than make a drawer look tidy. They give products a known place, give staff a repeatable movement, and give the store a clearer way to change collections.
Before you request a quote, complete four things: measure the working drawer, map the SKUs, define the counter routine, and list the sample checks. Then ask the supplier to build a functional sample around those facts. A tray that passes fit, access, product contact, visibility, cleaning, and reset checks is ready to support the retail floor with far less guesswork.
Popular on OTW Right Now!




About The Author

Gagan Bhangu
Founder of otechworld.com and managing editor. He is a tech geek, web-developer, and blogger. He holds a master's degree in computer applications and making money online since 2015.