How to Clear Recent Files in Windows 11 and 10
Do you want to know how to clear recent files in Windows 11 and 10?
Windows 11/10 keeps track of your file access history to increase productivity and enhance your experience. The operating system shows the recently used files in the start menu, file explorer quick access, and jump lists.
However, recent file history helps to save time and allows us to open recently used files with ease. But sometimes recent file access history creates privacy concerns.
If your system is often used by others, then you might not want to let others see your file access history.
So, in this article, I’ll show you how to clear recent files in Windows 11 and 10.
Operating systems and softwares give the option to access recently used files. This feature is convenient and saves the user time. On Windows OS, you can see the recent files, folders, and apps in the start menu and file explorer.
However, the recommended recent items section helps the user to quickly access the last used files. But, if you’re one of them who doesn’t like to see your file access history or don’t want to let others see that history, you should clear or disable this functionality.
How to Clear and Disable Recent Files in Windows 11 and 10
Windows 11 and 10 displays the file access history in different places. So, below are the different methods to delete and disable a recent file’s history.
1. Disable Recently opened Files and Folders history from Settings
Microsoft introduced new features in Windows 11 and this new version comes with a redesigned start menu.
By default, the start menu shows the pinned apps and recommended section. The recommended section shows the recently used files and apps. You can remove specific files or folder history from recommendations by right-clicking on the file. However, Windows 10 also shows the recent items in the start menu.
Windows 11 and 10 give the option to disable the recent files and folder history from the start menu recommendations. The steps are given below.
Windows 11
- Open the Settings app on your Windows 11 machine. For this, press the Windows key + I from the keyboard. Otherwise, you can access the setting app from the start menu or search.
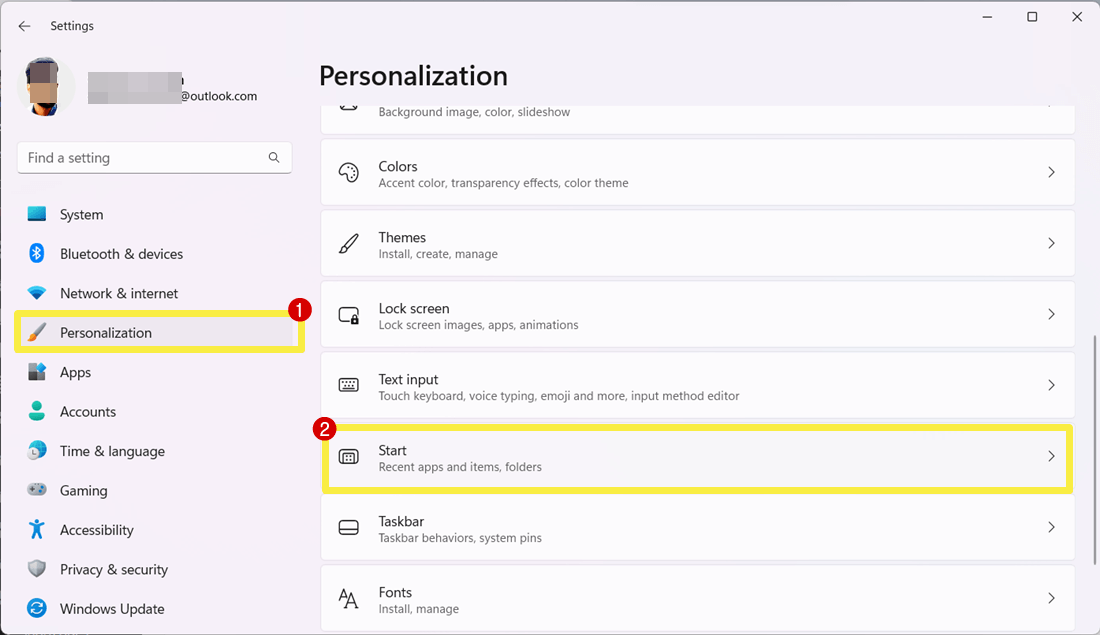
- Now go to the Personalization option from the left navigation menu and select the Start option from the right side.

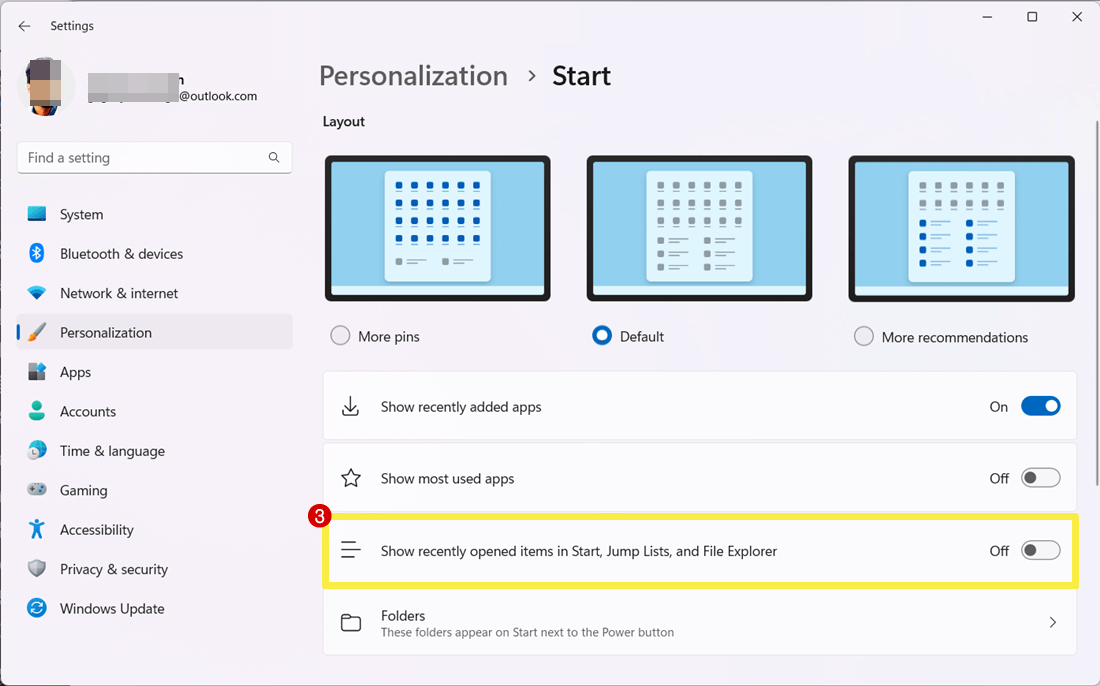
- Toggle off “Show recently opened items in Start, Jump Lists, and File Explorer”.
You can also toggle off the “Show most used apps” and “Show recently added apps” option to clear recommendations from the start menu.
- Now click on the start menu and you’ll see that all files will be cleared from the start menu.
- That’s all.
Windows 10
- Open the Settings app on Windows 10 device and click on the Personalization option from the left navigation panel.
- Now click on the Start option from the left side.
- Toggle off the “Show recently opened items in Jump Lists on Start or the taskbar” option.
- That’s it.
Read Also: How to Clear Recent in Google Drive
2. Clear/Disable recently used files and file explorer history from Quick access
Windows 11 and 10 file explorer offers Quick Access (Named Home in Windows 11) that shows the most used files and pinned favorites files. Also, explorer shows the searched files in the search option. The steps are given below to clear and disable this history.
Windows 11
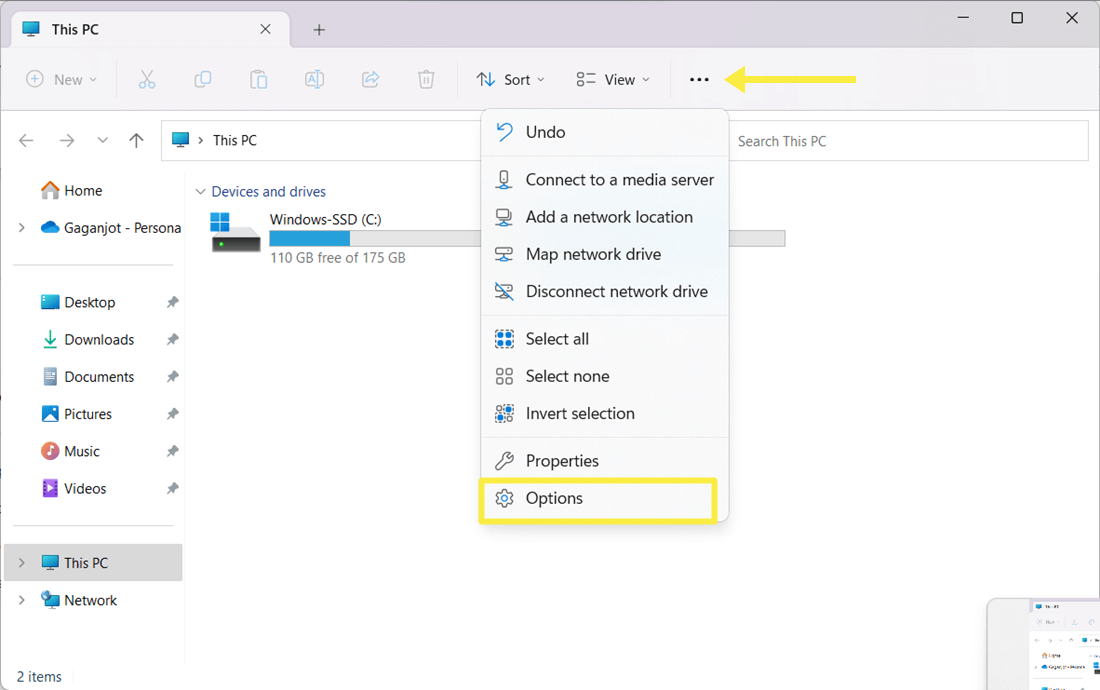
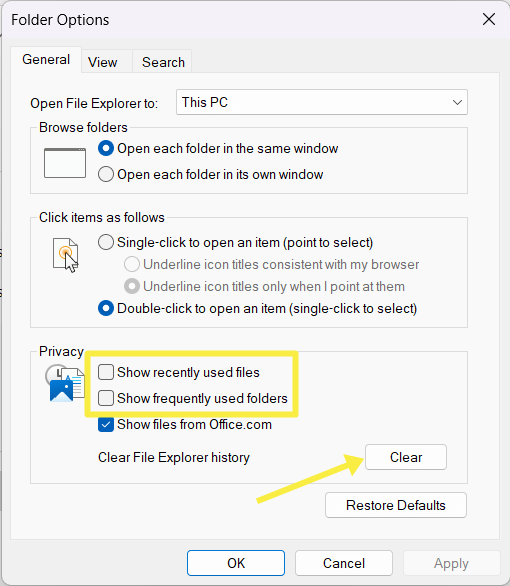
- Open File Explorer and click on See more (three dots) from the menu bar and click on Options from the context menu.

- Now the Folder Options will be open.
- To disable the recent files – From the General tab (opened by default), uncheck the “Show recently used files” and “Show frequently used folders” option.
To Clear the File Explorer history – Click on the Clear button next to the Clear File Explorer history.
- Click on the Apply and OK button
- That’s all.
Windows 10
- Open Folder options on Windows 10 device. For this, open File Explorer and click on the View tab from the top, and click on the Options from the Menu bar. Select the Change folder and search options.
Alternatively, you can open it from the search and control panel. - To disable the recent files – From the General tab (Opened by default) uncheck the “Show recently used files in quick access” and “Show frequently used folders in quick access” options.
To clear the history – Click on the Clear button next to the Clear file explorer history. - Click on the Apply and OK buttons.
- That’s all.
3. Delete Recent Files and Folders using Registry Editor
Steps are given below to use the registry editor to clear recent files history on Windows 11 and 10.
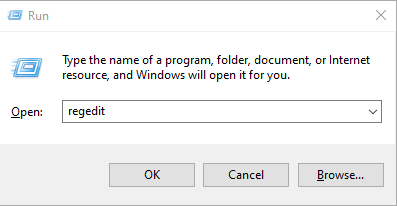
- Open Registry Editor on Windows 11 and 10 devices. For this, open the Run command prompt by pressing the Windows key + R from the keyboard. Type regedit in the run command prompt and click on the OK button. Click on the OK if User Account Control pop-ups.

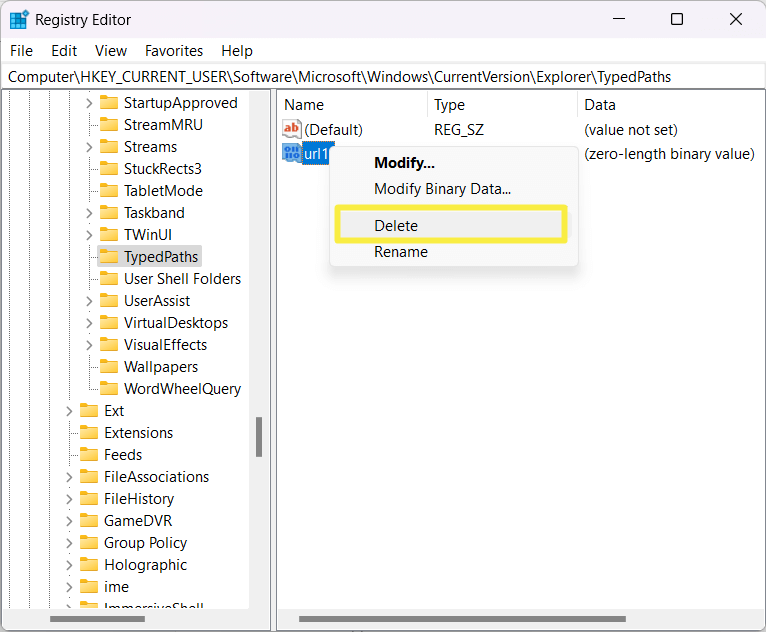
- Now navigate to the following path.
HKEY_CURRENT_USER\Software\Microsoft\Windows\CurrentVersion\Explorer\TypedPaths
- From the TypedPaths folder delete the url1, url2, url3 files. For this, right-click on the file and select the Delete option. (Note: do not delete Default file)

- That’s all.
4. Clear Explorer Address bar history
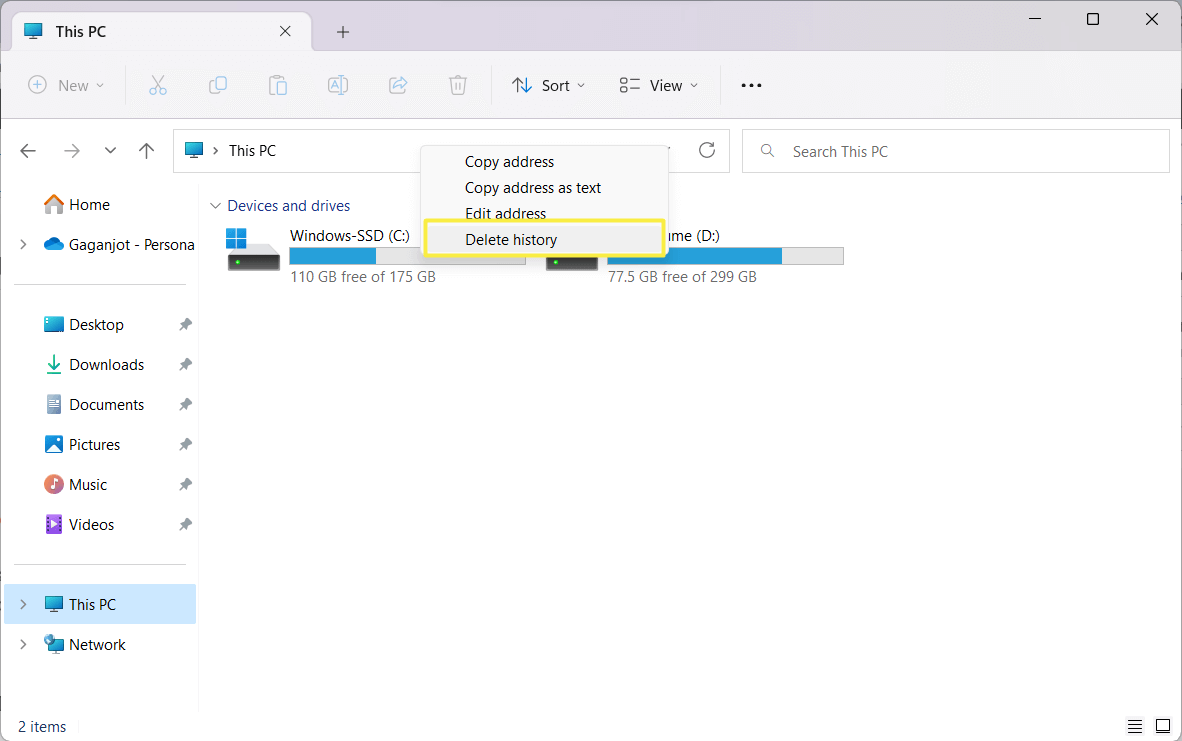
On Windows 11 and 10, if you often use the File explorer address bar to access the folders, you’ll see the history by clicking on the down arrow key from the explorer address bar.
Explorer gives a simple way to clear its address bar history.
Just open the File Explorer and right click on the Explorer address bar and select the Delete History option from the context menu.
5. Delete history from the Recent items folder
Windows stores the recent item’s content in a hidden folder. You can delete the content from that folder to get rid of file access history.
- Open File Explorer and copy and paste the following command in the Explorer address bar.
%APPDATA%\Microsoft\Windows\Recent Items
- This will open the C:\Users\<username>\AppData\Roaming\Microsoft\Windows\Recent Items location.
- Delete all files from the Recent items folder.
- That’s it.
6. Use Group Policy Editor to Turn Off Recent Files
If you’re using Windows 11/10 pro, you can use Group Policy Editor to turn off the explorer search box history. Follow the given steps.
Disable the history of recently opened documents
- Open Group Policy editor on Windows 11 or 10. Note that you must have the pro version.
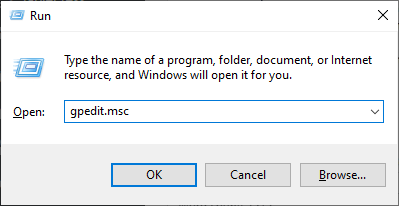
To open the Group policy editor, open the run command by pressing Windows key + R and typing gpedit.msc in the run command prompt. After that, click on the OK button.
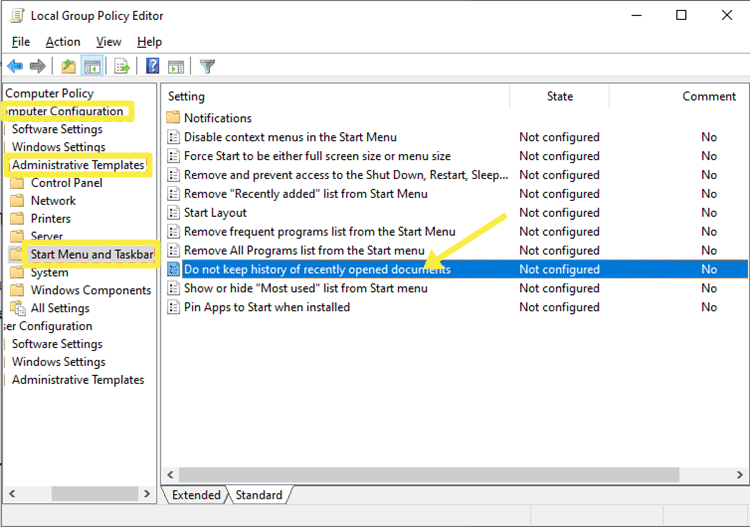
- Now navigate to Computer Configuration » Administrative Templates » Start Menu and Taskbar from the left panel.

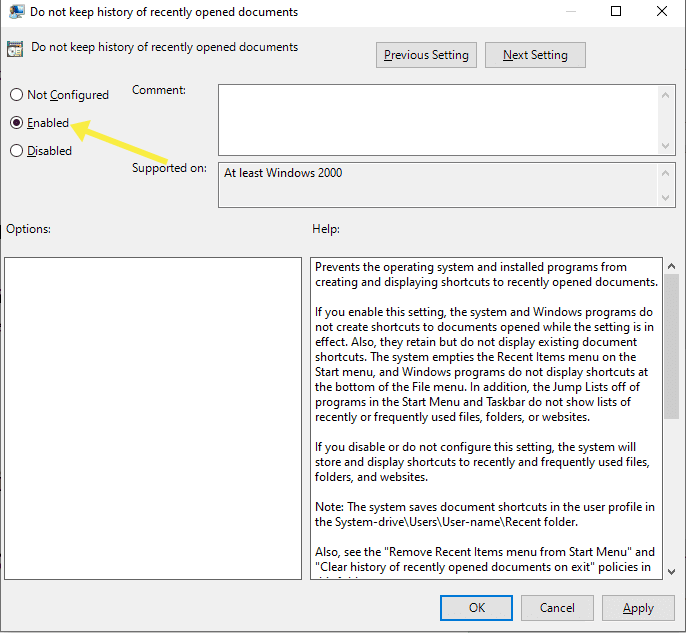
- Open “Do not keep a history of recently opened documents” from the right side and select the Enabled option and click on Apply and OK buttons.

Disable recent search entries in the File Explorer search box
- Open the Group Policy editor using the run command. Press Windows Key + R to open the run command and type gpedit.msc in the command prompt. Click on the OK to open it.
- Navigate to User Configuration » Administrative Templates » Windows Components » File Explorer from the left navigation panel.
- Open “Turn off the display of recent search entries in the File Explorer search box” from the right-side settings list.
- Select the Enabled option and click on the Apply and OK buttons.
- That’s it.
Final Words
I hope this article helped you learn how to disable and clear recent files in Windows 11 and 10. By default, the recent files history is visible in the start menu recommendations, file explorer quick access, the address bar, and search box. You can delete the history or disable this functionality to prevent your system from storing your file access history.
