
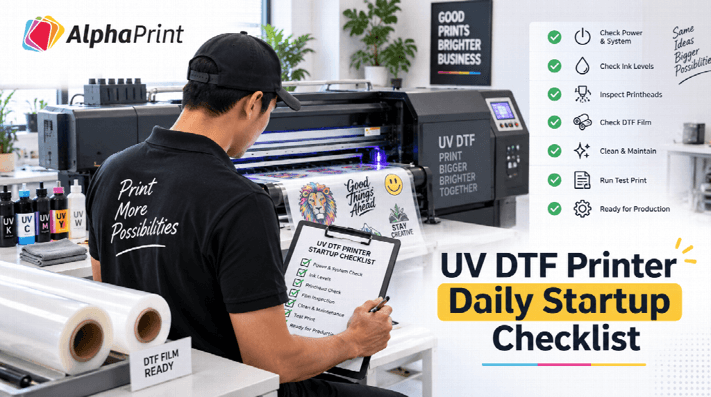
UV DTF Printer Daily Startup Checklist
A UV DTF printer should not begin the day with the first customer job. A short startup check gives the operator a controlled way to confirm that the machine, media, ink system, and job files are ready before valuable production material is committed.
The precise maintenance procedure varies according to the printer model, the ink system, the software, and the manufacturer’s instructions. Since this checklist is therefore a framework for ensuring production readiness rather than a substitute for the machine’s manual, it should be used to help you get started each day and then you must follow the approved technical procedure for the equipment in your shop.
Review Yesterday Before Powering Into Production
Begin by looking at the shift log from earlier. Check the entries concerning nozzle performance, media tracking, colour changes, head cleaning, alarms, any unusual noises, or jobs that needed to be reprinted. Spending just five minutes on this will stop the operator in the morning from having to repeat a problem that the operator on duty in the evening had already identified.
If you are working with a model such as the P604U UV DTF Printer, keep model-specific setup and maintenance information with the production log. The purpose is to connect daily observations with the correct equipment instructions.
Inspect the Work Area
Whilst checking the print queue, look first in the area nearby the printer. Take out any loose packaging, materials which produce dust, tools, and all other things that might interfere with the handling of the media. Ensure that the access panels, the ventilation paths, and the operator walkways are not blocked.
Check for any obvious leaks, drips, loose material, or waste that had not been cleared up after the previous shift. If an abnormality is noticed, halt the process and determine what it is before starting production.
Check Ink and Consumable Status
Make sure that the inks and other consumables needed for the jobs you plan to carry out are available. Don’t start a long production run if it’s likely that the shop will be out of a vital material halfway through the run.
Refer to the procedure that has been approved by the printer when checking the levels. Do not shake, open, mix, or handle UV ink systems in any way that is not suitable for the equipment. The operator’s responsibility is to check that the system is ready, not to come up with his own maintenance method.
Inspect the Media Path
Examine the film that is loaded and the route it will take through the system; the roll must be fitted properly, aligned with the machine, and free from any obvious creases, edge damage, contamination, or tension issues.
When replacing media, verify that the material matches the planned workflow. For example, the UV DTF A&B film roll is a specific production consumable, so operators should confirm the correct film type and orientation before starting a job rather than relying on the appearance of the roll alone.
Perform the Approved Printhead Check
Carry out the startup or nozzle-check procedure recommended by the printer manufacturer. This is so that you can make sure the print system is working properly before you begin printing the customer’s documents. If the check reveals an issue, then carry out the approved cleaning or recovery process for that machine.
Do not turn regular cleaning into over-cleaning since greater intervention is not necessarily better. Make a record of what the inspection revealed and of the action taken so that recurring problems can be spotted over time.
Confirm White Ink and Specialty Channels
The UV DTF processes can place a great deal of reliance on white ink and on other colours which provide opacity, layering, or finishing effects. It is necessary to make sure that the machine is showing a normal status and that the circulation or preparation procedure required has been completed in accordance with the equipment instructions.
If in the case of the prior shift there had been reports of settling, inconsistent output, or channel problems, then this should be regarded as a startup exception and you must not conceal it by going straight to a production file.
Run a Small Controlled Test
Before taking on the first major job, it is necessary to use a small approved test pattern or an internal control graphic. The test pattern should be easy to compare from one day to the next. You should look out for any obvious banding, any missing colour, any alignment problems, any unexpected marks, or any changes in the way the print looks.
It is better to use a consistent control file than to select a random customer design each morning since it provides the team with a familiar standard and makes it easier to detect changes.
Check Lamination and Transfer Readiness
The UV DTF production process is not considered complete simply because the ink has left the printhead; the downstream film and lamination stages must also be prepared. When checking the process path, look for any wrinkles, skew, contamination, or other conditions that might affect the transfer layer.
Make sure that the operator knows the right settings and the correct material path before beginning the first job if your equipment has an integrated or connected lamination process. Do not make any unverified adjustments just because the material used on the previous day was different.
Verify the First Job File
Open the first production file that is scheduled and verify the job name, the dimensions, the quantity, the orientation, and the approved version. Make sure that the correct queue or print mode has been chosen. Even if the printer is well maintained it is possible for the operator to carry out the wrong job if they start with an outdated file.
File verification should be kept apart from machine verification and production can only start after both types of verification have passed.
Record the Startup Status
A startup checklist gains greater value if the team records the results; the log can be brief, including the date, the operator’s name, the nozzle-check status, the media loaded, the consumables checked, the test result, and any exception.
As time goes on, the record will show certain patterns; for example, if the same problem occurs every Monday morning following a specific media change or after the system has been left idle for a long time, the team will have more useful information to give to technical support or to the maintenance staff.
Release the Printer to Production
The last step is to make a clear decision between going ahead or holding off. If the machine passes the visual inspections, the approved tests, the media review and the file verification, then it should be released for production; but if anything is outside the normal range, the first customer job should be held until the cause has been understood.
A startup routine that is well disciplined offers protection not only for the printer but also for the film, the ink, the customer deadlines, and the operator’s time. The most effective checklist should be short so that it can be used daily, specific enough to detect any changes, and at all times must be subordinate to the manufacturer’s approved maintenance instructions.
Popular on OTW Right Now!



About The Author

Gagan Bhangu
Founder of otechworld.com and managing editor. He is a tech geek, web-developer, and blogger. He holds a master's degree in computer applications and making money online since 2015.