
Fix SD Card Not Recognized in Windows 10/11
You plug your SD card into a reader, open File Explorer, and don’t see anything. There’s no drive or folder. Sometimes Windows even asks you to format the card. If it contains unbacked-up photos or files, don’t format it.
An unrecognized SD card is often caused by a loose connection, a faulty reader, a missing drive letter, an outdated driver, or file-system corruption. Some issues take seconds to fix. Others mean Windows can’t read the card, even if the data is still intact. This guide shares troubleshooting and SD card recovery steps before you risk data loss.
Key Takeaways
- Stop using the SD card if Windows 10/11 doesn’t detect it, and avoid formatting or initializing it before recovery.
- Check the card in File Explorer, Device Manager, and Disk Management to identify the issue.
- Test another reader, USB port, or computer, and update the Windows driver if needed.
- If the card is recognized but inaccessible, assign a drive letter — or run Windows Error Checking carefully after recovering your files.
- Use an SD card recovery software to recover important files before attempting risky repairs.
1. Protect Your Files Before Fixing a Not-Recognized SD Card
Protect the data already on an SD card before you fix an SD card not showing up on Windows. The steps below help you avoid overwriting files and identify exactly how Windows is detecting the card:
1.1 Stop Using the SD Card to Avoid Overwriting Data
Before you troubleshoot anything, stop using the card. Don’t shoot new photos or video to it, copy files to it, or save anything else while diagnosing the problem. None of this fixes a detection issue. It only increases the chance that new data overwrites sectors containing your old files, turning recoverable data into data that’s gone for good.
If you have another card, swap it in and set the problem card aside until you’re ready to go through the steps below. Handle it by the edges, and if it’s been ejected, leave it out rather than repeatedly reinserting it into different slots.
1.2 Identify How Windows Is Detecting the SD Card
Not every “Not Recognized” card is invisible to Windows in the same way, and where it appears tells you a lot about the problem. Check three places:
- File Explorer: Does a drive letter appear, even if it won’t open?
- Device Manager (right-click Start » Device Manager): Does the reader or card appear under “Disk drives” or show a warning icon?
- Disk Management (right-click Start » Disk Management): The most informative one. A card can be missing from File Explorer but still appear here as a disk with no drive letter.
| SD Card Status | Likely Issue | Recommended First Step |
| Not visible anywhere | Card reader, port, or hardware issue | Test another reader or computer |
| Visible in Disk Management only | Missing drive letter or partition issue | Assign a drive letter carefully |
| Visible but inaccessible | File-system corruption | Recover important files first |
| Windows asks to format it | Damaged or unreadable file system | Avoid formatting before recovery |
Once you know which row you’re in, the rest of this guide gets a lot faster. You can skip straight to the section that applies instead of working through every fix in order.
2. Check the SD Card Reader, USB Port, and Connections
Rule out problems with the reader, USB port, or connection. These quick checks can often identify a hardware or driver issue without risking the card’s data:
2.1 Test the Card on Another Reader or Computer
Before assuming the card has failed, rule out the simplest culprit. The reader or port. Remove the card, check the contacts for dust, moisture, or scratches, and reseat it firmly. Worn contacts or faulty adapters can cause intermittent “not recognized” behavior.
Then try another USB port, a different reader or adapter, or ideally another computer. If the card functions elsewhere, the problem is the original reader, port, or computer configuration, not the card.
2.2 Update the SD Card Driver in Windows
If the SD card is not recognized on a known-good reader, check whether Windows is the bottleneck. Here’s how:
Step 1: Open “Device Manager” and inspect “Disk drives.”
Step 2: For built-in readers, also examine “Memory technology devices” or “Universal Serial Bus controllers.” A yellow warning triangle usually points to a driver problem.
Step 3: Right-click the device and choose “Update driver.” Select “Search automatically for drivers.”
Step 4: If that doesn’t help, choose “Uninstall device,” then reconnect the card or select “Scan for hardware changes” to reinstall the driver.
Note: Only uninstall the driver. Don’t initialize, erase, or format the device, as those actions can reduce your chances of recovery.
3. Fix SD Card Detection Issues in File Explorer
Once Windows detects the card, the next step depends on how it appears in File Explorer and Disk Management. Use the matching fix below, and avoid formatting or initializing the card if you still need the data:
3.1 Assign a Drive Letter in Disk Management
If Disk Management shows your card as a disk with no drive letter (the second row in the table above), this is usually the fix:
Step 1: Open “Disk Management” and, in the lower pane, find the removable disk roughly matching your card’s capacity. It may be labeled “Unknown,” “Healthy,” or have no volume label.
Step 2: Right-click the volume itself (not the disk header on the left) and select “Change Drive Letter and Paths.” Tap “Add,” then choose any unused letter.
Step 3: Confirm the correct disk by its capacity. “Disk Management” may not clearly label removable media, so avoid assigning or changing a letter on the wrong drive.
Important: If the disk shows “Unallocated Space” instead of a proper volume, don’t create a new volume or initialize the disk. This formats the space. Instead, use recovery software such as 4DDiG Data Recovery, which can read the underlying data before a new file system overwrites it.
3.2 Run Windows Error Checking Carefully
If the card has a drive letter but Windows reports it as inaccessible or corrupted, try the “Error Checking” tool:
Step 1: Right-click the drive in “File Explorer.” Choose “Properties.”
Step 2: Tap “Tools.” Hit “Check.” This is a graphical front end for chkdsk and can sometimes fix minor file-system inconsistencies.
Two cautions to be aware of:
- If the card contains anything irreplaceable, recover your files before running it. chkdsk can rewrite file-table entries. While this often restores accessibility, it can also relocate or discard fragments of a damaged file structure.
- If the card disconnects during the scan, repeatedly disappears from File Explorer, or Windows freezes while checking it, stop. Repeated attempts can stress a card with a deeper hardware problem. Treat it as a recovery job, not a repair job.
4. Recover Files from an Not-Recognized SD Card with 4DDiG
Once you’ve freed up a drive letter or confirmed the card is corrupted, run a read-only SD card recovery scan instead of trying more repairs. A tool like 4DDiG Data Recovery can retrieve data from an not-recognized SD card, as well as formatted and corrupted cards through read-only scanning.
4.1 4DDiG Data Recovery Features
A few specifics worth knowing about 4DDiG before you run it:
- Read-Only Scanning: Scans without overwriting or further damaging the card’s data.
- Broad Device & File System Support: Works with SD, SDHC, SDXC, CF, MMC, miniSD, and microSD cards, and reads NTFS, FAT32/FAT16, and exFAT file systems.
- 2,000+ File Types: Recovers photos, videos, documents, audio, and archives across all common formats.
- Recover While Scanning: Recover found files before the full scan finishes, so you can quickly verify important shots.
- Free Preview: Offers a free preview of recovered files, so you can confirm they’re intact before saving.
- AI Photo/Video Repair: After recovery, can repair corrupted or unopenable photos and videos — including files damaged by interrupted writes.
- Free Recovery: The free version recovers up to 2GB at no cost, letting you confirm main files are recoverable before upgrading.
4.2 Scan the SD Card with 4DDiG Data Recovery
Here’s how to recover files from not recognized SD card with 4DDiG:
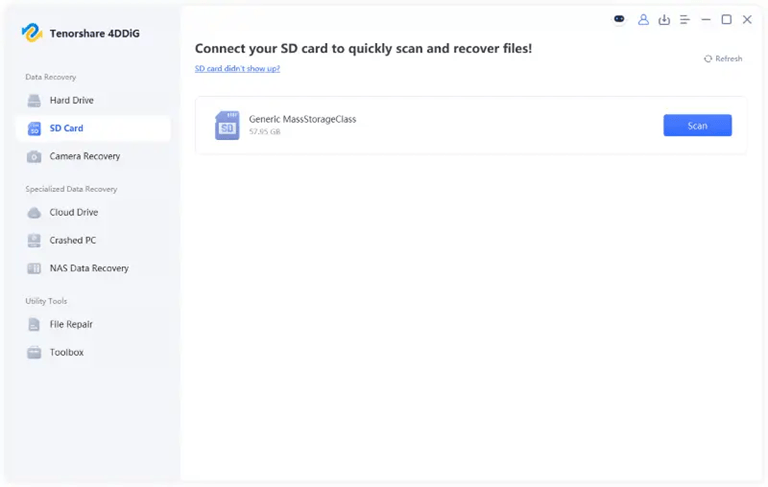
- Connect the SD Card: Use a working reader you’ve already confirmed detects the card (Section 2).
- Select the Card: Open 4DDiG Data Recovery and select the SD card from available drives. It should appear even if File Explorer doesn’t, as long as Windows recognizes the underlying hardware.

- Start Scanning: Pick the file types and start scanning. 4DDiG Data Recovery runs a quick scan first. You can also perform a deeper scan if needed, and pause and resume later, which is useful when recovering a large card.
4.3 Preview and Restore Recovered Files Safely
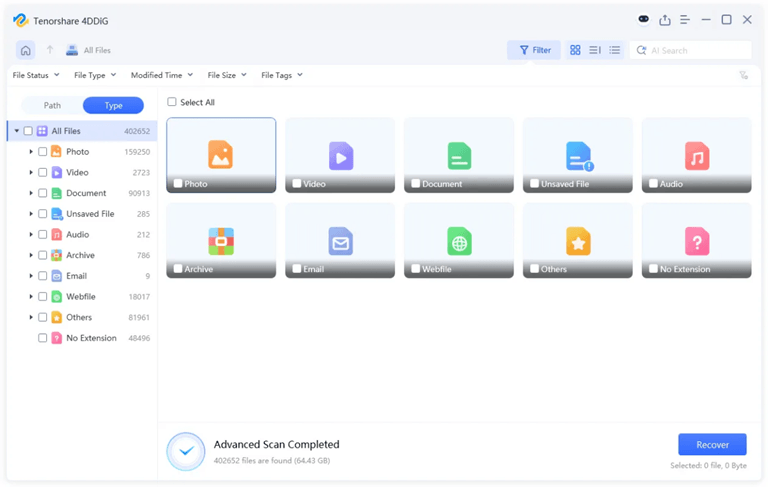
Once scanning starts, 4DDiG Data Recovery lists files as it finds them, organized by type, with filters for photos, videos, and documents. You can also find files by searching their names or entering keywords in the search field. Select the files you need and use “Preview” to confirm they’re intact, especially photos and short videos.
When recovering files, save them to a different drive, such as your PC’s hard drive or another USB stick. Never save them back to the SD card, as this could overwrite data you haven’t recovered and defeat the purpose of the read-only scan.
5. Prevent SD Card Detection Issues in the Future
After your SD card is functioning again, a few simple measures can reduce the risk of future detection problems:
- Safely Eject: Use “Safely Remove Hardware” or your camera’s eject/power-down sequence before removing the card.
- Avoid Mid-Transfer Removal: Don’t unplug the card reader during transfers, even if the progress bar appears finished; file-system writes may lag behind.
- Back Up Regularly: Back up camera and phone SD cards regularly instead of relying on them as long-term storage.
- Retire Failing Cards: If a card disconnects intermittently or has already needed recovery, treat it as a warning sign and replace it.
Final Thoughts
An SD card that isn’t recognized in Windows doesn’t always mean the data is lost. Start by protecting the card, checking the reader and USB connection, and using Disk Management or Windows Error Checking when appropriate. Avoid formatting or initializing the card if you still need the files.
If Windows still can’t access the card or the file system is corrupted, employ 4DDiG Data Recovery. Its read-only scanning, broad file-type support, preview, and SD card recovery features can help retrieve important files before further repairs put the data at greater risk.
FAQs
1. Why is my SD card not recognized in Windows?
Frequent causes include a faulty reader or port, a missing drive letter, an outdated driver, or file-system corruption. Try another reader or computer first.
2. Can I recover files if my SD card is not showing up in File Explorer?
Often yes, especially if it appears in Disk Management or Windows detects it enough to request formatting. Recovery software may still read the underlying data.
3. Can 4DDiG recover files from an unreadable SD card?
Yes, if Windows still recognizes the card as connected hardware. Recovery results depend on the damage and whether data has been overwritten, so act quickly.
4. Should I format an SD card that Windows cannot read?
No. Formatting rewrites the file system and can make recovery harder or impossible. Recover your files first, then format the card if needed.
5. Can I try 4DDiG for free before using advanced recovery options?
Yes. 4DDiG Free Data Recovery currently recovers up to 2GB at no cost, allowing you to test whether your files are recoverable before upgrading.
Popular on OTW Right Now!


About The Author

Gagan Bhangu
Founder of otechworld.com and managing editor. He is a tech geek, web-developer, and blogger. He holds a master's degree in computer applications and making money online since 2015.