How to Fix SSD Not Showing Up on Mac?
When you plug in an SSD into your Mac, you expect it to pop up and be showing up on mac in Locations in Finder. However, sometimes, your Mac fails to recognize the external SSD and may display an error message indicating, “The disk you inserted was not readable by this computer”.
There can be numerous reasons why the “external SSD not showing” issue can occur. Here, we will discuss some common reasons for that issues and proper workarounds to answer.
What Causes SSD Not Recognizable on Mac Issue?
Before you learn methods to fix the SSD drive that won’t show up on a Mac, it is important to know the exact cause of such an issue. There are a number of reasons why you’re SSD or any other drive might not be showing up. It may be either due to faulty or damaged cables or your drive may be corrupted itself or any other reason. Some other reasons that make an SSD not recognizable on Mac:
- Corrupted SSD File System
- Loose or damaged USB cable connection
- Damaged SSD controller chip
- Uninitialized external SSD
Quick Tips to Fix External SSD Hard Drive Not Detected on Mac
Now that you are familiar with the causes for the SSD not recognizable issue, it is time to apply some workarounds to fix it. Some common methods that can help you to fix the issue are:
Method 01: Check if SSD is Properly Inserted
Almost all SSD use the SATA interface. So when you encounter any problem while inserting an SSD on your MacBook, check if it is properly inserted or not. For this, you need to apply the below-given steps:
- First, you need to connect the SSD using any other cable to ensure that the original cable is OK.
- Now, check if your SSD uses SATA 1, 2, or 3 to identify if the adapter works with your External SSD.
- Select another SATA to USB adapter and check if it works by plugging it into another drive.
- It is important to check if your SSD is a type C drive. If it is, connect it directly to your MacBook rather than connecting via a USB-C adapter.
Method 02: Use Disk Utility
Most of the Mac problems can be easily resolved by using Disk Utility. If you are getting the unrecognized SSD error on your device, use the following steps to fix it:
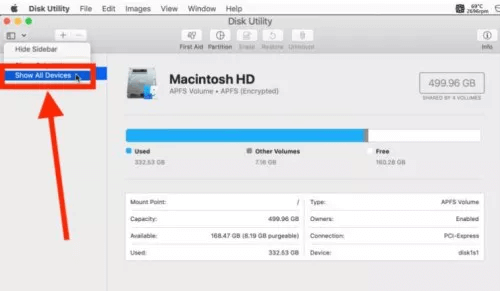
- On your Mac, go to Utilities » Disk Utility » View » Show All Devices.
- Now, you will be able to view the External SSD on the left-navigation pane of your screen.
- Tap the Volume button. If the drive was already mounted, you will get an option to Unmount Device on the menu that appears on the screen.
However, if the volume list does not appear on your screen, your Mac is unable to detect the External SSD. In such cases, make sure you don’t have any important data stored on this drive and then initialize it in the disk utility by erasing it.
Method 03: Fix Unrecognizable SSD Using First Aid
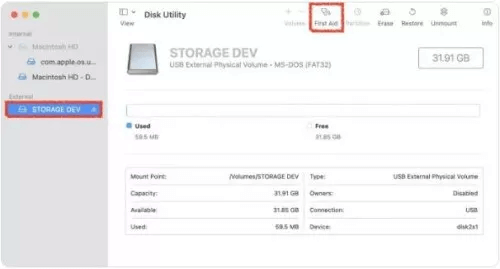
If you fail to access the External SSD in the disk utility, try using First Aid to fix the unrecognized SSD. This Mac utility tool checks the SSD for errors and prevents it from mounting on Mac. All you have to do is:
- Launch the First Aid feature from Disk Utility on your Mac. Then select Run and then press Continue.

- If you got the Overlapped Extent Allocation error on the First Aid window, it indicates that any file in the SSD is corrupted.
- To locate those files, navigate to the DamagedFiles folder in your drive.
- At last, check and delete all those files. Make sure you don’t delete any important files while deleting those files.
Method 04: Repair SSD Not Showing Via Terminal
If the above methods can’t fix the external SSD, you can use apply the below-given steps to repair the unrecognized external SSD with Terminal:
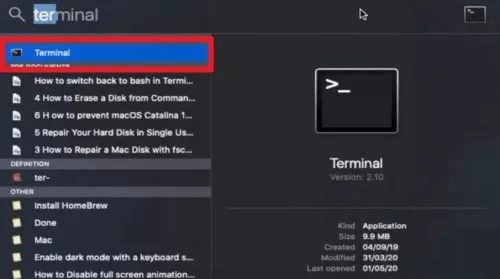
- Launch the Terminal app from Launchpad or navigate to Applications » Utilities, then choose Terminal in the Finder window.

- Now, type diskutil list in the Command Prompt window and press the Return key.

- Then, type the command: diskutil verifyVolume SSD_ID and press Return.
- Once the Repair process gets completed, go to Terminal and select Quit Terminal.
Method 05: Recover Lost Data from SSD Using a Professional Data Recovery Tool
Instances may occur when the SSD you have formatted might have some important data on it. If you need those deleted data back, you need to use professional data recovery software to get the deleted files back.
Mac data recovery software like Stellar Data Recovery Professional for Mac allows you to restore deleted files in a few simple clicks.
Features of Stellar Data Recovery Professional for Mac
Check out some given amazing features in order to understand more about this recovery tool:
- Restore deleted documents, photos, videos, audio, and other file types in no time.
- Supports recovery of data from the latest macOS Ventura 13 and lower versions.
- This software can restore files lost on Mac due to partition loss.
- You can recover data from Formatted APFS/HFS+ partitions using this recovery software.
Step-by-Step Guide to Recover Lost Data Using This Tool
To recover your lost data, you need to download and install Stellar Data Recovery Professional software on your Mac. Before proceeding further with the Mac data recovery process, connect the unrecognized SSD to your Mac. Now, go through the following steps to execute the data recovery process:
- Launch the software and from the “Select What To Recover” screen, select the file types that you need to restore and click the Next button.

- Now, from the Recover From screen, select the SSD that is not showing up on your Mac, and press the Scan button to start scanning.

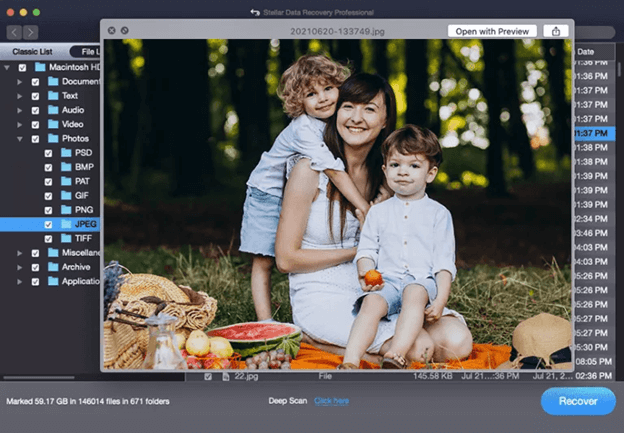
- After completion of the scanning process, preview the recoverable data, click the Recover button, and save the selected files to your desired location.

Wrapping Up
Go through the above fixes to resolve this issue. If you fail to access your important data from an external SSD, it is important to recover it at the earliest.
Third-party software like Stellar Data Recovery Professional for Mac can help you to restore deleted data files with 100% accuracy. Just install the software and proceed with the aforementioned recovery steps to get those deleted data back.


