How to Recover Unsaved Word Document on Mac – 2025
Microsoft Word for Mac is more commonly used than the built-in word processor Pages. However, Word for Mac is susceptible to losing unsaved work in the event that you fail to save the documents you’ve been working on or if your Mac unexpectedly shuts down.
In this article, we’ll explain how to recover unsaved Word document on Mac to prevent data loss. Additionally, we’ll cover how to retrieve documents that were deleted, lost, or unsaved due to accidental actions or malware. We’ll show you different methods, including using Word’s built-in tools, utilizing Time Machine backups, and third-party data recovery software.
Part 01. Recovering Unsaved Word Documents with AutoRecovery
If you’ve enabled the AutoRecover feature in Microsoft Office apps, they regularly save previous versions of your Word documents and offer you the opportunity to recover unsaved files. To check if AutoRecover is enabled on a Mac, go to Word » Preferences, click on “Save” under the Output and Sharing tab, and look for a checked box that says “Turn on AutoSave by default.” You can see the details in the image below.

To find AutoRecover files in Word for Mac, there are two methods you can follow:
Method 1: Using Finder Search
- Open Finder on your Mac.
- In the top-right search box, type “autorecovery,” and Finder will instantly display all files containing that word.
Method 2: Using Folder Path
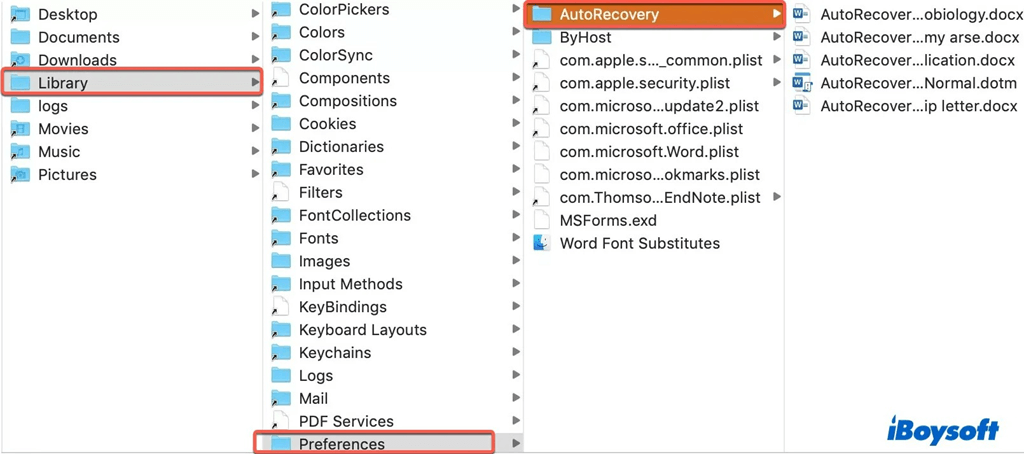
- In the Finder on your Mac, select the Go menu and click “Go to Folder.”
- Depending on your Word version, use the correct file path:
- For Microsoft Office 2019/2016/Office 365 in 2020/2021: ~/Library/Containers/com.Microsoft/Data/Library/Preferences/AutoRecovery
- For Microsoft Office 2011: ~/Library/Application Support/Microsoft/Office/Office 2011 AutoRecovery
- For Microsoft Office 2008: /Documents/Microsoft User Data/Office 2008 AutoRecovery
After locating the unsaved Word files you want to recover, follow these steps:
- Double-click to open the file.
- Click “File” » “Save As” and save it to a new location with your preferred file name.

Also Read: How to Extract and Save Images from Word Document
Part 02. How to Recover Unsaved Word Document from Temporary Folder on Mac
macOS includes various temporary folders that store temporary files primarily designed for advanced Mac users. You can follow these steps to locate and recover unsaved Word documents:
Step 1:
- Open Finder.
- Navigate to Applications and then click on Utilities.
- Select Terminal. In the Terminal window, type “open $TMPDIR” and press Enter.
Step 2:
- Once the Temporaryitems folder opens, look for files that start with “~Word Word.”
- Optionally, you can open these files with TextEdit to view their content, then copy the text and paste it into a new Word document.
Step 3:
- Determine which unsaved Word document you wish to recover.
- Click “File” and then “Save As” to save it to your preferred location with a new file name.
Part 03. Try Three Methods to Recover Deleted Word Files on Mac
Method 1: Recovering Word Documents from the Trash
If you’ve deleted a Word document, you can retrieve it from the Trash within 30 days.
- Click on the Trash icon in your Mac’s dock.
- Carefully search for the Word document(s) you want inside the Trash.
- Right-click on each file and choose “Put Back” to restore the Word document to its original location. If this method doesn’t work, continue reading for other options.
Method 2: Recovering Unsaved Word Documents with Time Machine
Time Machine is a built-in backup system on modern Macs that keeps regular backups for file recovery.
- Ensure your Time Machine backup disk is connected to your Mac.
- Open the folder where your deleted Word file(s) were located.
- Launch Time Machine by going to Launchpad » Other » Time Machine.
- Use the timeline and arrows to locate the deleted Word files, select the one you want to restore, and click “Restore.”

Method 3: Recovering Deleted Word Documents with Data Recovery for Mac
In certain situations, you may not find your Microsoft Word documents in the Trash or have a Time Machine backup to rely on. In such cases, the most effective solution is to utilize a third-party data recovery tool like iBoysoft Data Recovery for Mac. This professional software is adept at conducting a thorough scan of your file system to identify recoverable files that may not be visible to the naked eye.
To enhance the likelihood of successfully recovering the deleted Word file, it is highly recommended that you refrain from saving new files on your Mac. Your primary focus should be on promptly recovering the files. The following tutorial outlines the process of retrieving a deleted Word document using iBoysoft Data Recovery software:
- Download iBoysoft Mac Data Recovery from the official website and install the software. It’s advisable to have an external storage device, such as a USB flash drive or an external hard drive, ready to store the recovered files and prevent overwriting the disk containing the deleted Word files.
- Launch iBoysoft Mac Data Recovery and select your Mac’s hard drive or the partition where your Word file was stored. Click “Search for Lost Data” to initiate the data scanning process.

- Once the data scanning is complete, use the filters or search bar to refine the results and locate the lost or deleted Word documents you wish to recover.
- Finally, preview each file by pressing the Spacebar, choose the required file, and click “Recover” to save the lost Word document to a new location without delay.


