
How to Analyze and Group Keywords before Writing Any Blog Post
A Step-by-Step Workflow for Writers and Content Marketers
Most writers approach content creation back to front. They come up with a topic, sit down to write, and only think about keywords once the post is half finished or not at all. This is why most blog posts never appear on page one of Google, regardless of how well they are written.
The 20 minutes you spend analyzing and grouping keywords before writing determine whether a post has any realistic chance of ranking. It is not about stuffing a keyword into every paragraph. It is about understanding what searchers actually want, grouping related queries intelligently, and writing one comprehensive piece that satisfies an entire cluster of related searches.
This guide walks you through a six-step keyword analysis and grouping workflow you can apply before writing any piece of content, whether you are a blogger, a content marketer, or an SEO professional building topical authority for a client.
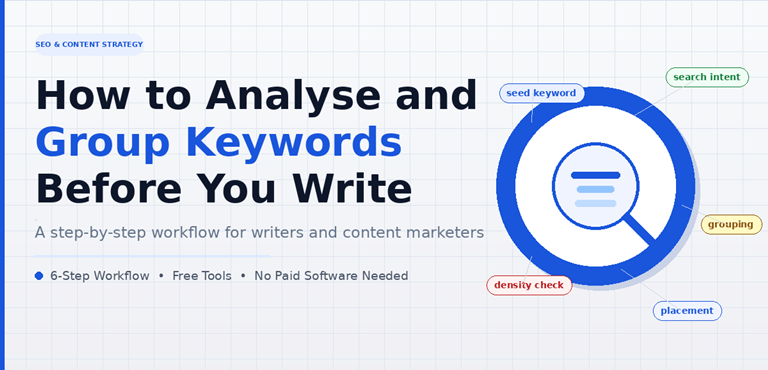
Step 1: Start with One Seed Keyword, Not a List
The first mistake most writers make is beginning with a spreadsheet of 50 keywords. A large keyword list creates analysis paralysis and encourages the wrong instinct: trying to cover everything at once on one page.
Instead, start with a single seed keyword. This is the core phrase that defines what your post is fundamentally about. Everything else in your analysis will branch out from this one term.
How to choose your seed keyword
- Think about the primary question your reader has when they find your post
- Express it in 24 words — this is almost always how people actually search
- Check that it has genuine search volume using Google Keyword Planner, Uber suggest, or Google autocomplete
- Make sure the intent is clear — is this someone who wants to learn something, do something, or buy something?
EXAMPLE: If you are writing about checking keyword density, your seed keyword might be ‘keyword density checker’ or ‘check keyword density’ — not the broad term ‘keywords’ or the vague term ‘SEO tips’.
Once you have one clear seed keyword, everything else in your analysis flows from it. The seed keyword is your anchor, not the post title, not the topic, not the category. Just a two-to four-word phrase that captures the searcher’s primary intent.
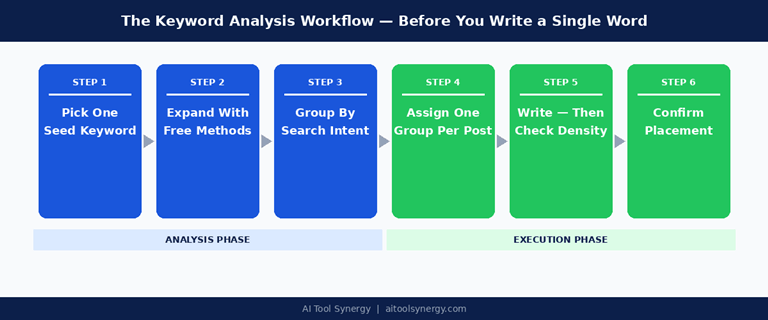
Step 2: Expand Your Keyword List Using Free Methods
Once you have a seed keyword, you need to identify all the related queries people search for around the same topic. These related queries are what you will group into clusters in Step 3. The good news is that Google itself gives you most of this data for free.
Google Autocomplete
Type your seed keyword into Google, but do not press Enter. The dropdown suggestions are real searches people have typed, sorted by frequency. These are legitimate keyword variations that belong in your analysis.
People Also Ask
Search your seed keyword and look at the ‘People Also Ask’ box in the search results. Thesequestion-formatt queries often reveal informational intent variations that you would not find through traditional keyword research tools.
Related Searches
Scroll to the bottom of any Google search results page to find the ‘Related searches’ section. These eight suggestions show semantically related terms that Google groups with your seed keyword — they are the highest quality grouping signal available from any free source.
Search Console (for existing content)
If you are optimizing an existing page rather than writing something new, export your Google Search Console query data for that page. You will find dozens of queries the page already appears for — many of which you never consciously targeted. These are your best grouping candidates because they represent real searchers Google has already connected to your content.
TOOL TIP: Once you have 2040 keyword variations collected, paste your draft content into a keyword density checker to see which of these terms are already appearing naturally in your writing and which are missing entirely. This turns your keyword list into an actionable editing checklist.
Step 3 — Group Keywords by Search Intent, Not by Word Similarity
This is the step most writers skip, and it is the most important one. Grouping keywords by word similarity (putting ‘keyword density’ and ‘keyword density checker’ together just because they share the same words) produces the wrong clusters.
Google does not group keywords by word similarity. It groups them by search intent what the user actually wants when they type that query. Two queries with completely different wording can have identical intent. Two queries with nearly identical wording can have completely different intent.
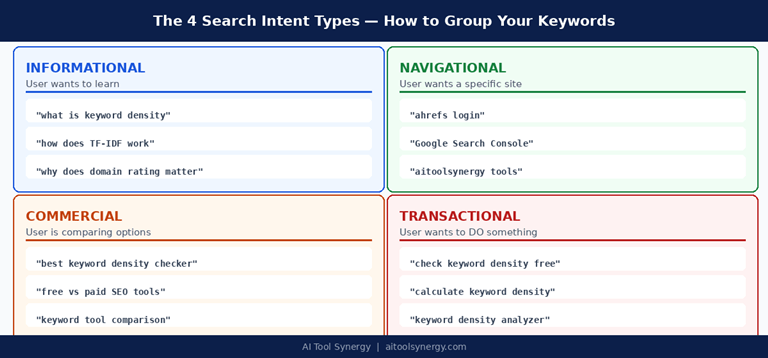
The 4 Intent Categories
Informational: The user wants to learn something. These queries produce blog posts, guides, and how-to articles. Example: ‘what is keyword density’, ‘how does TFIDF work’.
Navigational: The user wants to reach a specific website or tool. Example: ‘Ahrefs login’, ‘Google Search Console’. You cannot win these unless the user is searching for your brand.
Commercial: The user is comparing options before making a decision. Example: ‘best keyword density checker’, ‘free vs paid SEO tools’. These belong on comparison or review pages.
Transactional: The user wants to do something right now. Example: ‘check keyword density free’, ‘calculate keyword density’. These belong on tool pages.
Keywords with the same intent belong in the same cluster. Keywords with different intent should go on different pages — even if they use almost identical wording.
CRITICAL RULE: ‘Best keyword density checker’ (commercial intent — comparing tools) and ‘check keyword density’ (transactional intent — do it now) look similar but belong on different pages. Putting both on one page confuses Google about what the page is primarily for.
Step 4: Assign One Keyword Cluster per Post
Once your keywords are grouped by intent, the rule is simple: one cluster per post, one post per cluster. This is how you avoid keyword cannibalization, the situation where multiple pages on your site compete against each other for the same queries.
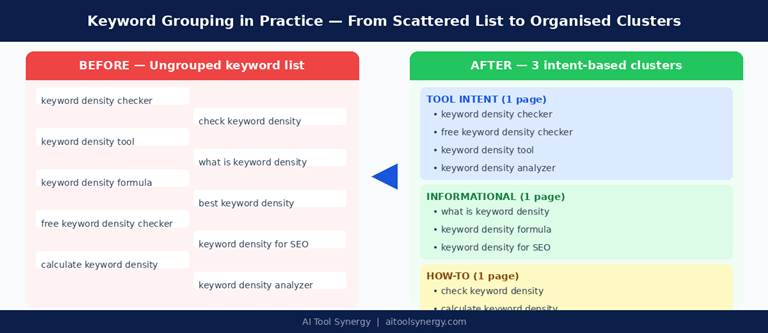
Looking at the example above, a writer who started with ten ‘keyword density’ variations would be tempted to write one long post covering all of them. But the correct approach is three separate posts:
- A tool page targeting the transactional cluster (people who want to use a density checker right now)
- An informational guide targeting the learning cluster (people who want to understand what keyword density means)
- Ahow-too post targeting the action cluster (people who want step-by-step instructions)
Each post covers one cluster comprehensively. Together, they build topical authority on the subject — which is how newer sites with lower domain authority compete against established sites with large link profiles.
Keyword Density Targets by Content Type
Once you know which cluster a post belongs to, you also know what density range to target for the primary keyword. Here are the practical benchmarks:
| Content Type | Word Count | Target Density | Max Before Risky |
| Blog post | 600–1,200 words | 1.5%–2% | 3% |
| Longform guide | 2,000–5,000 words | 1%–1.5% | 2.5% |
| Product page | 300–600 words | 2%–2.5% | 3.5% |
| Landing page | 500–900 words | 1.5%–2% | 3% |
| Category page | 200–400 words | 2%–3% | 4% |
Table 1: Target keyword density by content type and word count
These ranges are guidelines, not hard rules. Content that reads naturally to a human reader and stays within these ranges will almost always pass any keyword density check without issues.
Step 5: Write First, Then Check Keyword Density
This is the step that catches most writers out — they try to track keyword density while writing. This is the wrong approach. Writing with one eye on a density counter produces stilted, unnatural content that reads like it was written for an algorithm rather than a person.
The correct workflow is: write naturally with your cluster in mind, then check density after the draft is complete. The density check is a quality control step, not a writing guide.
How to run the density check
- Complete your full draft without counting anything
- Copy the entire body text (not the title or metadata — just the article body)
- Paste into a keyword density checker tool
- Look for your primary cluster keyword — it should appear at 13% density
- Check for any unexpected phrases appearing above 3% — these are stuffing risks
- Identify core topic terms that appear at 0% — these are likely missing entirely from your draft
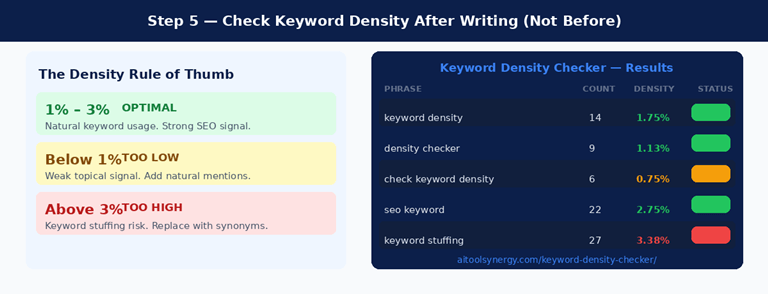
A free keyword density checker tool such as the one at AI Tool Synergy shows you the density percentage for every phrase in your content, color-coded by risk level. This single check takes under 60 seconds and tells you immediately whether your draft needs more keyword mentions, fewer, or is already well calibrated.
WHAT TO DO WITH THE RESULTS: If your primary keyword is below 1%, add 35 natural mentions in headings and body paragraphs. If it is above 3%, replace some exact match occurrences with synonyms or referential language (‘the tool’, ‘this method’, ‘the process’). If a secondary keyword is above 3%, same fix — replace excess exact matches with natural variants.
Step 6: Confirm Keyword Placement before Publishing
The final step is a placement audit — a quick check that your primary keyword appears in the seven locations that carry the most SEO weight. Density across the body text is one signal. Placement in structural elements is a different, higher-weight signal.
The 7 placement locations (in priority order)
- Title tag: Your primary keyword must appear in the page title, ideally within the first 60 characters.
- H1 heading: The main visible heading on the page should contain the keyword or a close variant.
- First 100 words: Include the keyword naturally within your opening two or three sentences.
- H2 subheadings: 23 of your subheadings should contain the keyword or a semantic variant.
- Meta description: Include the keyword once — it gets bolded in search results when it matches the user’s query, improving click-through rate.
- Image alt text: Include the keyword in the alt text of one relevant image, accurately describing what the image shows.
- URL slug: Set a clean, keyword-containing URL slug before publishing. Never change it after the page is live without a 301 redirect.
Run through this checklist for every post before publishing. It takes under five minutes and covers the highest weight on-page signals available. Many posts that fail to rank are missing the keyword from just one or two of these locations — particularly the title tag and the first 100 words.
Putting It All Together — the Prewriting Keyword Workflow
The six steps above take between 20 and 40 minutes before you write a single word of content. That time investment changes the trajectory of a post completely — from a piece of content with no keyword strategy to one that is built around real search demand, grouped by intent, and calibrated to hit the right density and placement signals before it goes live.
To summarise the complete workflow:
- Pick one seed keyword that captures your reader’s primary intent
- Expand to2040-relatedd queries using Google autocomplete, People Also Ask, and related searches
- Group those queries by search intent — not by word similarity
- Assign one cluster to one post — avoid covering multiple intent types on a single page
- Write naturally, then check keyword density after your draft is complete (target 13% for the primary keyword)
- Confirm your keyword appears in all seven placement locations before hitting publish
Free tools make this entire workflow accessible without a paid subscription. Google provides the research data. A free keyword density checker handles the density audit in seconds. The six-step process itself costs nothing beyond the time it takes to apply it.
Content that follows this workflow does not just rank better — it answers reader questions more completely, covers topics more systematically, and builds the kind of topical authority that compounds over time as each post reinforces the others in the same cluster.
About the Author
This post was contributed by the team at AI Tool Synergy (aitoolsynergy.com), a free tool platform for writers, content marketers, and SEO professionals. Their free keyword density checker is available at https://aitoolsynergy.com/keyword-density-checker/ — no signup or word limit required.
Popular on OTW Right Now!




About The Author

Gagan Bhangu
Founder of otechworld.com and managing editor. He is a tech geek, web-developer, and blogger. He holds a master's degree in computer applications and making money online since 2015.