How To Turn Off Background Data In Windows 10
Do you want to restrict or turn off background data in Windows 10?
Windows 10 consumes a lot of data in the background because of windows updates, live tiles, apps updates, etc. Also, Windows 10 designed for unlimited internet data and Windows 10 has a lot of Hidden features. Well, If you have an internet connection with limited data, don’t worry, Microsoft provides an option to restrict background data.
You can turn off background data of WiFi Connection and Ethernet connection in Windows 10.
If you want to save your data, then you need to Set your WiFi or Ethernet connection as Metered Connection.
When Microsoft launches Windows 10, there was no such option available to limit Ethernet data usage. Because Windows 10 only allows WiFi connection to set as a metered connection at that time. Now, after Windows 10 Creators Update, you can Set Ethernet connection as metered connection.
If you have a previous version of Windows 10, then you can set an ethernet connection as metered with Registry editor. This also helps to disable Windows 10 updates.
Why do you need to turn off background data in windows 10?
If you have a slow internet connection and your Internet service provider limits the data, you should set the connection as metered in your Windows 10 machine.
- If your internet connection is slow: If your internet speed is slow, and this option prevents background data consumption.
- To disable Windows updates: If you want to turn off windows updates, then, set the connection as metered.
- If you use mobile data: If you are using mobile data on your PC laptop with WiFi hotspot, and your data is limited, then you need to use this option.
- To disable Windows Store apps updates: If you set the connection as metered then windows store apps are not updated automatically.
- Live Tiles: Live Tiles also consume data. Live Tiles won’t update if the connection is metered.
How To Turn Off or Restrict Background Data In Windows 10
- Turn Off Background data of WiFi connection (If you are using WiFi on your PC/Laptop).
- Turn Off Background Data of Ethernet Connection (If you are Ethernet/Wired connection on your PC/Laptop).
1. How To Set WiFi Connection As Metered Connection In Windows 10
So, the steps are given below to set WiFi connection as metered connection. The steps may differ in the older versions of Windows 10. You can read those steps in F.A.Q’s.
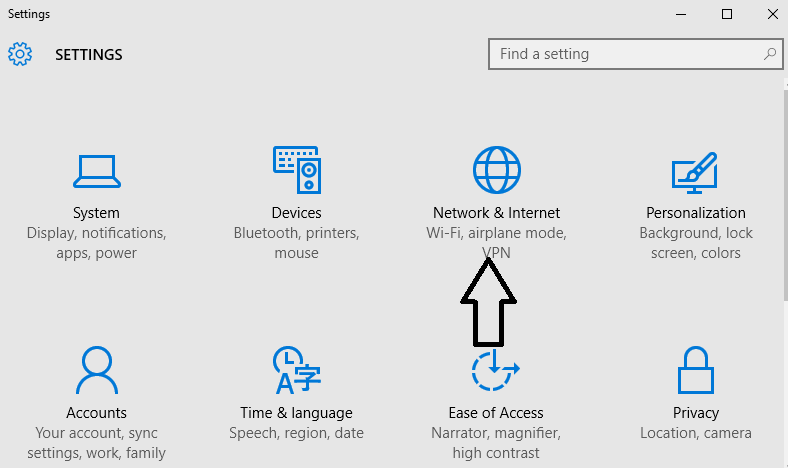
- Go to Settings by pressing Windows Key + I. Otherwise click on the Start button from the bottom left and select the gear icon (Settings).
- Now the settings will be open. Go to Network and Internet.

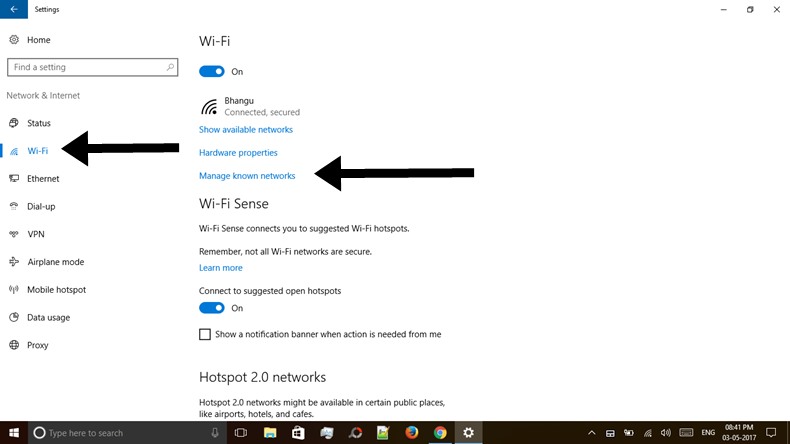
- Click on WiFi and Click on Manage known networks. (You can click directly on the connected connection to set the connection as metered).

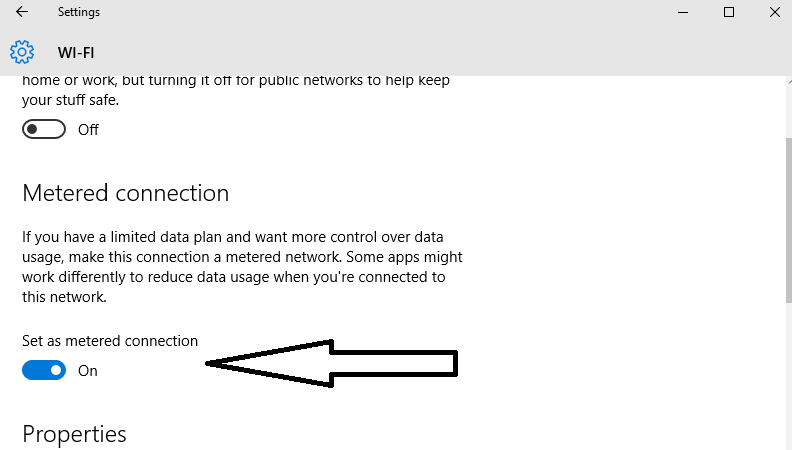
- Click on your network and select Properties.
- Turn On Set as metered connection.

F.A.Q’s
Options are different on My PC.
These options are from Windows 10 Anniversary update and Creator Update. If you have the previous version of Windows 10, then Go to Start > Settings > Network & Internet > WiFi > Advanced Options.
Read Also: How To Save Data On Android Phone
2. How To Set Ethernet Connection As Metered Connection In Windows 10
So, In Windows 10 Creator Update, you can also set an Ethernet connection as a metered connection to turn off background data. In the previous versions of Windows 10, you need to set the Ethernet connection as metered with the registry editor. But now it is easy to do this.
- Open Settings from the start menu or by pressing Windows Key + I.
- After that, Open Network & Internet.
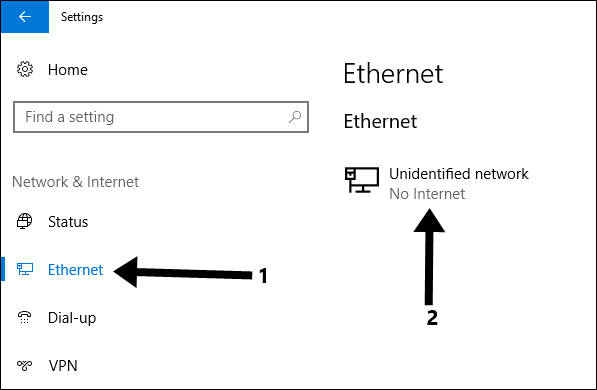
- Click on Ethernet from the left side of the screen. After that, Click on the Ethernet connection.

- Turn on the option Set as metered connection.


Set Wired or Ethernet Metered Connection in the Previous Version of Windows 10:
- First of all open Regedit. To open Regedit, Open Run command by pressing Windows key + R and type Regedit.exe in Run command.

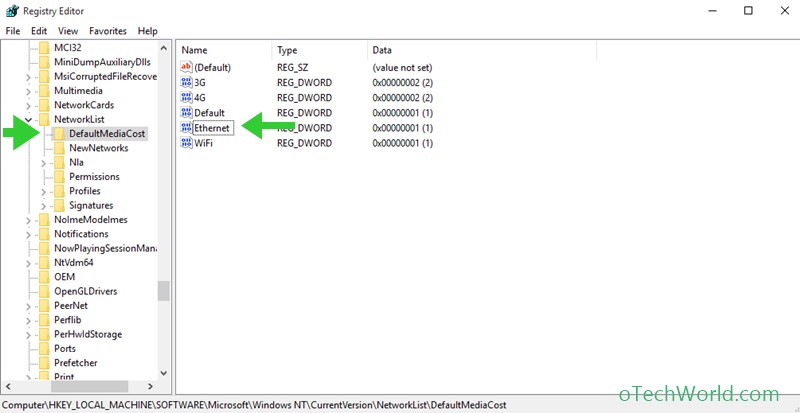
- Navigate to HKEY_LOCAL_MACHINE > SOFTWARE > Microsoft > Windows NT > CurrentVersion > NetworkList > DefaultMediaCost.

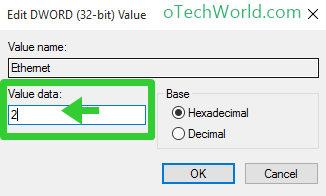
- Double Click on Ethernet and write 2 in Value Data and click on OK.

Now your background data is disabled on Ethernet connection.
Note: In Value data, write 1 for unmetered connection and write 2 for metered connection. You can change these values anytime.
Problem while changing the value?
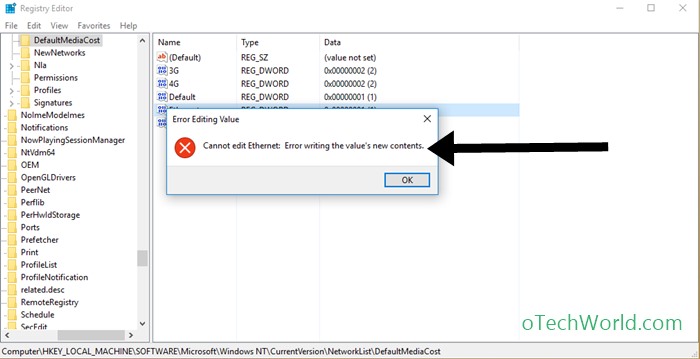
If you can not change the value of the registry key, then here’s HOW TO CHANGE REGISTRY KEYS IN WINDOWS 10.
Final Words
So, Guys, this How to turn off background data in Windows 10. Now you can set Ethernet metered connection in the new version of Windows 10. These options also prevent the Automatic updates of Windows 10. If you have a limited data connection, then you can use these options to save your data.


It shows error while I edit my ethernet value to 2 ……
Disable Antivirus and unplug Ethernet cable. Try again.
Error : cannot edit Ethernet/wifi. Error writing the value’s new content
ethernet connection not show in my setting
how to solve and disable to background data use
google it, “Change permission for DefaultMediaCost”
or check this out: askvg.com/guide-how-to-take-ownership-permission-of-a-registry-key-in-windows/
Very help for those who are using mobile date on their WINDOWS 10
Thank you for another essential article. Where else could anyone get that kind of information in such a complete.
Hello
Same with me too…it says can’t change the value.
first you need to get permission to change the values
Oao. Very nice. Post. It is verry helpful for me
For Dial Up Connection?
What to do?
Appreciation for really being thoughtful and also for deciding on certain marvelous guides most people really want to be aware of.
Those who are getting error, Change permission for DefaultMediaCost 😉
can’t change the value
for modem connection what to do?????
You can do with registry editor
Thank you so much. 😉
It says cannot edit Ethernet: error writing the value’s new contents
Read this https://otechworld.com/how-to-change-registry-keys-in-windows-10/
Those who are getting error on changing the value, google “Change permission for DefaultMediaCost”
or check this out: askvg.com/guide-how-to-take-ownership-permission-of-a-registry-key-in-windows/
How to prevent win from using data from DATA CARD (its not wireless its plug & play daata card)
M goona do it…will reply soon wether it works or not
Sure 🙂
It didn’t work.
WiFi or Ethernet?
Thanks for the information. The thing, though, is that I’ve already registered my hotspot as a metred connection, and still huge amounts of data are being consumed. I’ve already added 5GB to my monthly plan of 4, and now even that is almost finished. It’s clear that a lot of data is still being gobbled up in the background without my consent—before, I used an Android tablet, and this sort of thing did NOT happen.
I’m at loss as what to do…
Check your data usage from Settings > Network & Internet > Data Usage > Usage Detail. And see which app or software consumes more data. Also, connect your device to WiFi and track the live data usage from Task manager. Open task manager (Ctrl + Shift + ESC) and click on More detail and click on the Network to see live data usage bandwidth.
I cant save this page
This is the best article on this annoying subject that I have found. Thank you so much
very helpful bro… this site is awesome.
What if we are connected via VPN ?
Does this data limit can be enabled ?
Nice article.. I set my connection to metered connection but my data is still being consumed heavily even though the data usage on my phone is showing me I have used little data but my service provider says otherwise
Please my usage details says my system consumes more data, please what do I do to stop my system from consuming much data.
Very useful. Thank you very much. Now I can save my data usage.
Help! This stupid Windows 10 update keeps failing. Burns up all my data. Cost $100 dollars already! I uninstall the update but it keeps coming back to burn up more! I can hardly get on the net. I keep losing my connection. It’s a Windows 10 update virus! I am so pissed off! Windows Microsoft should pay for this!
Just Great thanks brother
Dude you saved my day like a hero!
Thank You very much sir,
Its working fine.
thank you very much, jazakallah khair(may ALLAH bless you with goodness ).
thanks that was really helpful